Executing High-Privilege Tasks via PowerShell on W11

Executing High-Privilege Tasks via PowerShell on W11
PowerShell is a task-based command-line shell and scripting language built on .NET technology. It’s designed especially for system administrators and power users, so it has more features than the standard Command Prompt. If you want to use PowerShell to do anything more than basic tasks, you must run it as an administrator.
In this guide, we’ll show you ten simple ways to open an elevated PowerShell prompt on Windows 11.
Disclaimer: This post includes affiliate links
If you click on a link and make a purchase, I may receive a commission at no extra cost to you.
1. How to Open Windows PowerShell as an Administrator Using the Power User Menu
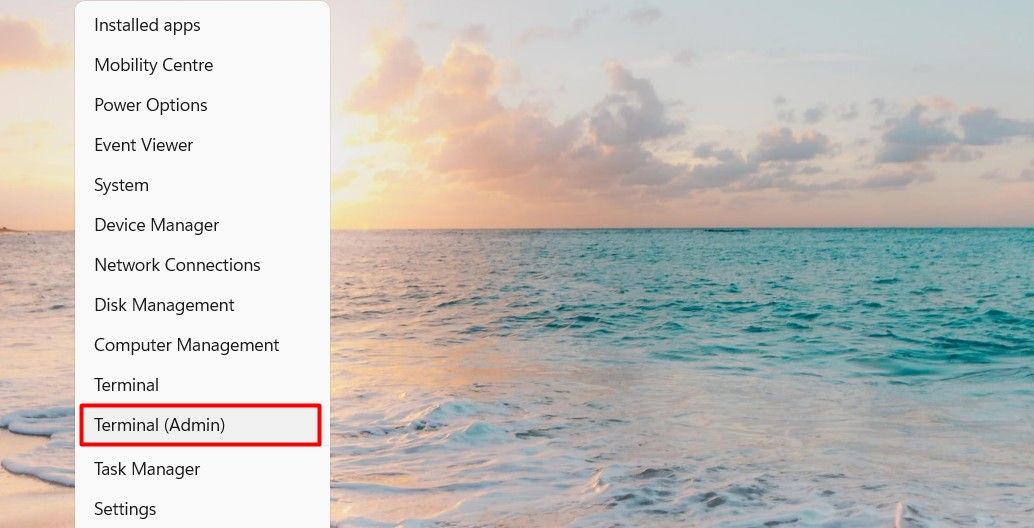
The Power User Menu is a great way to quickly access important system tools and settings in Windows 11. To open Windows PowerShell using the Power User Menu, do the following:
- Right-click onStart to open the quick access menu. You can also access it by pressingWin + X on your keyboard.
- From the menu list, selectTerminal (Admin) .

- If UAC appears on the screen, clickYes to grant permission.
2. How to Open Windows PowerShell as an Administrator From the Windows Search Tool
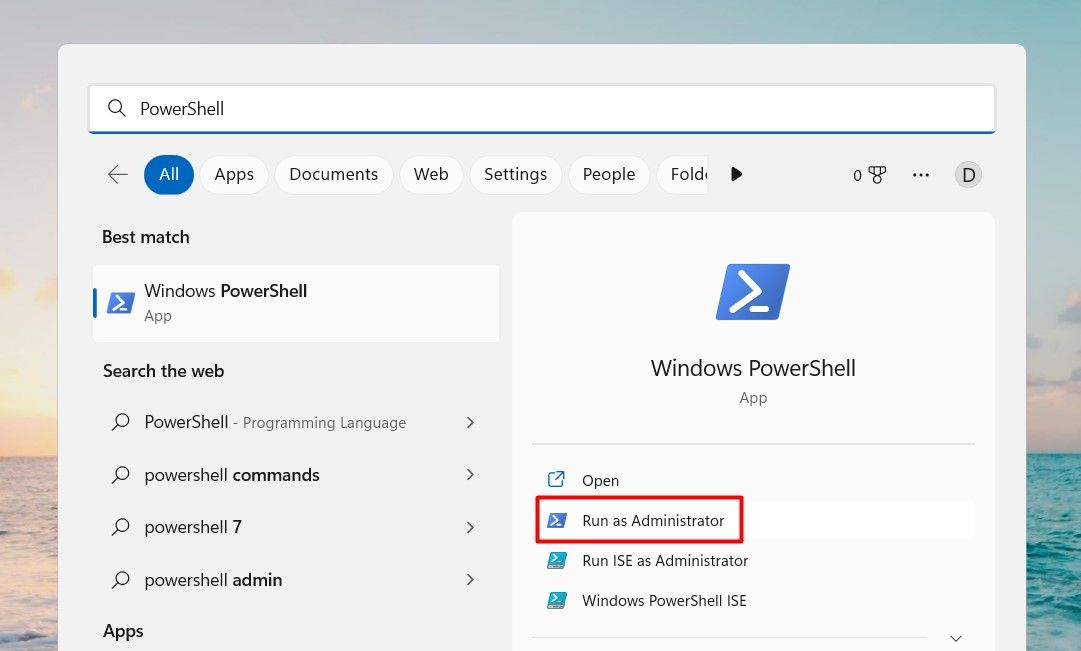
Alternatively, you can open Windows PowerShell as an administrator using the Windows Search tool. This process is relatively simple and only takes a few steps. Here is how to do it:
- Press theWin + S keyboard shortcut to open Windows Search.
- Type “PowerShell” into the search bar.
- From the right pane, selectRun as administrator .

- If User Account Control prompts you, clickYes to grant admin privileges.
PowerShell will now open with administrative privileges. Here you can type any PowerShell command you want to execute. To exit PowerShell, type “Exit” and pressEnter .
3. How to Open Windows PowerShell as an Administrator Through the Run Command
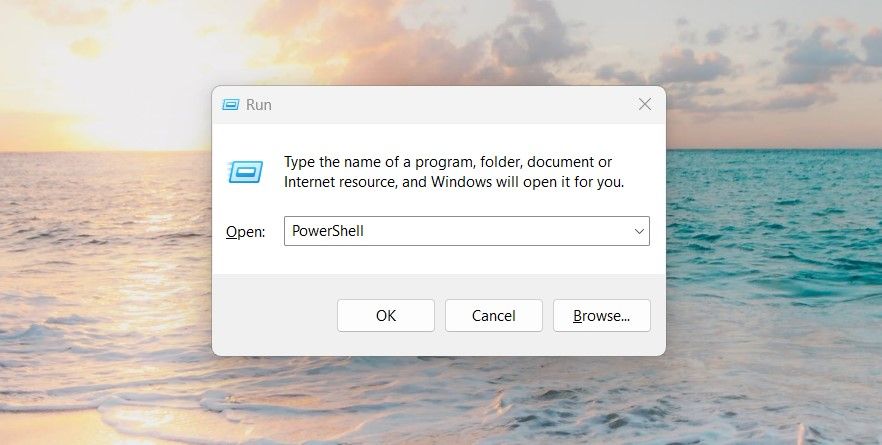
There is a powerful tool in Windows 11 called Run Command that lets you access files, launch programs, and adjust many system settings. You can also use it to launch Windows PowerShell as an administrator. Here’s how:
- PressWin + R on your keyboard. This will open the Run dialog box.
- From here, type in “PowerShell” and pressCtrl + Shift + Enter key combination.

- If a confirmation prompt pops up, clickYes to continue. This will launch PowerShell as an administrator.
4. How to Open Windows PowerShell as an Administrator From Windows File Explorer
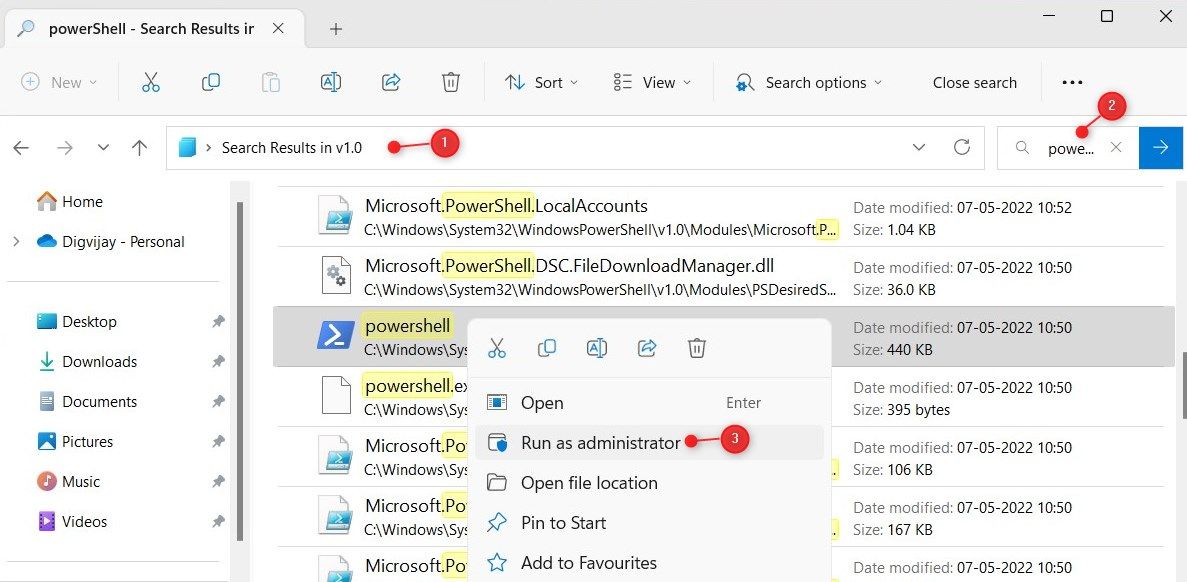
Another method for opening Windows PowerShell as an administrator is through File Explorer’s address bar. To do this, follow these steps:
- PressWin + E on your keyboard to open Windows File Explorer.
- In the File Explorer address bar, type the following command and press Enter.
C:\Windows\System32\WindowsPowerShell\v1.0\ - Next to the address bar, search for “PowerShell”.
- Right-click on the PowerShell executable file and selectRun as administrator .

- When UAC appears, clickYes to grant admin rights.
5. How to Open Windows PowerShell as an Administrator Using Command Prompt
A command prompt lets you run almost any program or application on your Windows device. To run Windows PowerShell using this tool, follow these steps:
- Run Command Prompt as an Administrator (seehow to open the Command Prompt as an administrator for instructions).

- In the elevated command prompt, copy and paste the given command line:
powershell Start-Process powershell -Verb runAs
As soon as you type the above command line in the elevated command prompt window, Windows PowerShell will start running as an administrator.
6. How to Open Windows PowerShell as an Administrator From the Start Menu
The Start Menu contains a wide range of software programs and files that provide a central place for launching applications and other tasks. Start Windows PowerShell with these steps:
- Click theStart button at the bottom left of your screen.
- SelectAll apps from the upper right corner.
- Scroll down and click theWindows Tools option
- Now right-click onWindows PowerShell and selectRun as administrator .

- The UAC will appear on the screen. If it does, clickYes to grant administrative privileges.
7. How to Open Windows PowerShell as an Administrator Through Task Manager
Task Manager is a powerful tool that can help you troubleshoot and fix problems with your PC. Besides this, you can also use this tool to launch programs on your Windows device.
Here’s how to start Windows PowerShell as an administrator with this tool.
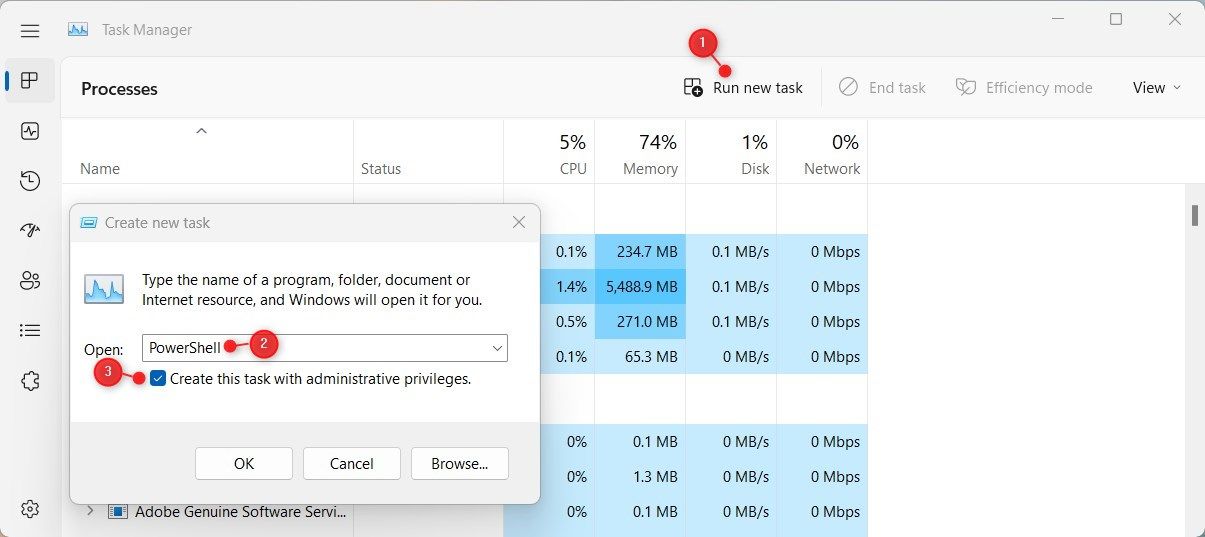
- PressCtrl + Shift + Esc on your keyboard to open Task Manager (seehow to open the Task Manager for more tips).
- SelectRun new task from the top of the page.
- In the pop-up menu, type “PowerShell” and check the “Create this task with administrative privileges” box.

- ClickOK and Windows PowerShell will start as an administrator.
8. How to Open Windows PowerShell as an Administrator Using the Control Panel
Windows Control Panel is a software program that contains many tools for managing settings on Windows. With this tool, you can launch almost any application installed on your computer. Follow these steps to open Windows PowerShell as an administrator:
- Use one of the manyways to open the Control Panel .
- Click onSystem and Security .
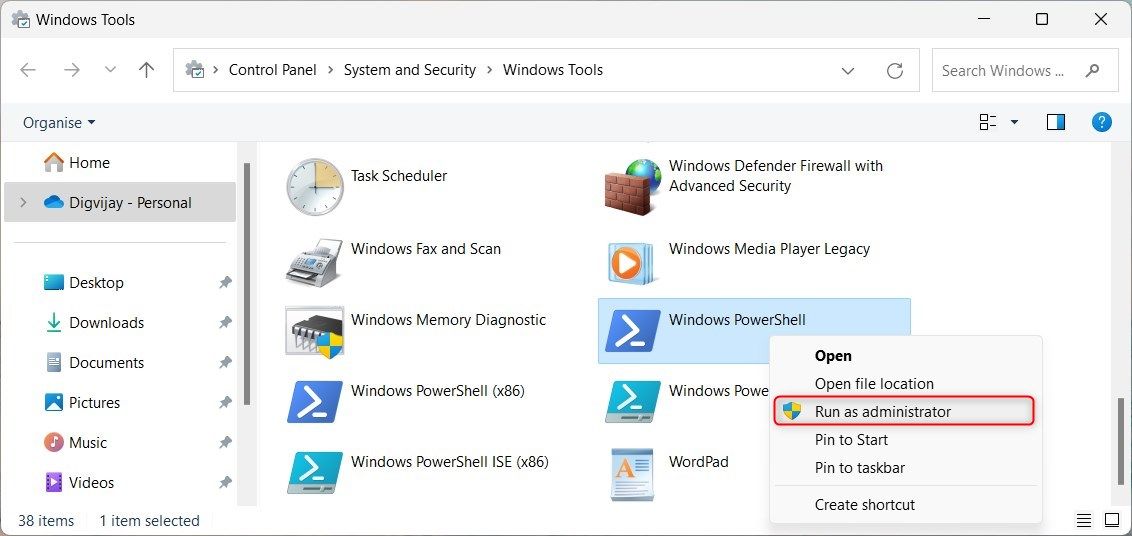
- Scroll down to the bottom and selectWindows Tools .
- Right-click onWindows PowerShell and selectRun as administrator .

- A User Account Control pop-up window will appear asking if you want to allow this app to make changes to your PC; clickYes to continue.
PowerShell will now launch as an administrator, and you can run commands with full privileges. If you need to exit PowerShell, type Exit and press Enter.
9. How to Open Windows PowerShell as an Administrator With a Desktop Shortcut
If you often run commands that require administrative privileges, consider creating a desktop shortcut. Here’s how to do it with Windows PowerShell.
- Right-click on your Desktop and selectNew > Shortcut .
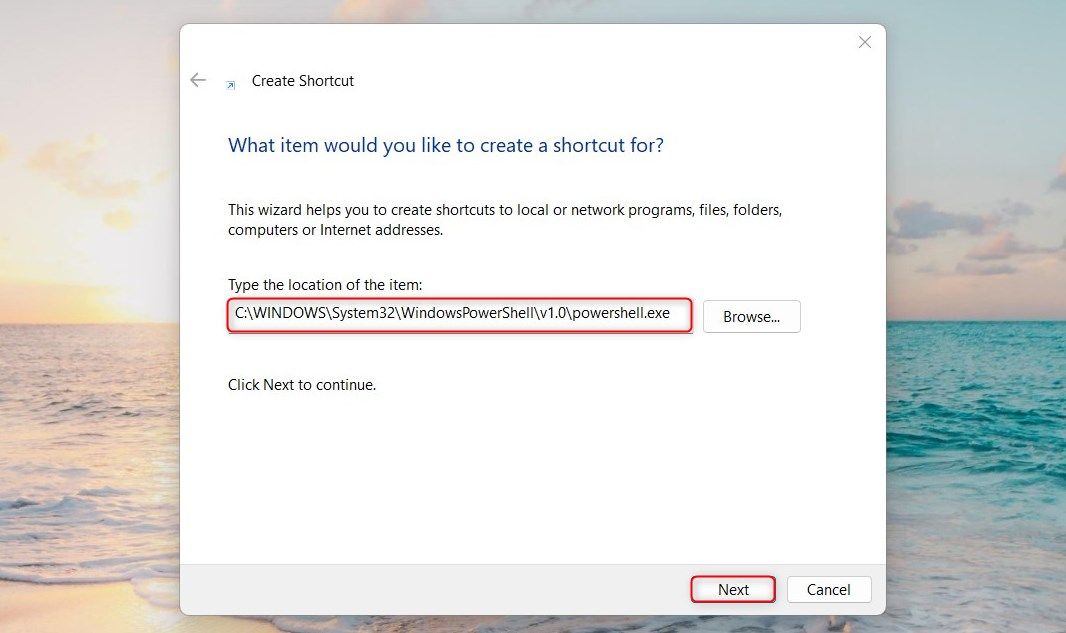
- Next, type the following command in the “Create Shortcut” window.
C:\WINDOWS\System32\WindowsPowerShell\v1.0\powershell.exe - Then clickNext to continue.

- Type in a name for the shortcut and click Finish.
Now, whenever you want to open PowerShell as an administrator, simply double-click on the shortcut.
10. How to Open Windows PowerShell as an Administrator Using a Batch File
This method involves creating a batch file to open Windows PowerShell as an administrator. Here’s how to do it:
- PressWin + R , type “Notepad”, and hitEnter to open it (seehow to open Notepad for more ways).
- In Notepad, copy and paste the following command line:
Powershell.exe -Command “& {Start-Process Powershell.exe -Verb RunAs}” - Now click onFile and selectSave as from the menu list.
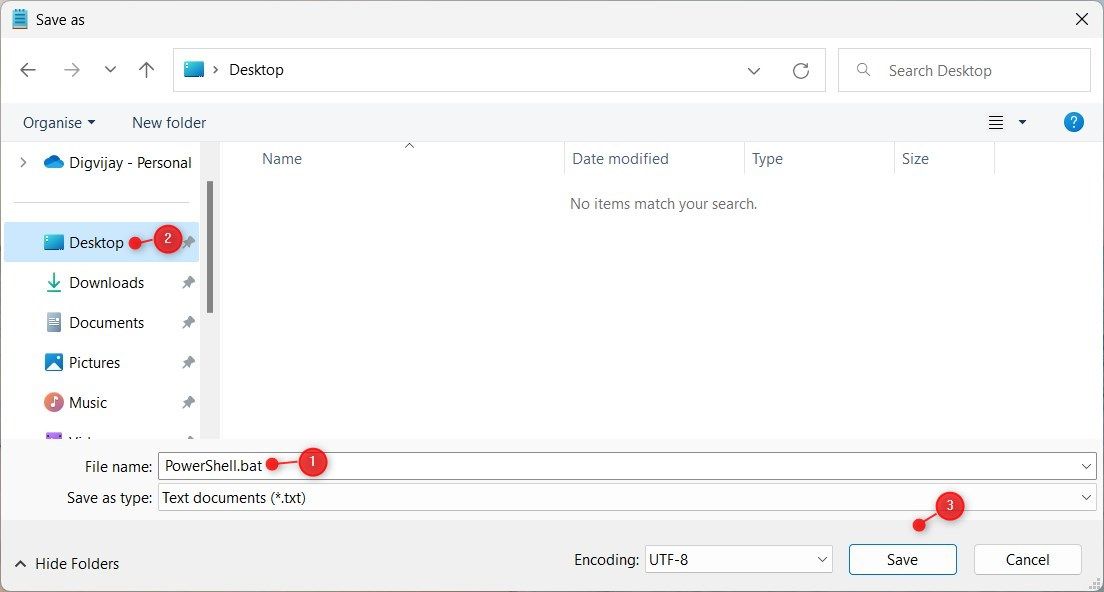
- Put “PowerShell.bat” in the file name. You can name your file anything you like with the .bat extension.
- Choose the location where you’d like to save it, and then clickSave .

This will create the Windows PowerShell batch file. To open Windows PowerShell with administrator access, double-click the batch file. When the UAC prompt appears, clickYes to continue.
Get an Elevated Windows PowerShell Running
When you are working with files or folders that need elevated permissions, you may need to open PowerShell as an administrator. This is because some tasks require elevation in order to complete them successfully. As shown above, there are several ways to open Windows PowerShell as an administrator.
Also read:
- [New] In 2024, Quick Launch Checklist Essential Tasks for Bringing Your Review Channel to Life
- [Updated] Designing Professional YouTube Editors' Workflow for 2024
- Assembling an Eye-Catching Movie Miniature
- Brother MFC-L2740DW: Compatible Windows Drivers Download Links Here
- How to Stop Win XP/Vista DF Failsafe
- Join the Winning Circle: Insider Program Tips
- League of Legends Reconnect Loop Bug – 2024 Fix
- Navigating Your PC's Firewall Settings with Ease
- Optimizing GTA nV Performance: Solutions to Eliminate Frame Drops
- Resolve Persistent Scroll Failures in Office Excel
- Resolving PC Startup Issues with Outriders
- Sidestep 'Connect Now' Bluetooth Frustration on Your System
- Streamline Playtime: Windows + Unplugged PS3 Pad
- Troubleshooting Unclickable Elements in Windows 11
- Unhiding: Hidden Bluetooth in Device Management Space
- Title: Executing High-Privilege Tasks via PowerShell on W11
- Author: David
- Created at : 2024-11-30 11:11:33
- Updated at : 2024-12-06 22:50:59
- Link: https://win11.techidaily.com/executing-high-privilege-tasks-via-powershell-on-w11/
- License: This work is licensed under CC BY-NC-SA 4.0.
