
Enabling Transferable Operation: Relocating Your Torrent Software
Enabling Transferable Operation: Relocating Your Torrent Software
You might have upgraded your computer, reinstalled Windows, or moved your HDDs around. Is there a way to keep using qBittorrent like before without losing any of the torrents you’d added? Can you continue your downloads from where you left them without re-adding everything to qBittorrent’s list from scratch?
The answer’s likely a positive “yes,” but the way to do it isn’t as simple as copying a folder from point A to point B. However, as we’ll see next, it’s not too complicated.
Setting Up a Plan of Action for Moving qBittorrent
In this article, we’ll look at how it’s possible to migrate qBittorrent’s installation, keeping all the settings we had previously customized and the progress of all torrent files. This will allow us to resume downloading and uploading from where we were before.
That’s why the process we will see here is a tad more complicated than reinstalling an app and moving some files.
- The first step will be to copy qBittorrent’s configuration files from the old environment into the new one. Then, do the same with all torrent files.
- Next, we will have to adjust and tweak qBittorrent’s configuration on the new environment to account for discrepancies compared to the previous one.
- Finally, we will have to recheck all torrent files to ensure the new qBittorrent installation “knows everything it needs” about their current state.
Note that, for simplicity’s sake, in the rest of this article, we’ll talk about moving qBittorrent’s installation from an old to a new PC. However, the steps we’ll see should be the same if you’ve moved drives around or reinstalled your OS.
Still, with a new PC maybe you’d also like to keep your software fresh, and try out new things, like another torrent client. Although qBittorrent’s at the top spot in our best torrent clients for Windows article, you’ll also find some nice alternative options there.
How to Move Your Torrents
Since we are dealing with migrating qBittorrent’s installation from an old PC into a new one, you will need a way to facilitate this data exchange.
You may use a flash drive for transferring the app’s configuration files and a handful of small torrents from your old to your new PC. It’s best to use a sizeable external hard disk drive or a network connection between the PCs for large amounts of data.
Still, we’ll skip those specifics since the data transfer method won’t affect anything we see here. Thus, we’ll take for granted an unspecified method for copying data between your PCs. Feel free to go for whichever solution you prefer.
- Launch a file manager on the source PC from which you want to move your qBittorrent installation to the new PC. Visit your user account’s folder, and within it, navigate to
AppData > Local > qBittorrent. The path in our case was:c:\Users\koura\AppData\Local\qBittorrent. Copy this folder’s contents to the equivalent path on your new PC. Remember to update the username part of the path if it’s different on your second computer.
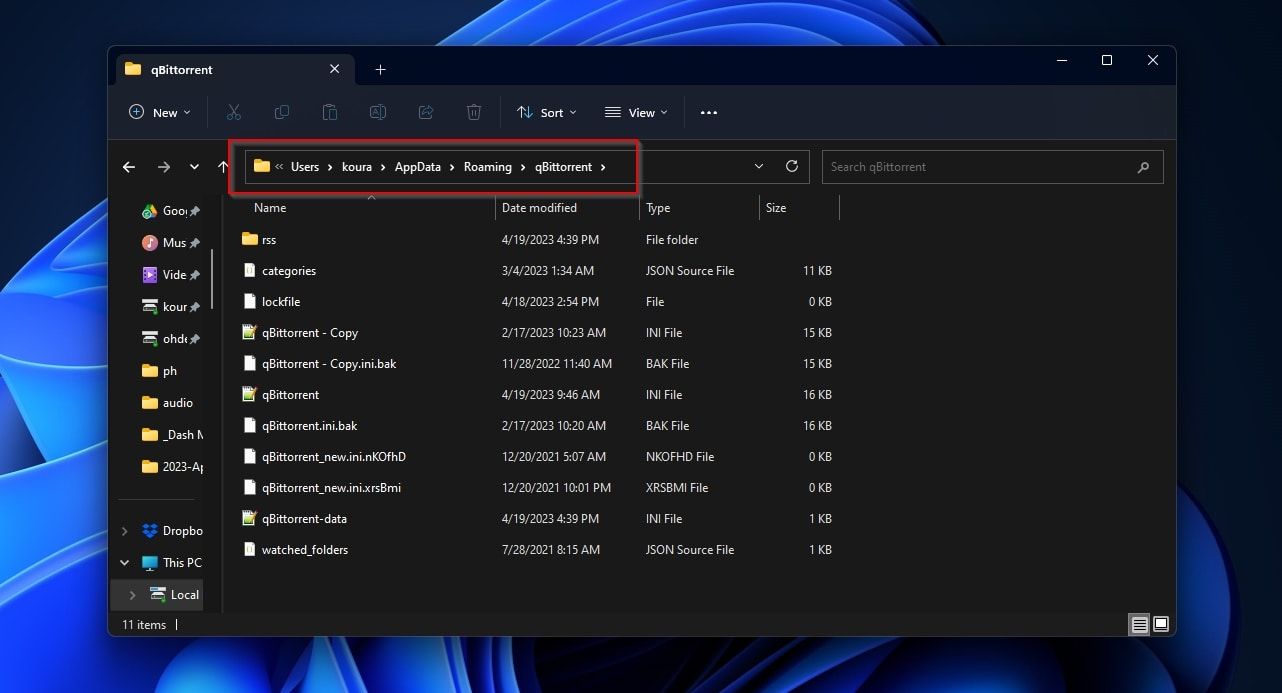
- Return to your user account’s folder on the original PC, and this time navigate into the
AppData > Roaming > qBittorrentpath. Do the same as above, and copy all its contents to the equivalent path on your new PC.
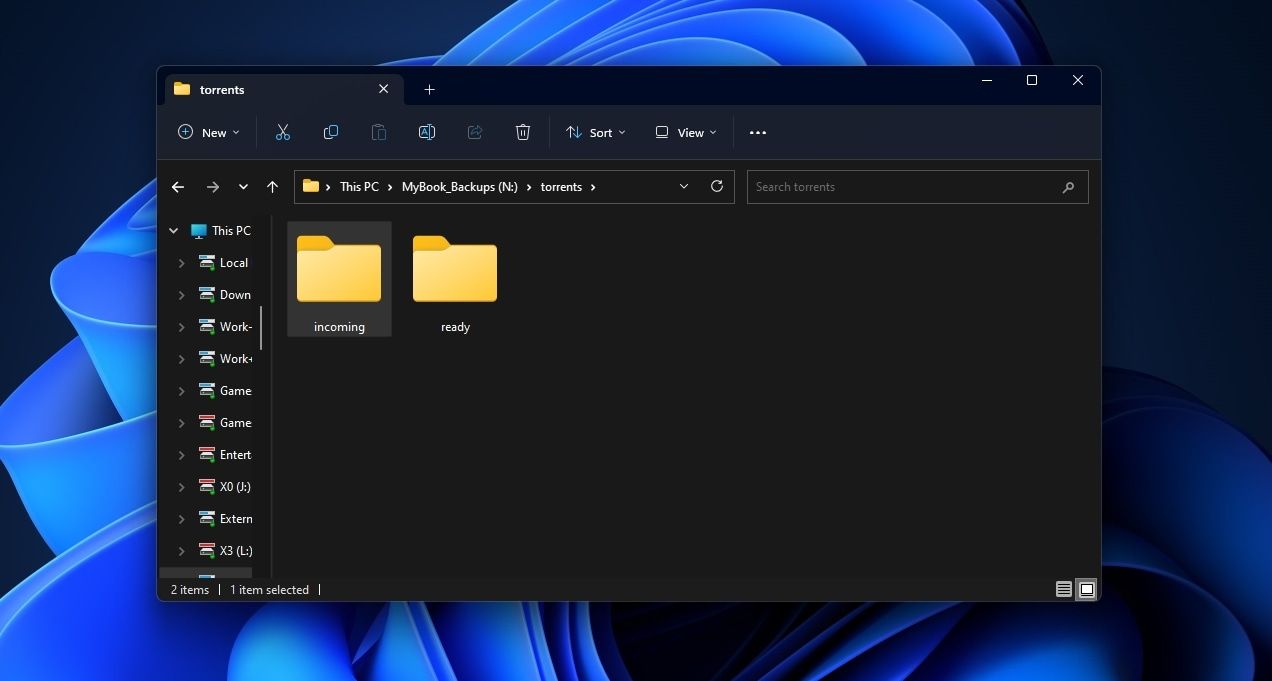
- For the final data transfer, you must move the folder where your torrents were stored from your old PC to the new one. We can’t offer specifics for that because their setup depends on your qBittorrent configuration. In our case, we had two separate folders, one for incoming torrents and another for those that had completed downloading. Both conveniently placed within a “torrents” folder on an external hard disk drive. Unplugging it from the old PC and reconnecting it to the new one was all needed for “transferring our torrents”.


The Problem With Moving qBittorrent to a Different Drive Letter
Moving your torrent collection to your new PC should be a breeze if you kept it on an external hard disk like us. Still, you might meet a slight problem: the drive might be assigned a different letter on your new PC, preventing qBittorrent’s installation from finding your torrents. qBittorrent will seek them on Drive D, while your torrent drive was assigned the letter H.
The simple fix for that problem is to change your torrent drive’s letter to the same one assigned to it on your previous PC. For more information on that, check our guide on how to change drive letters in Windows .
With all your torrent files in the same spot as before, if you run qBittorrent on your new PC, it should detect and start loading them.
And yet, swapping drive letters may be impossible or lead to other issues. For example, you might have started using your new PC and already actively used another drive with the same letter your torrent drive had on your previous PC. In this case, changing your torrent drive’s letter to “fix” qBittorrent could break other software.
Thankfully, there’s a solution for that, too, as we’ll see next. However, it is more complicated than reassigning a letter.
Update and Double-Check Your Folder Paths
If you can’t or don’t want to change your torrent’s drive letter, or you did, but qBittorrent still doesn’t detect your torrents, you should make sure it’s looking at the right place. For that, with qBittorrent running…
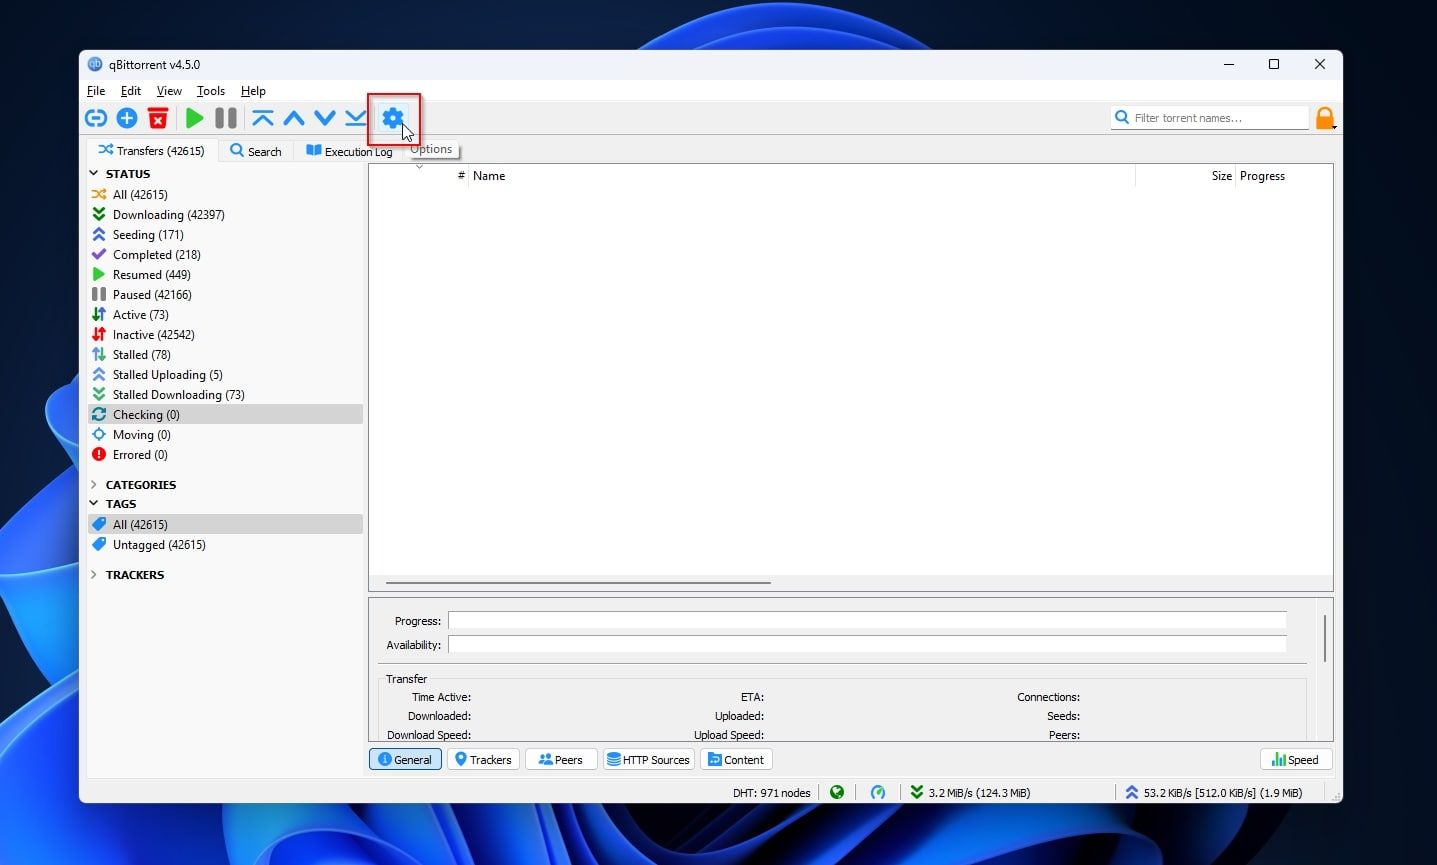
- Click the app’s Options button (with the little cog icon).
The BootIt Collection covers multi-booting, partitioning, and disk imaging on traditional PC’s using the standard BIOS and newer PC’s using UEFI. The collection includes BootIt Bare Metal (BIBM) for standard BIOS systems and BootIt UEFI (BIU) for UEFI system.
- Select the Downloads page from the list on the left, and scroll down a bit to find Default Save Path. Make sure it points to the correct path for your downloaded torrents folder. Here, if, like us, you also used a second folder for incomplete torrents, make sure the option Use another path for incomplete torrents is enabled and that the field on its right points to the correct folder for your half-downloaded files, too. Click OK to save your changes to qBittorrent’s configuration, and exit the Options window.
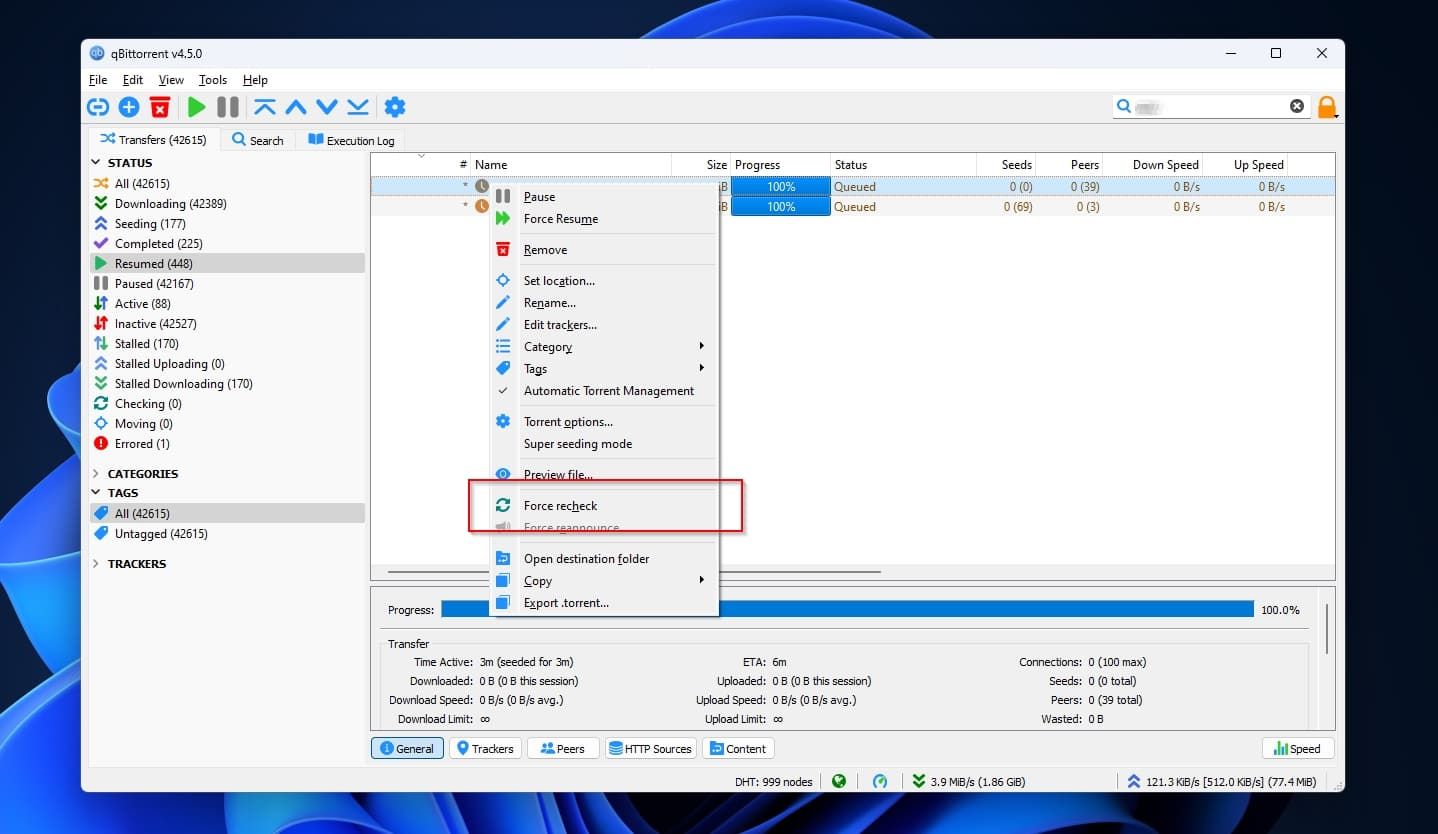
- Fully exit qBittorrent and rerun it. This time it should find and start importing your torrents. However, it may fail to detect their progress and general state correctly. To fix that, highlight all your torrent files in qBittorrent’s transfers list, right-click on them, and select Force Recheck. If your transfer list adds up to a multi-gigabyte sum, and especially if stored on an old and slow HDD, this process can take a while. When it finishes, your migrated qBittorrent installation should be indistinguishable from the original.
 The BootIt Collection covers multi-booting, partitioning, and disk imaging on traditional PC’s using the standard BIOS and newer PC’s using UEFI. The collection includes BootIt Bare Metal (BIBM) for standard BIOS systems and BootIt UEFI (BIU) for UEFI system.
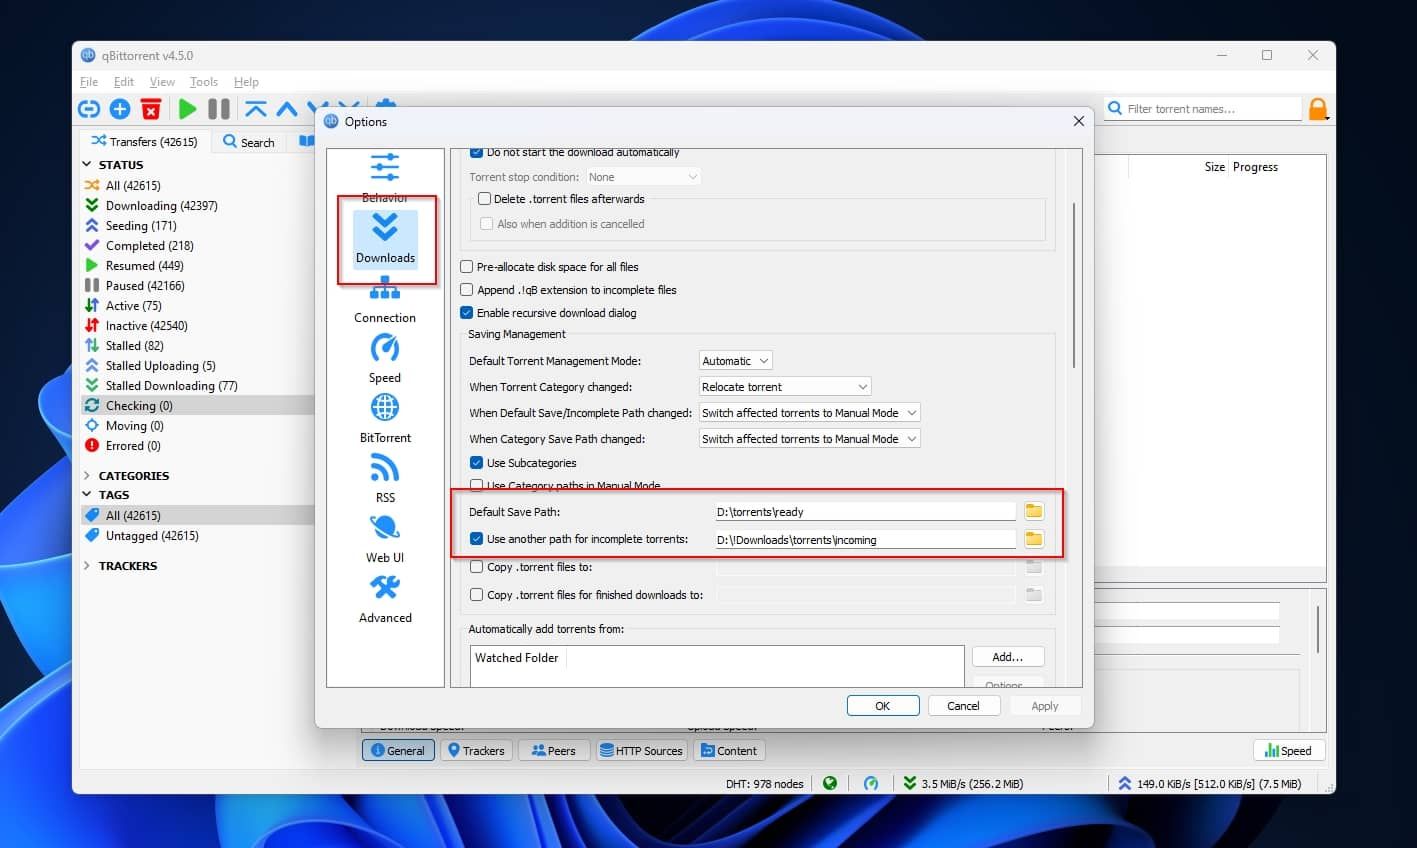
And yet again, that might not be enough. qBittorrent also supports categories, each of which can have its own path. So, if you used that feature to have your torrents downloaded to different folders, you must also update each category’s path.
Unfortunately, each category might point to a different path. There’s no way to fix them all with a single move. You will have to right-click on each category and select Edit Category. Then, under Save Path, click on the button with the folder icon, and point the requester to the correct path on your PC.
When you’re finally done, and your torrent setup’s up to speed, it’s time to move to the next logical step, also involving “torrents” and “speed”: check our article with the best tips to increase your torrent download speeds .
When you eventually start downloading again, don’t seek torrent links at shoddy sites: qBittorrent comes with a built-in search function you can use to find new torrents. Plus, we’ve covered how you can make it even more useful by expanding it with more search engines .

A Seamless Transition for qBittorrent
It might involve taking an external hard disk drive from your old PC and plugging it into your new one, but migrating your qBittorrent installation between computers is not as simple.
Thankfully, as we saw, you don’t have to wave bye-bye to your torrents, nor manually (and painstakingly) re-add them to your new qBittorrent installation one by one.
Moving a bunch of existing files to the correct new spot and changing a handful of options in qBittorrent is all you need to seamlessly migrate all your torrents from your old to your new PC.
The answer’s likely a positive “yes,” but the way to do it isn’t as simple as copying a folder from point A to point B. However, as we’ll see next, it’s not too complicated.
- Title: Enabling Transferable Operation: Relocating Your Torrent Software
- Author: David
- Created at : 2024-08-16 00:16:57
- Updated at : 2024-08-17 00:16:57
- Link: https://win11.techidaily.com/enabling-transferable-operation-relocating-your-torrent-software/
- License: This work is licensed under CC BY-NC-SA 4.0.