
Efficient Installation of Chrome on Windows 11 PCs

Efficient Installation of Chrome on Windows 11 PCs
If you’re running Windows 11, Chrome is easily the best browser you can use. So what happens when you run into issues during installation?
Installing Chrome on Windows 11 isn’t as simple as you might think. Let’s run through a few of the choices you have and issues you might run into while trying to install it.
Disclaimer: This post includes affiliate links
If you click on a link and make a purchase, I may receive a commission at no extra cost to you.
Should You Download the 32-bit or 64-bit Version of Chrome?
First up, you need to know if you’re running 32-bit or 64-bit Windows 11. There are a few ways you can tell if you’re running 64-bit Windows, but here is the simplest and quickest way.
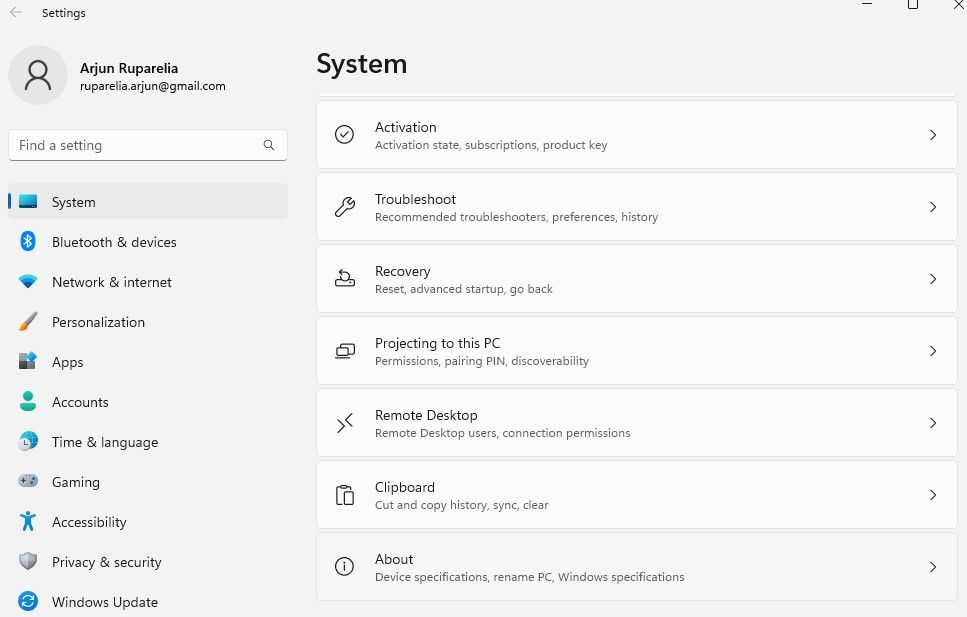
Press the Start button and selectSettings . From here, click onSystem .
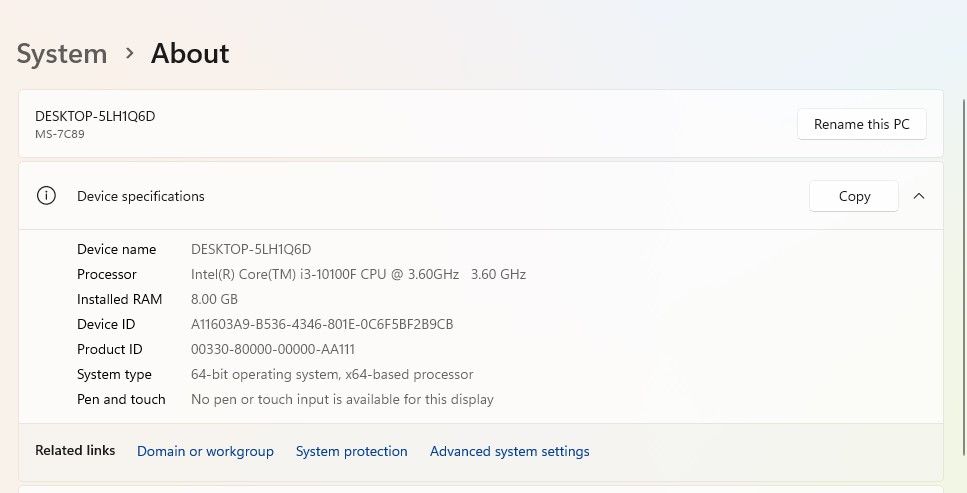
You’ll see a lot of system-related options on the right; scroll to the bottom of the page, and chooseAbout . Here, underSystem type , it should tell you if you have 64-bit or 32-bit Windows.
By default, when you visit thedownload Chrome webpage , it will offer up the 32-bit version of Chrome. This is because the 32-bit version will run on 64-bit computers (the inverse, however, is not true—64-bit Chrome will not run on 32-bit Windows).
So if you have a 32-bit system, simply click theDownload button on this page. The download of the .exe file will begin after you accept Google’s terms and conditions and choose if you want it as your default browser or not.
Those with a 64-bit system will want to visit the64-bit Chrome download page , which is specifically for 64-bit Windows. Once the download is complete, just run the .exe file as you normally would, and presto: you’ve got 64-bit Windows that can fully take advantage of all the perks of your system.
64-bit Users: It’s Time to Update
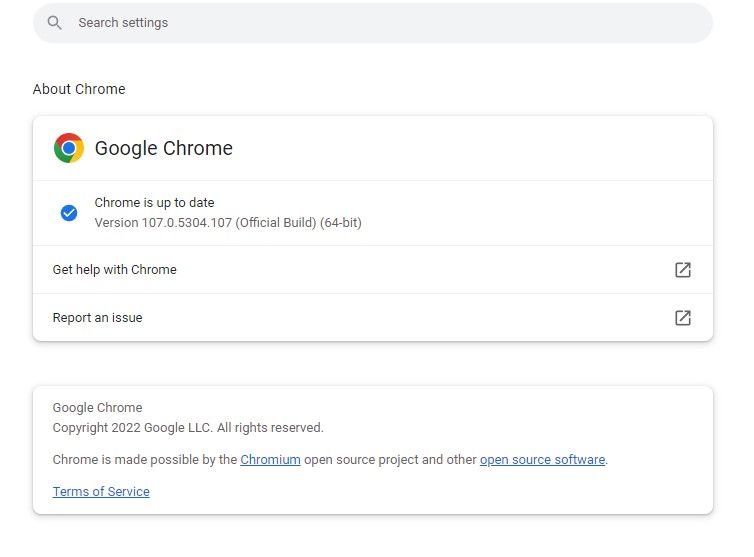
You can verify which version you’re running by clicking on the vertical ellipsis in the top-right corner of the Chrome browser and selectingSettings . You’ll be redirected to a new page. Here, chooseAbout Chrome . Here, you can check if you’re running 32-bit or 64-bit Chrome.
If you’re running 32-bit Chrome, don’t worry; the transition is seamless. Simply download 64-bit Chrome as detailed above and run the installer. Once the installer is done, close Chrome completely.
Then reopen Chrome. You can go back to theAbout Google Chrome screen to verify that you’re running 64-bit Chrome now. All your bookmarks and synced info should remain exactly as it was, and you can even open the last tabs you were using by clicking on the vertical ellipsis once again, and hovering over theHistory option.
What About the Chrome Beta or Canary Channels?
There are actually many different versions of Chrome for you to download beyond what is visible on the main download page. These other versions are available in separate “release channels”, which just means you need another link to get to them. Aside from the default stable build which we’ve already discussed, you can also choose between Chrome Beta (32-bit or64-bit ) and Chrome Canary (32-bit or64-bit ).
Chrome Beta usually sees major updates a month before the stable build, and it’s relatively low-risk to use. Yes, you may run into issues here and there, but for the most part it should be near-stable. If you download Chrome Beta, it replaces your regular stable Chrome, so you do use it at your own risk.
Chrome Canary, on the other hand, is much riskier than the Beta. Canary is for the bleeding edge folks who want the latest and greatest and are willing to sacrifice stability. Thankfully, Canary runs as a separate app from stable Chrome, so you can have both running side-by-side. That way, if a major bug renders Canary unusable, you have stable Chrome as a backup.
What if Windows SmartScreen Can’t Be Reached?
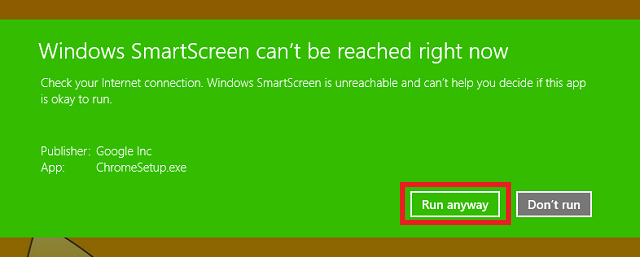
If during the installation of your chosen version of Chrome, you get a large green bar across your screen that saysWindows SmartScreen Can’t Be Reached and won’t allow you to run the installer, there’s a simple fix.
Windows Smartscreen is one of the manysecurity features of Windows 11 , and it’s meant to protect you from viruses. When connected to the internet, Smartscreen scans any executable files (like the .exe that installs Chrome) and compares them to a list of known malware. This is a great last defense if you’ve accidentally downloaded malware and it has tried to install itself, but Chrome is obviously not malware.
To get SmartScreen working, your first step should be to fix your internet connection. This error message most often appears due to having no connection. If that’s out of the question, though, you can simply select theRun Anyway option to install Chrome without scanning it first, since you know Chrome isn’t going to harm your computer. However, you should be more cautious in the future when choosing what files you trust enough to bypass SmartScreen.
If you feel that you really don’t want SmartScreen wasting your time checking all your executable files, you can disable it. Press theStart button and go toSettings . Now, go toPrivacy & security , and selectWindows Security . Here, selectApp & browser control .
Click onReputation-based protection settings and turn off theSmartScreen for Microsoft Edge toggle.
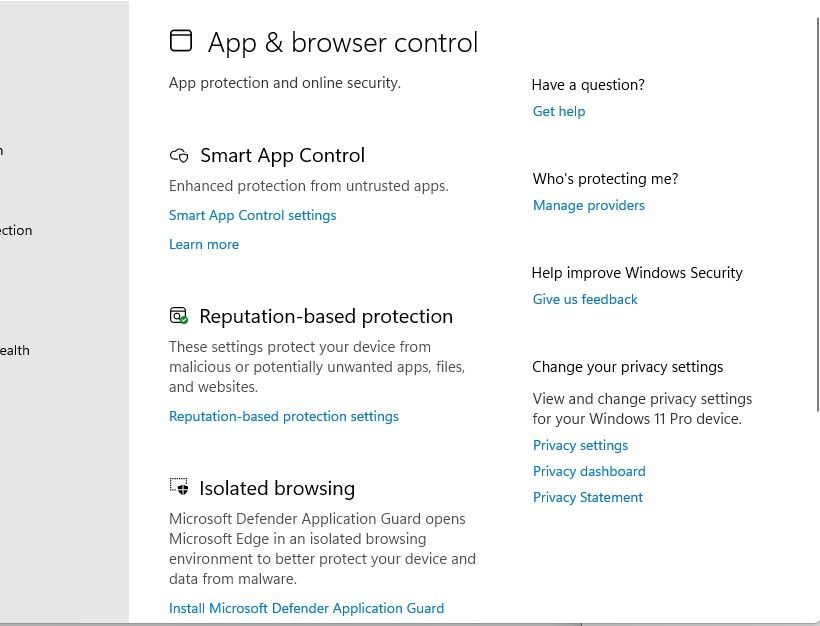
Doing this will disable Windows SmartScreen, although this is not recommended.
Trouble With Your Internet Connection?
The Chrome installer needs the internet to properly install, but not everyone has a consistent and strong enough connection for it to work well. If that’s the case, go ahead and download theoffline Chrome installer . After downloading the file, you can share it with another PC or install it on the PC you downloaded it to. Launch the installer and follow the on-screen instructions to install Chrome.
Once Chrome is installed, though, you should really keep your Chrome updating in the background for security and performance enhancements. If you prevent Chrome from doing that, you should revisit the offline Chrome installer page every once in a while to install the newest version of Chrome to make sure your browser remains secure and fast.
Common Errors With Your Chrome Installation
If your Chrome installation fails, it should give you an error number for why it failed. Remember that number, and you can look it up onGoogle’s Chrome support website for specific instructions on how to fix it.
The Start Menu and Taskbar Icons
With Chrome installed, the icon will appear in your list of apps. You can see this list by pressing the Windows Key to get to the Start menu, and then either swiping up (on a touchscreen) or searching forChrome (on a non-touchscreen).
Find Google Chrome in the search results. You can then right-click on it to decide if you want to pin it to the Start menu or Taskbar.
If you prefer to stay in the desktop environment, you can pin it to the Taskbar to keep it pinned to the bar that runs along the bottom of your desktop.
Master the Chrome Keyboard Shortcuts
We’ve provided a list of all thekeyboard shortcuts for Chrome on Windows, and they’re incredibly helpful for increasing the speed at which you can use your browser. Keep a list of the most useful ones for yourself and work on memorizing them—you won’t regret it.
Are You Using a Touchscreen? Enable Pinch-to-Zoom
If your device has a touchscreen, pinch-to-zoom will be an invaluable feature. If it isn’t working when you start Chrome, you can enable it by navigating tochrome://flags/#enable-pinch in the address bar and selectingEnabled from the drop-down menu forEnable pinch scale .
If it ever gives you issues, you can always go back and disable it.
How to Uninstall Chrome
Switching to another browser and no longer want Chrome? Uninstallation is easy. Press theWindows key to get back to the Start menu and typeUninstall . SelectApps & features from the search results that appear on the left side.
This will open a window on the desktop with a list of all your installed desktop applications. Find Chrome, select the vertical ellipsis to the app’s right, and clickUninstall .
Getting the Most Out of Chrome on Windows 11
Chrome is the most-used browser on the market right now, and for good reason. Hopefully, by now, you’ve got Chrome all set up and working perfectly on your Windows 11 device.
Also read:
- [New] 2024 Approved Excellence Collection Highest Quality Webcam Supports
- [New] Streamlined Accessibility Learning iPhone/iPad Techniques for Podcast Downloads
- [New] Uncover the Full Potential of Vita's Video Editor - Comprehensive Guide 2024
- [Updated] A Beginner's Guide to Navigating Digital Marketing with Reddit Savvy
- [Updated] Leveraging XML & TTML for Cutting-Edge SRT Creation Processes
- 2024 Approved Panoramic Photo Showdown Deciding 360 Supremacy
- How to Add a Hidden Items Context Menu Option in Windows 11 & 11
- Innovative Ways to Erase TaskView on Bar
- Navigating the Job Market with AI: 10 Essential ChatGPT Tactics for LinkedIn Success
- Overcoming Windows Restrictions for Hidden Software
- Resolve Setup Woes: MS PC Manager Fix
- Solving Issues with Your Sound Blaster Mic: A Step-by-Step Guide
- Tackling ONEDRIVE Error Code X04Dec5 on Windows 11 Login
- Top-Rated Apple Watch Models : Comprehensive Reviews by Experts - ZDNet
- Unveiling Blackout Glitches in Windows Remote Services
- Title: Efficient Installation of Chrome on Windows 11 PCs
- Author: David
- Created at : 2024-10-25 19:09:28
- Updated at : 2024-11-01 21:42:16
- Link: https://win11.techidaily.com/efficient-installation-of-chrome-on-windows-11-pcs/
- License: This work is licensed under CC BY-NC-SA 4.0.