
Disabling Users with Precision: Four Easy Techniques on Win11
Disabling Users with Precision: Four Easy Techniques on Win11
You can create multiple users account on Windows 11 for yourself and others. This allows you to create different spaces for your personal and work tasks and enable others to share your computer and have their own spaces.
But what if you need to stop someone from accessing their account without deleting it? While you can temporarily disable a user account on Windows 11 using the block sign-in option, there are a few other ways to disable specific or all user accounts on Windows 11.
1. How to Disable a User Account in Windows Settings
Windows allows the system administrator to manage user accounts on Windows 11. Not only can you add a local user account there, but you can also block sign-in to disable an account temporarily.
To disable user accounts via Settings:
- PressWin + I to open theSettings panel.
- In the left pane, click on theAccounts tab.

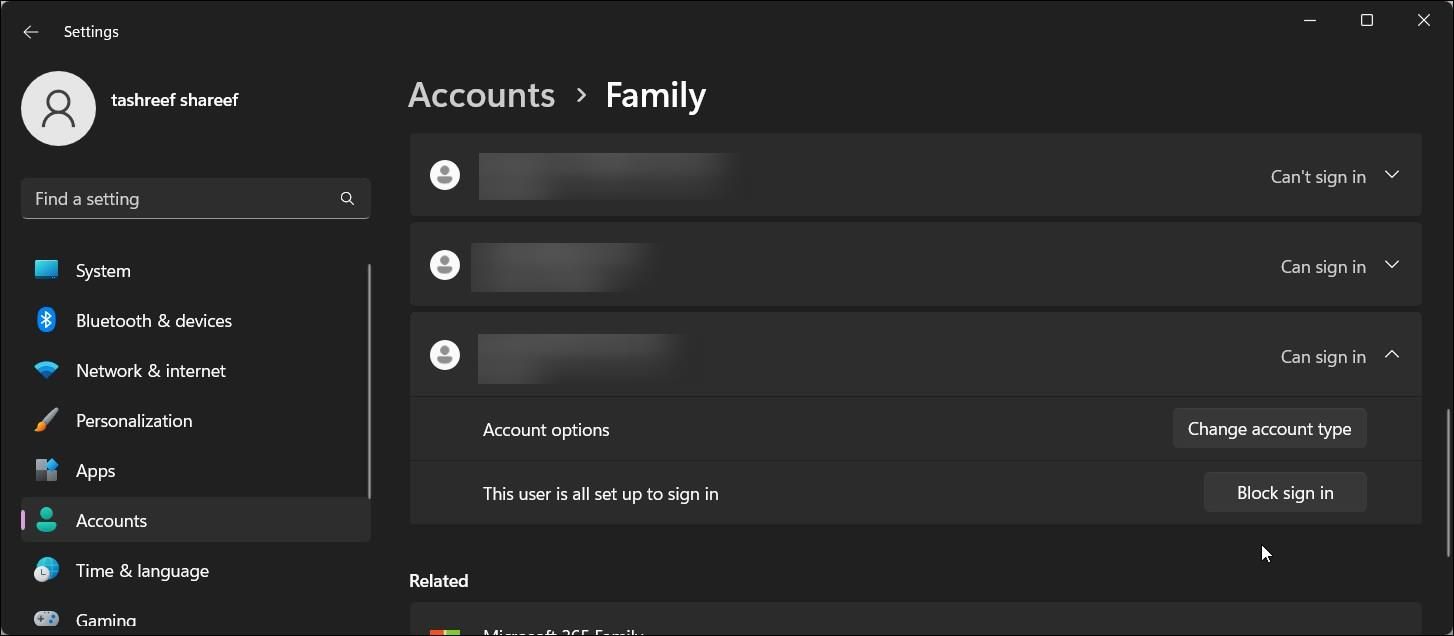
- Next, in the right pane, scroll down and click onFamily .
- UnderYour family , scroll down and click on the account you want to disable.
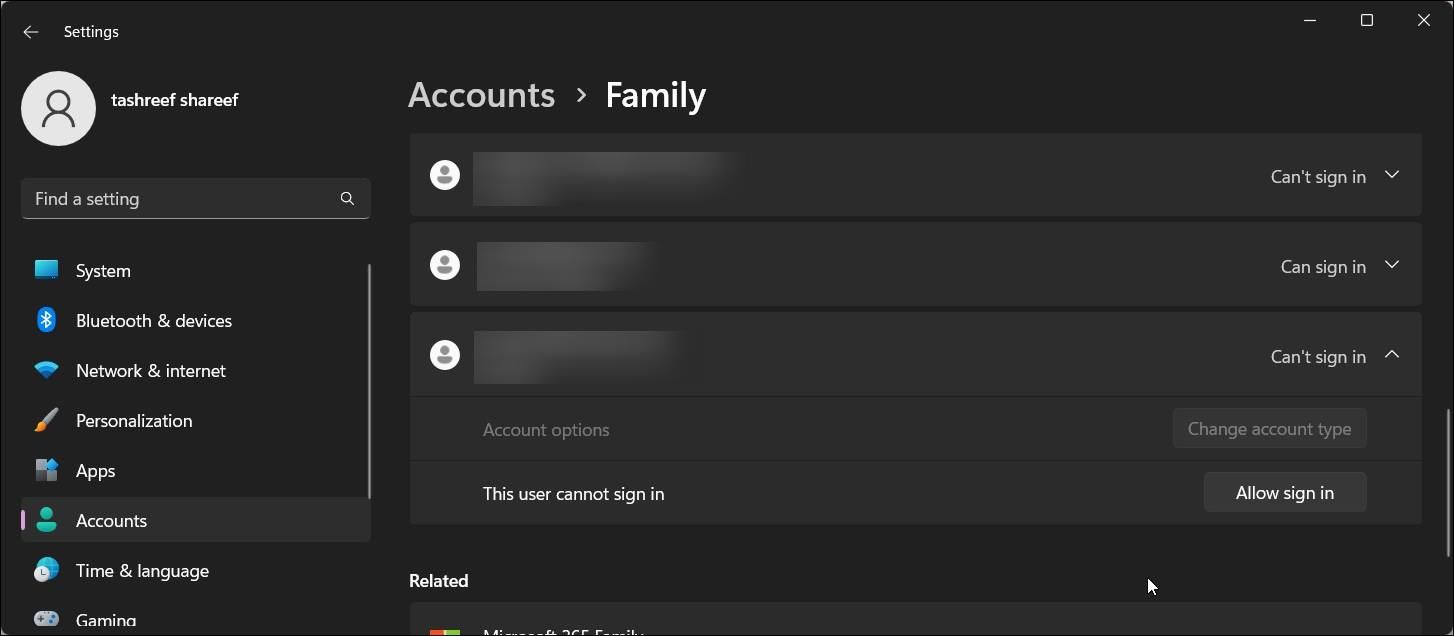
- Next, click theBlock sign in button and clickBlock in the confirmation dialog.
- If you need to enable the user account again, click theAllow sign in button and clickAllow to confirm the action.

Note that you must log in to your administrator account to make changes to user accounts. Also, you can only block sign-in for members ofYour family in the Family groups from Settings. If you need to disable a local user account, you must use the PowerShell and Command Prompt methods below.
 Epubor Audible Converter for Win: Download and convert Audible AAXC/AA/AAX to MP3 with 100% original quality preserved.
2. How to Disable a User Account Using Windows PowerShell
If you need to disable and enable user accounts frequently, PowerShell can help you do it efficiently. To do this, you can use the Disable-LocalUser cmdlet and specify the user account name you want to disable.
To disable a user account using PowerShell:
PressWin + X to open theWinX menu.
Click onTerminal (Admin) . It will open Windows Terminal with PowerShell set as the default profile.
If not, click the drop-down icon in theTerminal tabs section and selectWindows PowerShell .
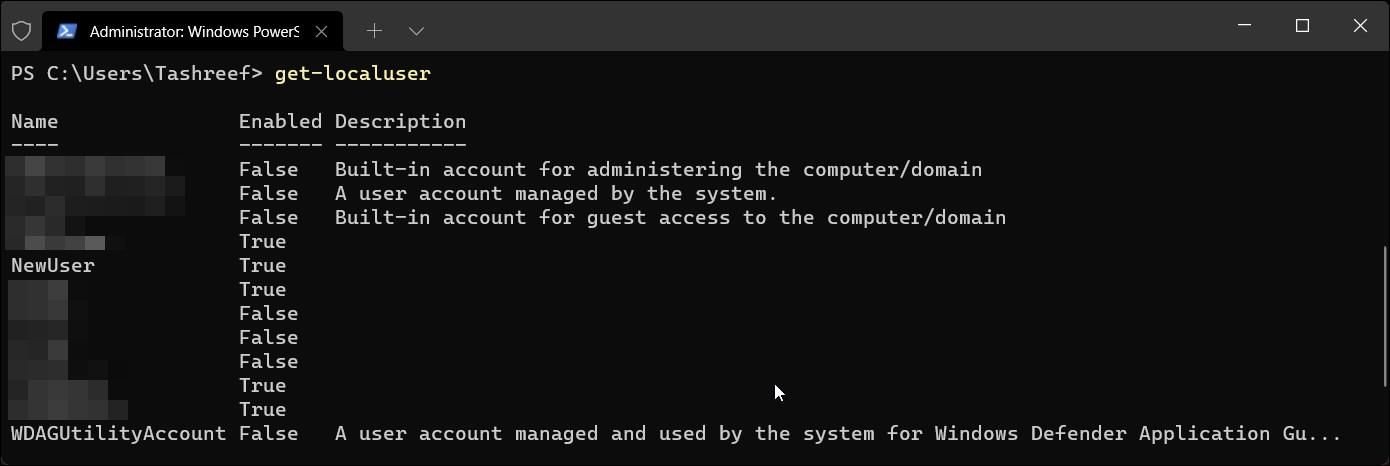
Next, type the following command to find all the user accounts on your PC:
Get-LocalUserLocate the user account name in theName column.
Next, type the following command to disable the specified user account:
Disable-LocalUser -Name “NewUser”In the above command, replaceNewUser with the user account name you want to disable.
PowerShell will not return a success message after the user account is disabled.
If you need to enable the account again, type the following command and press Enter:
Enable-LocalUser -Name “NewUser”In the above command replace NewUser with your user account name.


When disabled, the user account will be hidden from your lock screen. To verify the same, pressWin + L to lock your Windows 11 computer . Next, double-click on the lock screen to view the login screen. If disabled, the user account will appear on the lower left side of your screen.
3. Disable a User Account Using the Command Prompt
Another way to disable a local user account is via the Command Prompt. It is a command-line utility that you can use to disable Microsoft or local user accounts.
To disable a user account using Command Prompt:
- PressWin + R to openRun .
- Typecmd in theRun box. Next, pressOK while holding theCtrl + Shift key to open the elevated Command Prompt. ClickYes if prompted by User Account Control.
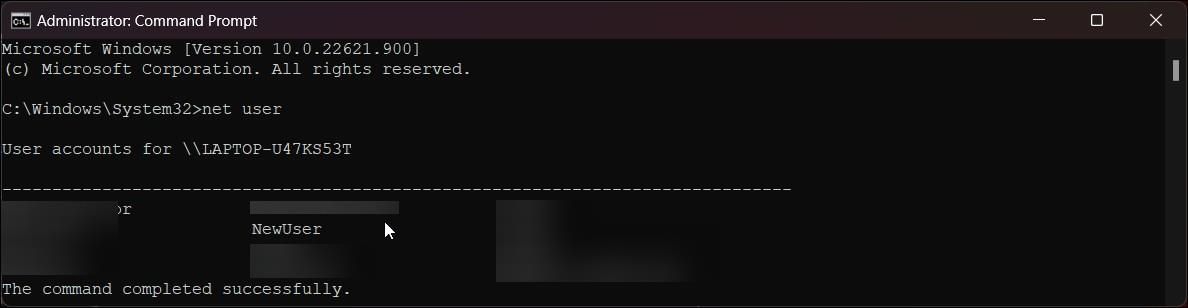
- In the Command Prompt window, type the following command to find all the available user accounts on your PC:
net user - Locate the user account name in the return list.
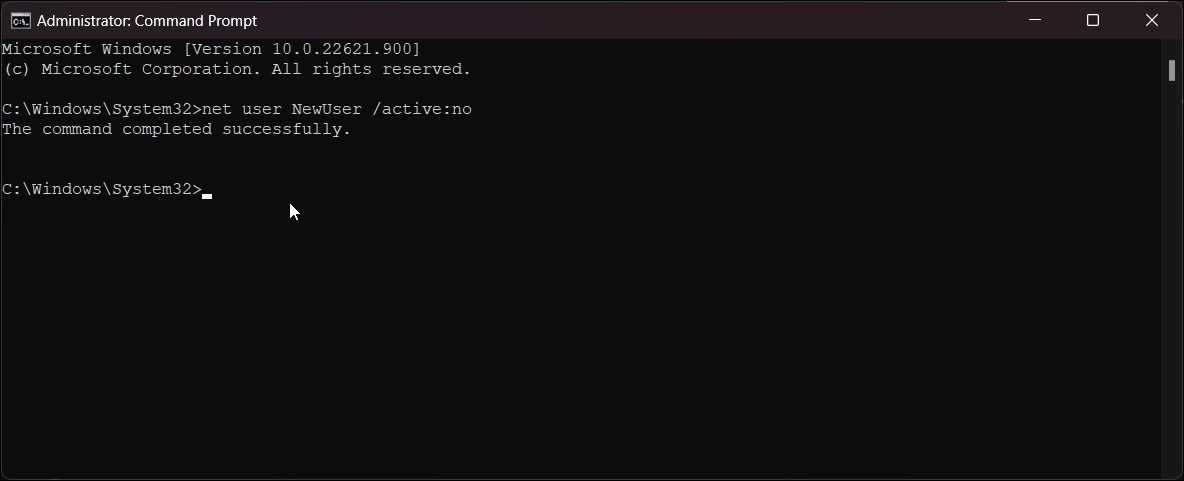
- Next, type the following command to disable the specified user account:
net user NewUser /active:no - In the above command, replaceNewUser with the user account name you want to disable.
- Next, typeexit and press Enter to close Command Prompt.
- If you need to enable the account again, execute the following command:
net user NewUser /Active:yes - Make sure to replace NewUser with the account name you want to enable.

4. Disable a User Account From the Computer Management Console
The Computer Management Console gives system administrators access to advanced tools such as Task Scheduler, Event Viewer, Device Manager, etc. Another useful Computer Management feature is Local Users and Groups.
Local User and Groups lets you manage user accounts and groups on your Windows computer. While the Computer Management console is available on all versions of Windows, Local User and Groups is only available on the Pro, Edu, and Enterprise edition of the OS.
To disable user accounts using the Local Users and Groups Management console:
Click on theSearch icon inTaskbar .
Typecomputer management and click onComputer Management from the search result.
In theComputer Management console, expandSystem Tools .
Next, locate and selectLocal Users and Groups.
Select theUsers folder**.**
In the right pane, you can view all the user accounts on your PC.
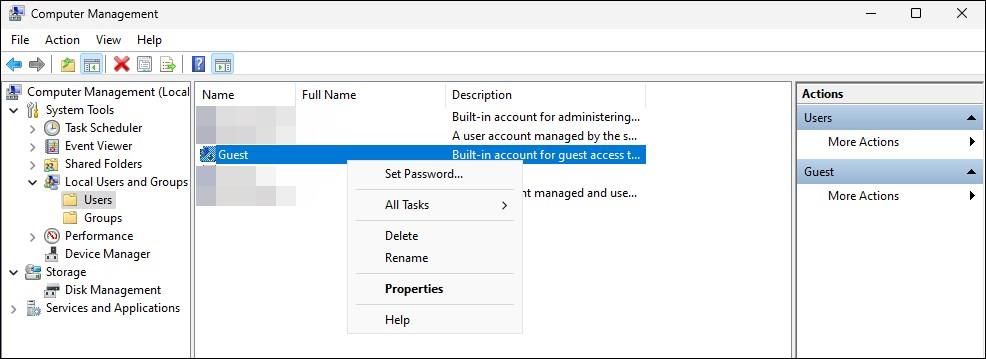
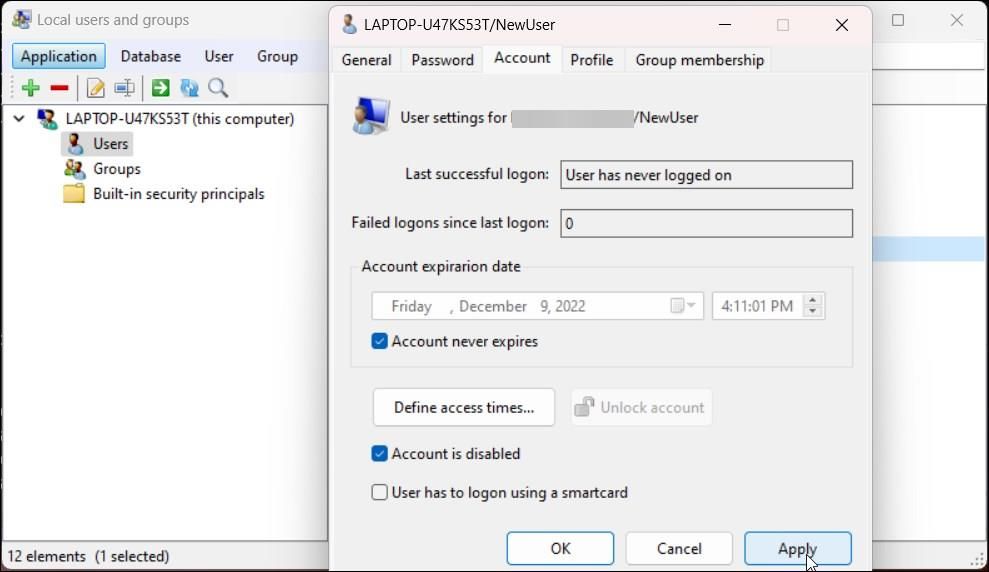
To disable a user account, right-click on theUser Account Name and selectProperties .
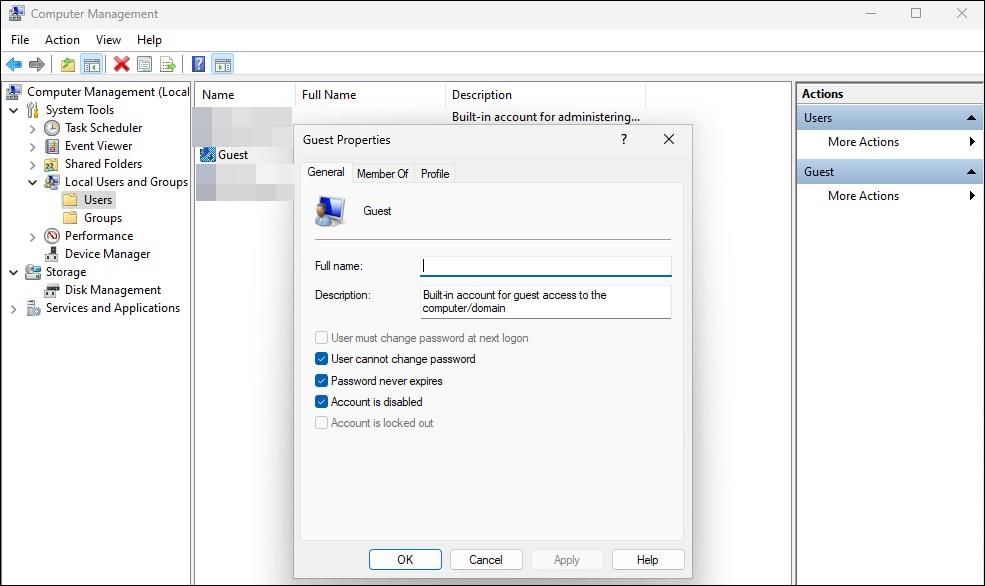
In theProperties dialog, select theAccount is disabled option.
ClickApply andOK to save the changes.
To enable the account gain, uncheck theAccount is disabled option and clickApply andOK .
Disable User Account Using Local Users and Groups on Windows 11 Home
Windows 11 Home users will have to rely on a third-party tool to disable a user account via the Local User and Groups console. Lusrmgr is a third-party snap-in that offers similar functionalities as the Local Users and Groups Management console.
To install the tool, follow our guide to enable Local User and Group Management on Windows 11 . Once done, follow the steps below:
- Double-click on thelusrmgr.exe file to launch the application.
- In theLocal users and groups dialog, selectUsers .
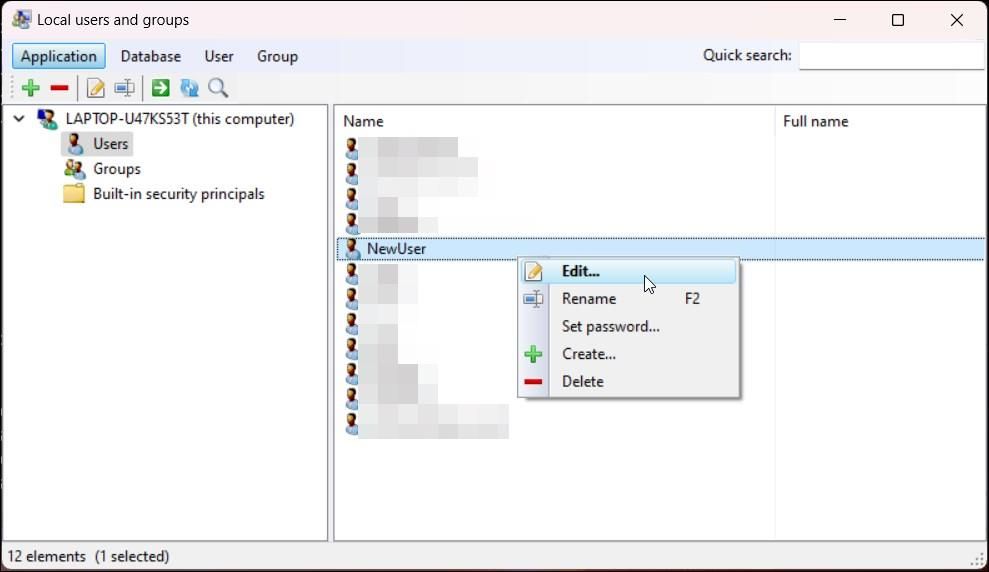
- Right-click on the user account you want to disable and selectEdit .
- Next, open theAccount tab.
- Select theAccount is disabled option.
- ClickApply andOK to save the changes.

There Are Many Ways to Disable a User Account on Windows 11
Disabling a user account lets you restrict access to a specific user account without deleting the account completely. This way, if you need to restore the account at a later stage, you can enable it and continue using it without restoring files and folders.
That said, removing a user account on Windows 11 is not a complicated process. Just log in to your administrator account and block sign-in or remove user accounts from Settings, and you’re pretty much done.
- Title: Disabling Users with Precision: Four Easy Techniques on Win11
- Author: David
- Created at : 2024-08-15 23:43:40
- Updated at : 2024-08-16 23:43:40
- Link: https://win11.techidaily.com/disabling-users-with-precision-four-easy-techniques-on-win11/
- License: This work is licensed under CC BY-NC-SA 4.0.