
Creating a Personalized Windows Speech-to-Text App Using Whisper & AHK
Creating a Personalized Windows Speech-to-Text App Using Whisper & AHK
OpenAI’s Whisper is one of the most powerful solutions for turning your voice into text. However, Whisper can also be annoying to use, since you have to type commands to transcribe an audio file into text. But why do that when we’ve got AutoHotkey?
With AutoHotkey, we can effortlessly create a basic GUI for command-line apps like Whisper. So, let’s do that and see how you can create your own transcription app by combining AutoHotkey’s GUI-making superpowers with OpenAI’s Whisper as the “brain” behind the buttons.

Laying the Foundations for Whisper and AutoHotkey
You can make cool scripts with AutoHotkey , but that’s not all it can do. For this project, we’ll use AutoHotkey to create a GUI for Whisper. This will allow us to use OpenAI’s voice recognition AI tool by clicking buttons and customizing its functionality using menus instead of typing commands.
However, this means that you’ll need to have both AutoHotkey and Whisper installed to follow along.
For the first part of the equation, you can download AutoHotkey from its official site , then run its installer and follow the presented steps.
Note that we’ll use the older “v1” version of the scripting language, not the new v2. That’s important because the two versions use a somewhat different syntax. What we’ll see here might not work if using the new v2.
The second part is more complicated, but you can learn how to do it by checking our article on how to turn your voice into text with OpenAI’s Whisper for Windows .
With both installed, our plan of action is as follows:
- Create a GUI with elements for Whisper’s variables and values.
- Create functions to grab values from the interface, select files and folders, and assemble everything into a usable Whisper command.
- Run the Whisper command to produce results.
Of course, you could always use Windows built-in support for Voice Typing, as we saw in our article on how to start Voice Typing on Windows 11 . Still, as you’ll see while using it, Whisper is much more accurate (but also slower).
On a more personal note, I should explain that I am not a programmer, and this project is a “remix” of a solution made for personal use.

How to Make a New AutoHotkey Script
The first step is to create a new blank script file. Keep it in its own folder, just in case you decide to tweak or build on it, creating more files.
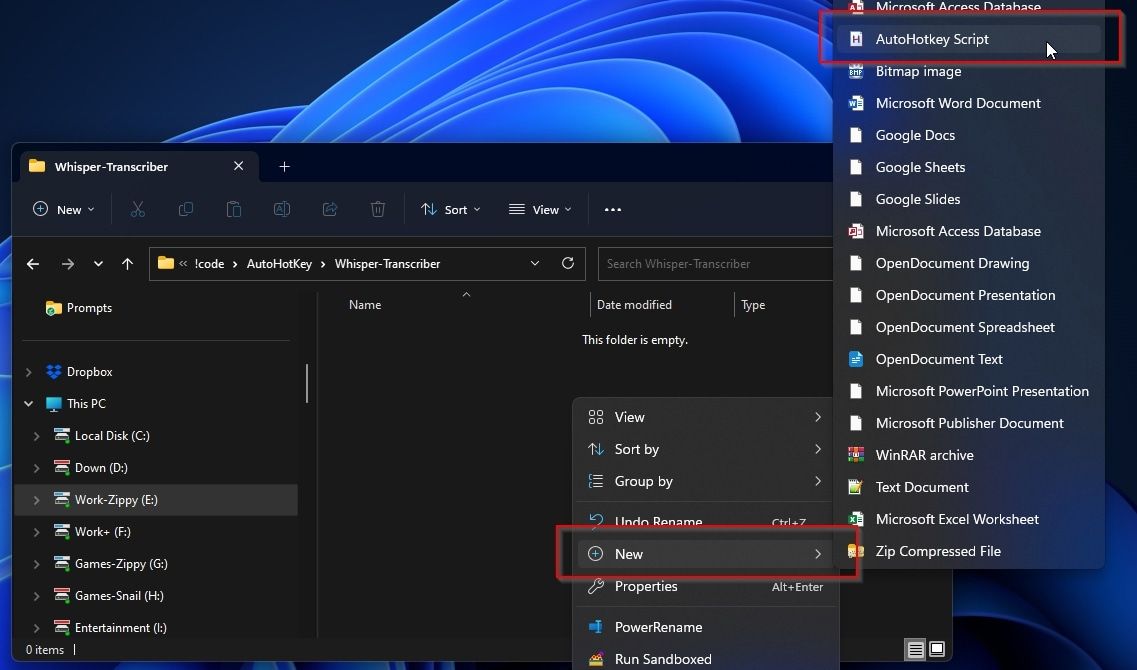
- Run your favorite file manager (or press Windows Key + E to launch Windows Explorer) and create a folder for your transcription app anywhere you like.
Any DRM Removal for Win:Remove DRM from Adobe, Kindle, Sony eReader, Kobo, etc, read your ebooks anywhere.
- Right-click on a blank spot of the window and select New > AutoHotkey Script to create an empty script file.
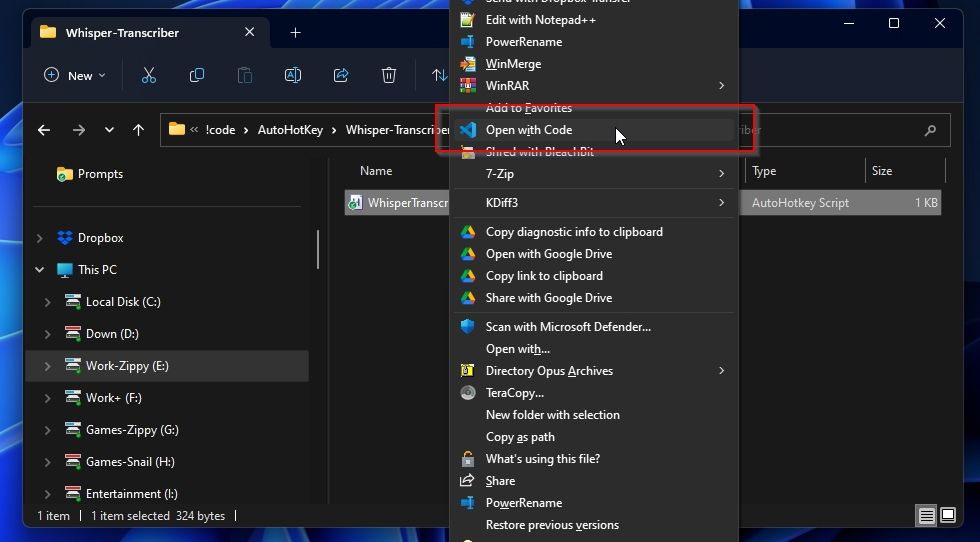
- Shift + Right Click on the file to access the full context menu and select to open it with your favorite code or text editor. Windows’ own Notepad will do.
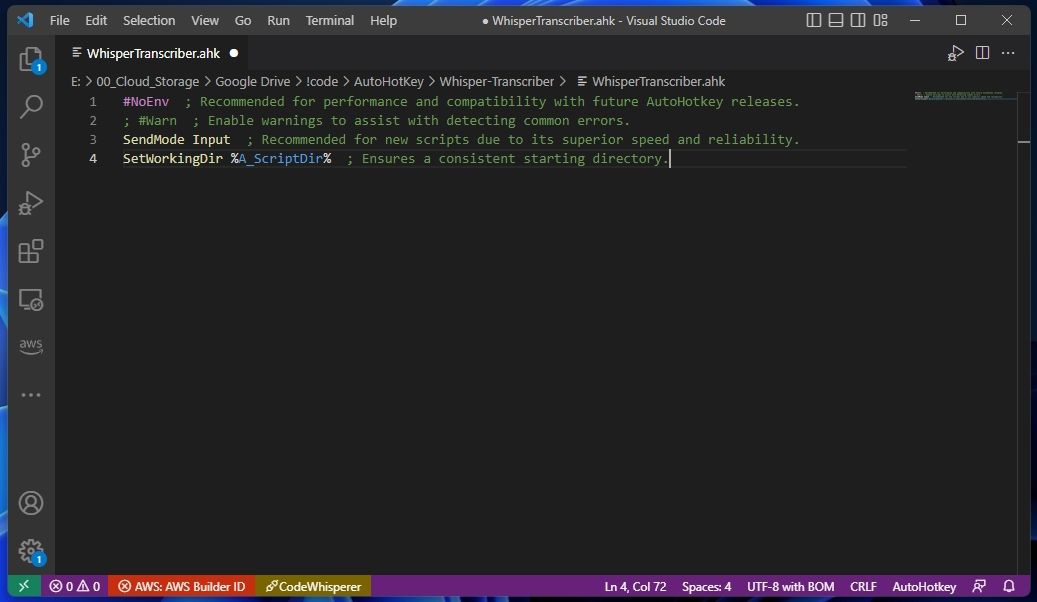
- Despite being “an empty script”, your AHK file will already be pre-populated with some “stuff”. Those are useful AutoHotkey variables and flags that define how it should work on your desktop. Ignore them, leave them as they are, and do all your future typing underneath them.
 Any DRM Removal for Win:Remove DRM from Adobe, Kindle, Sony eReader, Kobo, etc, read your ebooks anywhere.
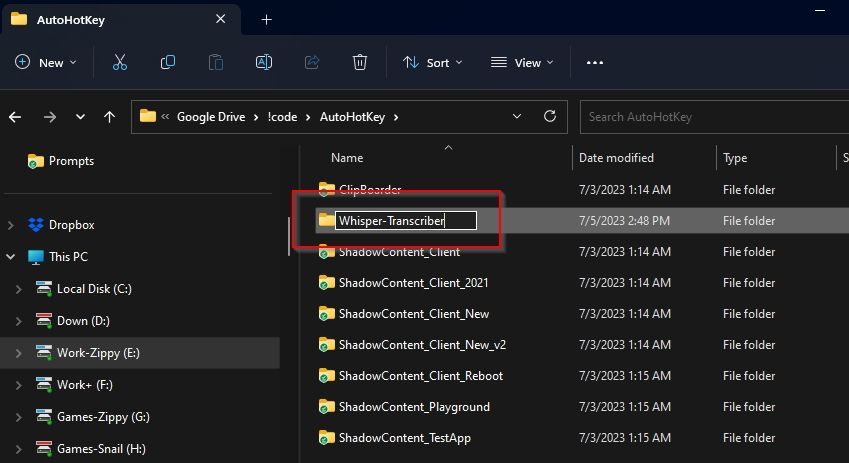

Getting to Know Whisper’s Flags
Since we’re making a GUI for a command line app, it’s handy to have a reference to its major variables and flags that we’ll be using in our project. You can check them out by reading Whisper’s documentation, visiting its official Github page , and running it in your terminal.

WPS Office Premium ( File Recovery, Photo Scanning, Convert PDF)–Yearly
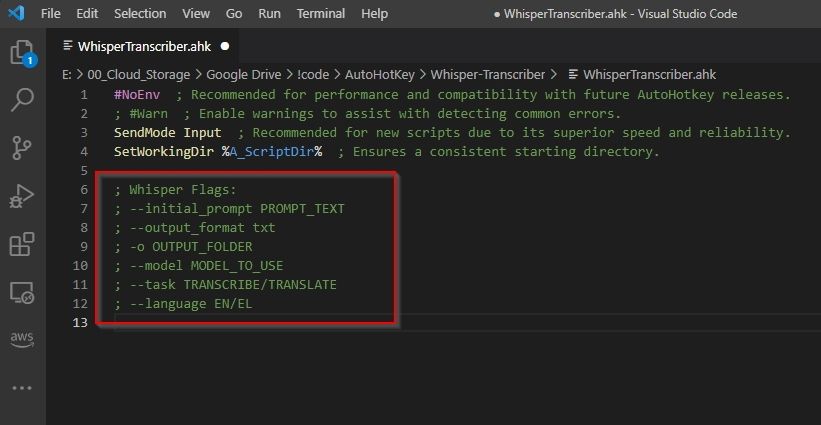
We’ll list the ones we’ll use in this project for convenience. We suggest you add them to your script as comments (in separate lines, each beginning with a “;” character followed by a space).
; Whisper Flags:; --initial_prompt PROMPT_TEXT; --output_format txt; -o OUTPUT_FOLDER; --model MODEL_TO_USE; --task TRANSCRIBE/TRANSLATE; --language EN/EL
Creating the GUI With AutoHotkey
We suggest you split your script into sections using comments like we did to keep it organized. We’ll start by defining some variables, continue to the actual GUI, and end by defining its functions.

Establishing the Hidden Variables
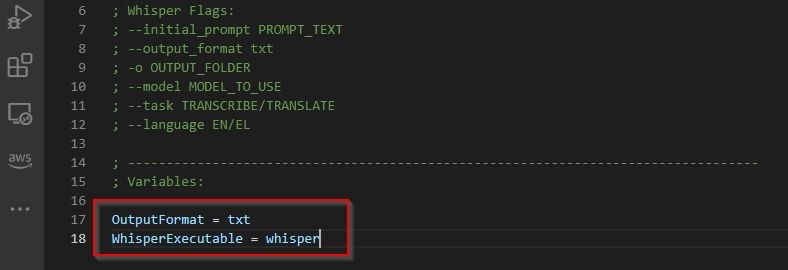
We begin with a section where we’ll define variables we may want to change in the future, but not so often that we’d like to expose them through the GUI, over-complicating it. You can type “Variable_Name = Content or value of the variable” with one variable and value pair per line.
For this project, we’ve defined a OutputFormat variable that we set to the “txt“ value and a WhisperExecutable variable stating Whisper’s executable file name. This way, if we want to use the same solution in the future to create SRT subtitle files instead of TXT documents or upgrade Whisper/switch to an alternative app, we can adjust the values of those variables on that single spot instead of throughout the script.
OutputFormat = txtWhisperExecutable = whisper
Setting Up the User Options
When using Whisper on the command line, three of its flags allow you to define:
- If you’re doing translation or transcription
- The audio file’s language
- The language model you want to use (various sizes are available, each affecting performance VS quality of results).
The easiest way to offer the same functionality through a GUI is through tried and tested drop-down lists. The syntax for adding a drop-down list to an AutoHotkey GUI is as follows:
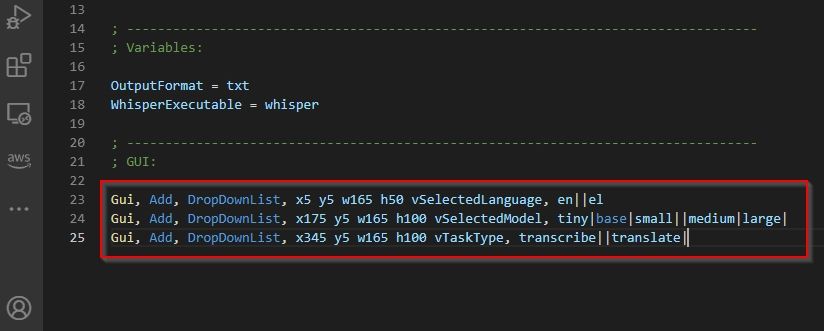
Gui, Add, DropDownList, xPosition yPosition wWidth hHeight vVariable_that_will_hold_selected_value, optionA|optionB|default_optionC||optionD|
Based on that, let’s add three drop-down lists to our script for selecting Whisper’s language (between English/en and Greek/el), model (tiny, base, small, medium, large), and task type (transcribe or translate).
Gui, Add, DropDownList, x5 y5 w165 h50 vSelectedLanguage, en||el Gui, Add, DropDownList, x175 y5 w165 h100 vSelectedModel, tiny|base|small||medium|large| Gui, Add, DropDownList, x345 y5 w165 h100 vTaskType, transcribe||translate|
To set an option as the default selection, use a double pipe symbol (“|”) after it. You can see that, in our example, we’ve set our language to en, SelectedModel to small, and TaskType to transcribe.
How to Guide Whisper
Since Whisper is AI-based, there’s no way to have absolute control over how Whisper transcribes audio. It’s free to choose what it considers optimal.
However, like other AI solutions, Whisper can accept user prompts. By crafting a prompt, you can “guide” how it transcribes your audio.
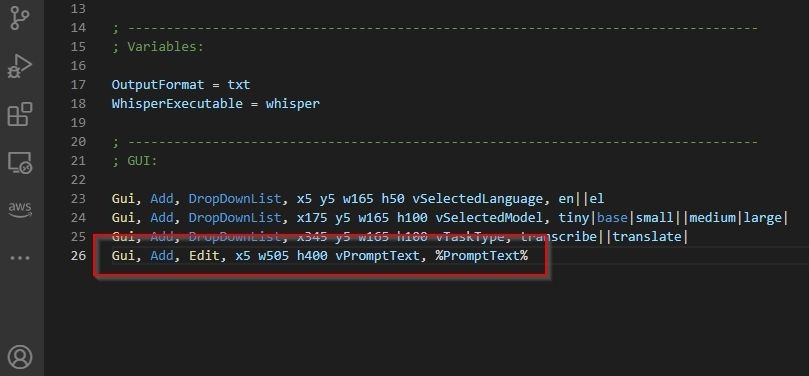
Did the solution we’re making fail to Transcribe something correctly? You can try “explaining” to Whisper “what the voice file is about”, including the syntax of words, acronyms, and phrases in your prompt as you want them to appear in the transcription. For that, we’ll add an AutoHotkey Text Edit field.
The syntax is not too different than what we used for adding drop-down lists above:
Gui, Add, Edit, x5 w505 h400 vPromptText, %PromptText%
The “%PromptText%” at the end “tells” AHK to show the PromptText variable’s content (if it’s already assigned a value) within the text field. It won’t show anything in the script we’re making, but consider it a placeholder for when you eventually tweak the script in the future also to save and load prompts!
Would you prefer to assign a predefined value to the PromptText variable? Add something like the following to the Variables section of the script. Remember to replace “Your Name’s” with your actual name.
PromptText = Transcription of Your Name's notes

Setting Up the Action Buttons
For choosing files, folders, and running Whisper after we’ve set everything up, it’s better to use buttons. You can add buttons to an AHK-made interface using the following:
Gui, Add, Button, xPosition yPosition wWidth hHeight gFunction_To_Perform, Button Text
 /a>
/a>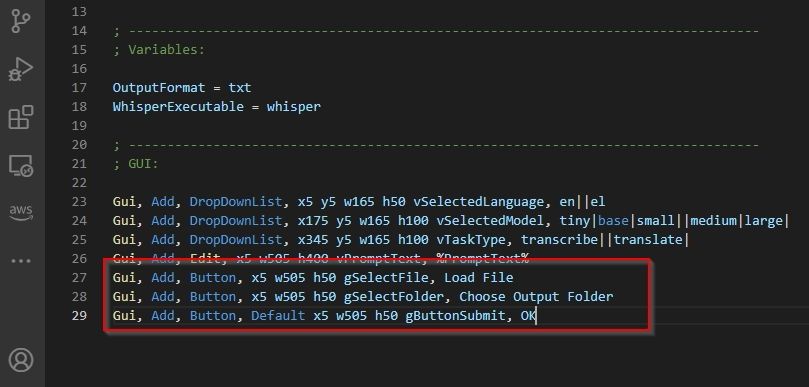
Notice that unlike variables in GUI elements, which begin with the letter “v”, function names start with “g”, for “Go (to this spot of the script)”.
A single button of an AHK interface can also be deemed “the default one”, which will be activated if you don’t click anywhere on the GUI and press Enter. This is defined by adding “default“ in the coordinates-and-function section, as you’ll notice in our “OK” button:
Gui, Add, Button, x5 w505 h50 gSelectFile, Load FileGui, Add, Button, x5 w505 h50 gSelectFolder, Choose Output Folder Gui, Add, Button, Default x5 w505 h50 gButtonSubmit, OK
With the above, we’re defining three buttons:
- One labeled “Load File“ that, when clicked, will run the SelectFile function.
- One labeled “Choose Output Folder“, which will run the SelectFolder function.
- One labeled “OK“, selected by default, “calling” the ButtonSubmit function.
How to Show Your GUI
Our GUI is ready but won’t appear on our screen because we haven’t “told” AutoHotkey to show it or what each button should do.

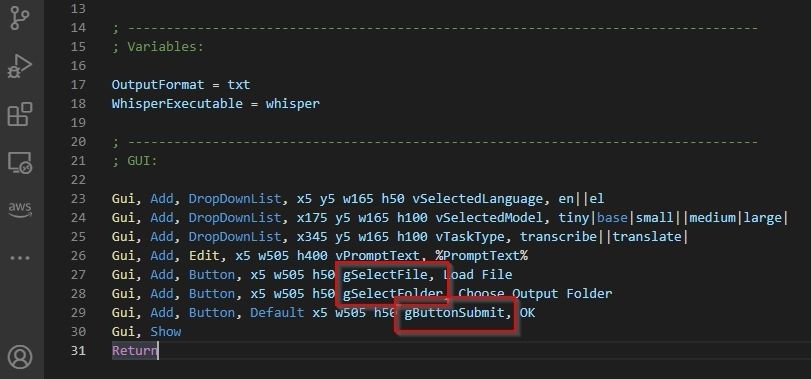
For that, add the following two lines below those that define your GUI:
Gui, ShowReturn
The first line “tells” AHK to show the GUI’s window, while the second marks the section’s end.
The Functions and Functionality of Our App
Although we’ve completed the GUI section, if you try to run the script, it will crash. That’s because we’re referencing non-existing functions in it. So, our next move is to create those functions.

The three functions we want are:
- Select an input file.
- Select the output folder where the transcribed file will be stored.
- Craft a command that will “assemble” all variables into a usable Whisper command, akin to what we’d type ourselves in a terminal, and then run it.
Input File Selection
The first function, which we’ve already named “SelectFile“ when we added its button to the GUI, is:
SelectFile:FileSelectFile, SelectedFileReturn
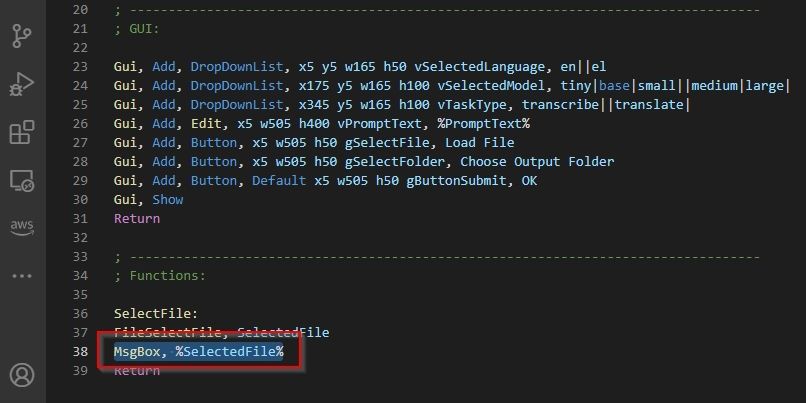
FileSelectFile is an AutoHotkey function that displays a typical file requester, allowing the user to select a file. SelectedFile is the variable in our script that will “hold” the path to the file the user selected.
However, as you’ll see in our screenshots, we’ve also added the following line right above the function-ending “return”:
MsgBox, %SelectedFile%
This will have AHK show a Message Box with the selected file after we choose it, which is useful when troubleshooting your script. If this message box shows your selected file’s path and name, it’s not your file-selecting button or function that requires fixing.
Output Folder Selection
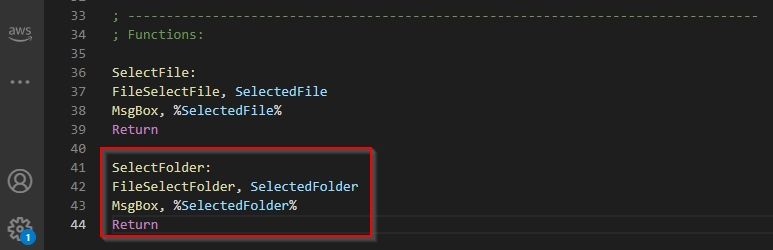
The function for selecting a folder is almost identical, with only the command’s name and variable changing, to show we’re dealing with folders instead of files:
SelectFolder:FileSelectFolder, SelectedFolderMsgBox, %SelectedFolder%Return
The Final Function
The final function will be the most complicated. Mapped to the OK button, this will “gather” all variable values from the GUI, morph them into a usable command, and then run it.
We begin by stating the function’s beginning and end:
ButtonSubmit:Return
 The BootIt Collection covers multi-booting, partitioning, and disk imaging on traditional PC’s using the standard BIOS and newer PC’s using UEFI. The collection includes BootIt Bare Metal (BIBM) for standard BIOS systems and BootIt UEFI (BIU) for UEFI system.
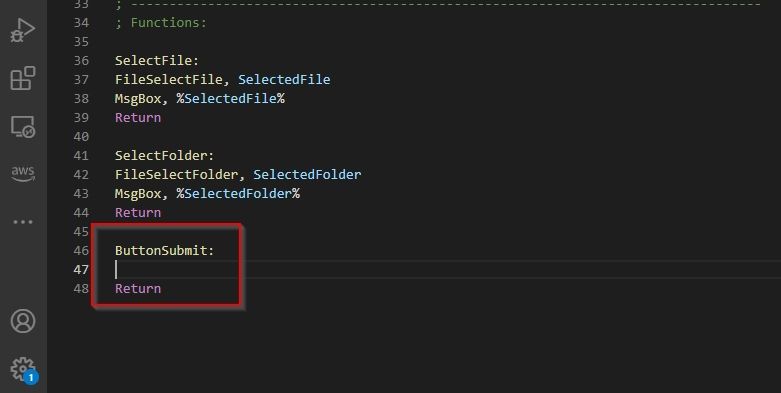
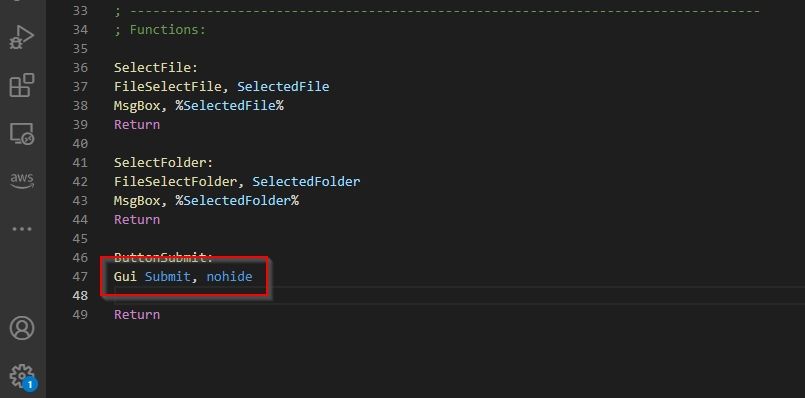
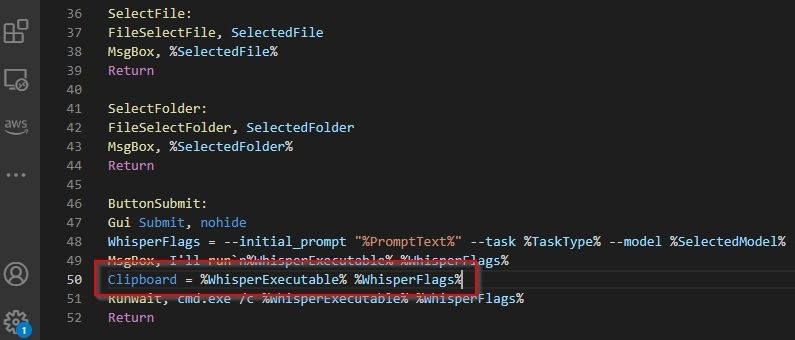
To “grab” all of the GUI’s values, add the following under the ButtonSubmit line:
Gui Submit, nohide
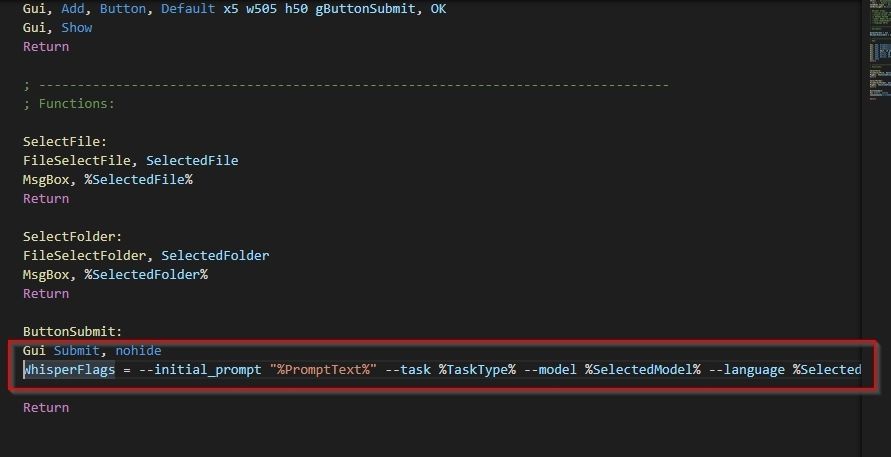
The following line creates a new variable called “WhisperFlags“. It then adds to it all of the GUI’s variables as flags for the Whisper command.
WhisperFlags = --initial_prompt "%PromptText%" --task %TaskType% --model %SelectedModel% --language %SelectedLanguage% --output_format %OutputFormat% -o "%SelectedFolder%" "%SelectedFile%"
Next, we’ll “tell” AHK to use the default terminal (CMD.exe) to run Whisper’s executable (that we defined with the WhisperExecutable variable) with the GUI’s variables (that are now “assembled” in the single WhisperFlags variable).
RunWait, cmd.exe /c %WhisperExecutable% %WhisperFlags%
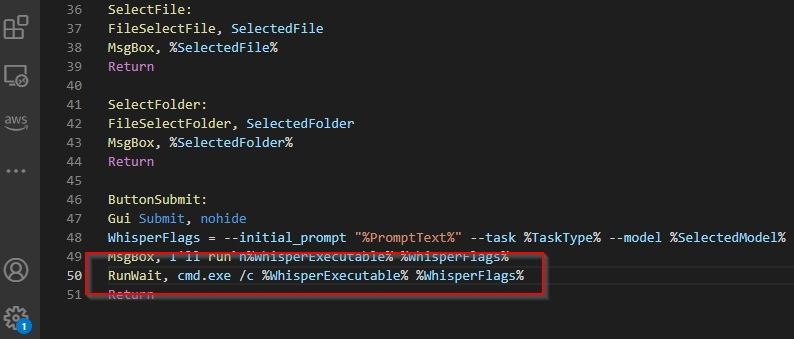
For even easier troubleshooting we’ve also added a msgbox, as before, but also added the following line:
Clipboard = %WhisperExecutable% %WhisperFlags%
This will copy to the Clipboard the complete command issued to CMD. So, if something fails, instead of only seeing the command in one of AHK’s message boxes, you’ll also have it available in your Clipboard.

Open a terminal, paste the command from the Clipboard, and check the errors that pop up to locate potential problems.
 LYRX is an easy-to-use karaoke software with the professional features karaoke hosts need to perform with precision. LYRX is karaoke show hosting software that supports all standard karaoke file types as well as HD video formats, and it’s truly fun to use.
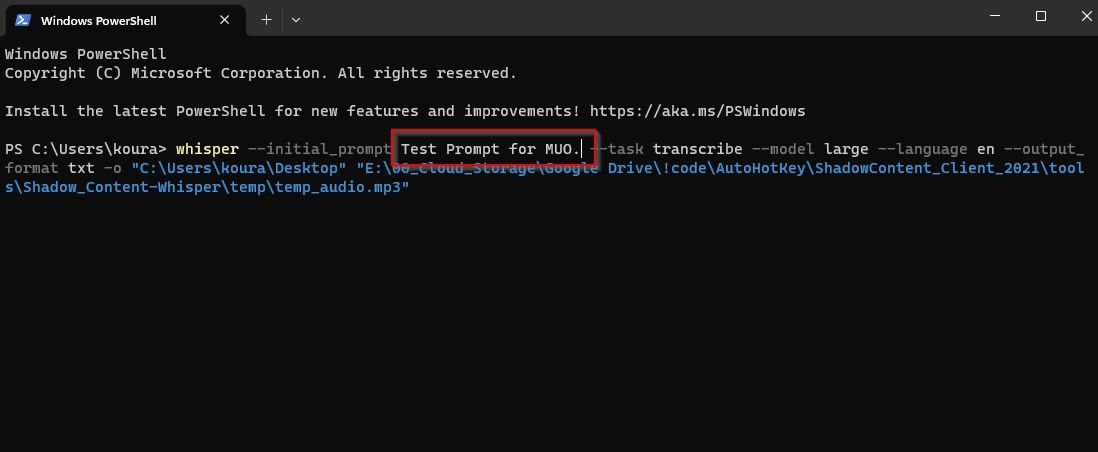
For example, while working on the script, I initially forgot to have the prompt enclosed within quotation marks. Thus, the command failed, since Whisper tried to parse the prompt as flags.
Testing and Final Tweaks
That was it—we’ve just created a transcription app using AutoHotkey’s GUI-making capabilities and a ready-to-use AI transcription solution.
Try running your script (double-click its file), and you should see your GUI on your screen.
- Change Whisper’s settings using the drop-down lists at the top.
- Type a short description of your transcription (and some terms) in the Prompt field.
- Click the Load File button and choose the audio file you want to transcribe.
- Click the Choose Output Folder button and select where the produced text file should be stored.
- Click on OK to unleash Whisper, as configured by your GUI, on your selected audio file, and save its transcription as a text file in the folder you selected.
If everything worked, go back to your script and either delete or Comment out (by adding a “;” at their beginning) all the troubleshooting functionality (message boxes and copy-to-Clipboard lines).
Taking Whisper Further With AutoHotkey
By correctly setting the default values of your GUI and maybe adding a generic prompt, you can turn Whisper into a three-clicks-to-transcribe solution: No paying for commercial solutions, third-party services, fiddling with complicated interfaces, or typing in a terminal.
With AutoHotkey, we can effortlessly create a basic GUI for command-line apps like Whisper. So, let’s do that and see how you can create your own transcription app by combining AutoHotkey’s GUI-making superpowers with OpenAI’s Whisper as the “brain” behind the buttons.
- Title: Creating a Personalized Windows Speech-to-Text App Using Whisper & AHK
- Author: David
- Created at : 2024-07-29 15:44:00
- Updated at : 2024-07-30 15:44:00
- Link: https://win11.techidaily.com/creating-a-personalized-windows-speech-to-text-app-using-whisper-and-ahk/
- License: This work is licensed under CC BY-NC-SA 4.0.