Command Line Connections: Utilizing WSL in Windows

Command Line Connections: Utilizing WSL in Windows
Key Takeaways
- You must enable Windows Subsystem for Linux (WSL) before you can install a Linux distribution on a Windows PC.
- Not all Windows 10 versions are compatible with WSL, but all Windows 11 versions are.
- The updated WSL2 is more convenient and gives better performance, but you can switch to WSL1 to suit specific needs.
If you want to run a Linux terminal on Windows, your best bet would be to enable Windows Subsystem for Linux (WSL), a gateway opener that allows you to install a Linux bash shell on a Windows OS. Once you’ve enabled WSL, you can install a Linux distro.
Requirements for Running WSL on Windows 10
Before you enable Windows Subsystem for Linux, you should know of the minimum requirements needed to run WSL.
According to Microsoft , you should be running Windows 10 (64-bit) version 2004 or higher with Build 19041 or higher.
All Windows 11 versions can run WSL.
If you’re not sure of your Windows 10 flavor, it’s easy to check which version of Windows 10 you have installed .
Some older versions of Windows 10 can also work, but you’ll have to manually install WSL.
How to Enable Windows Subsystem for Linux
In order to install the Linux bash shell on Windows 10, you first have to enable Windows Subsystem for Linux.
You’ll know if WSL isn’t enabled because you’ll run into the error: “The Windows Subsystem for Linux optional component is not enabled. Please enable it and try again.”
Here’s how to enable WSL in Windows 10:
You first need to get into Windows Programs and Features.
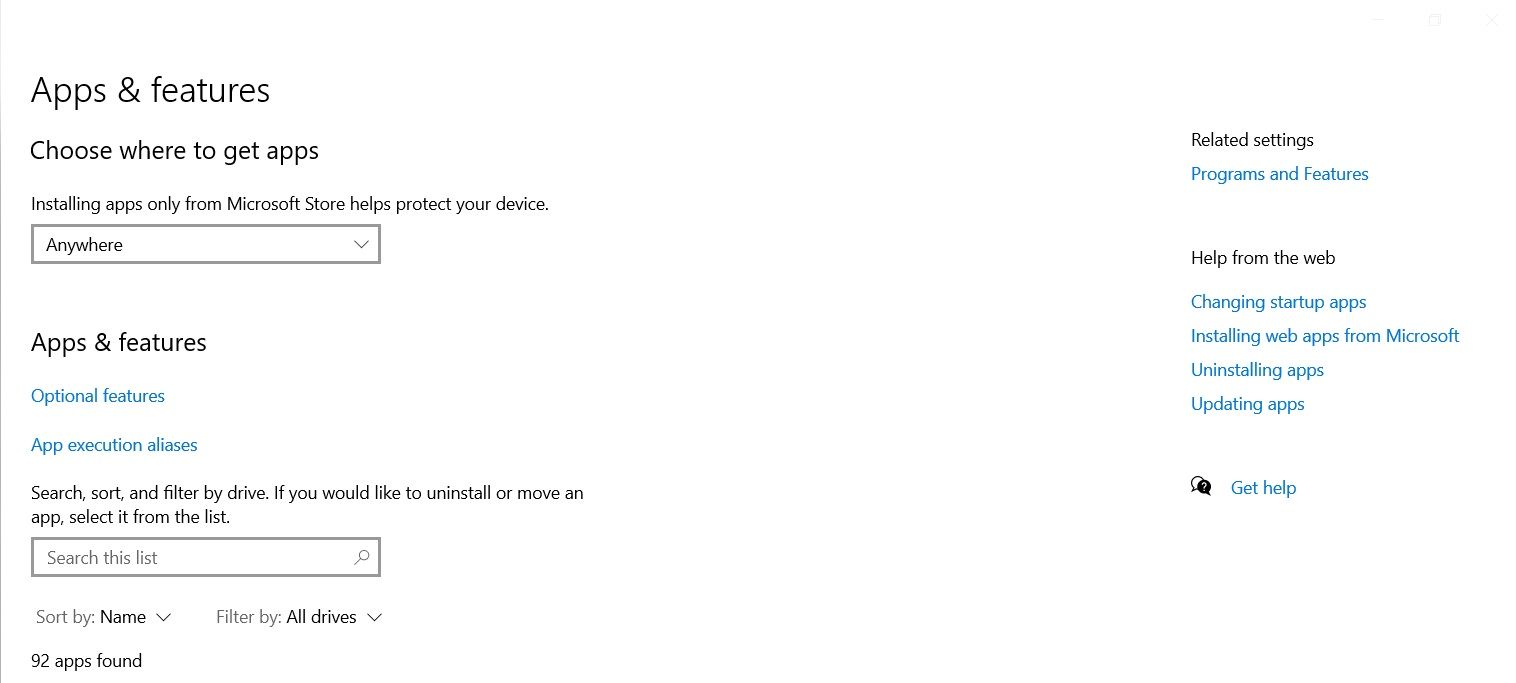
- Open Windows 10 Settings and select Apps.
- On the right side of the window, under Related settings, click on Programs and Features.

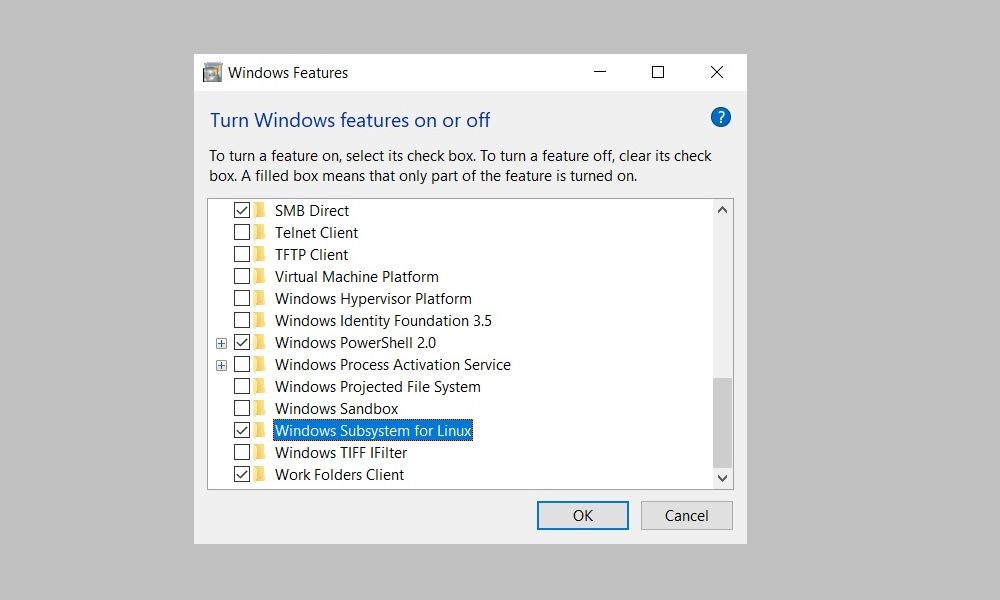
Once you’re in, click on Turn Windows features on or off on the left panel. Then scroll down and check the corresponding box to enable Windows Subsystem for Linux.

Click OK to save your changes and hit Restart now to finish the process.
Installing WSL on a Windows Machine
With WSL enabled on your Windows device, you can install Windows Subsystem for Linux . After that, you can install any supported Linux distro right inside your Windows PC. Choosing a small, lightweight Linux distro might be helpful.
You can also install a Linux desktop in Windows that gives you a graphical UI to work with.
WSL1 or WSL2: Which Is Better For You?
WSL2 is an upgraded version of Windows Subsystem for Linux and is now the default when installing a Linux distribution in Windows. It works with Windows 11 or Windows 10, Version 1903, Build 18362 or higher.
There are a few differences between the two versions of WSL; chiefly, WSL2 offers better performance in addition to support for full system call compatibility and IPv6 support. Also, WSL2 uses a full Linux kernel inside a managed virtual machine (VM), so you don’t have to set up and manage a VM to run a Linux distro.
Reasons to Switch to WSL1
While the latest version of WSL offers better performance and a wider range of support, there are reasons you may want to use the older version. This is because WSL1 runs with older versions of VMware and VirtualBox—and WSL2 does not, although it is compatible with the latest versions of VirtualBox and VMware, which both support Hyper-V.
The main reason to use WSL1 instead of WSL2 is that it offers better performance across OS file systems—a hurdle that can be overcome by creating your project files in the Linux file system.
With WSL enabled and a Linux distro installed, you’ll be on your way to executing commands.
If you want to run a Linux terminal on Windows, your best bet would be to enable Windows Subsystem for Linux (WSL), a gateway opener that allows you to install a Linux bash shell on a Windows OS. Once you’ve enabled WSL, you can install a Linux distro.
Also read:
- [New] 2024 Approved Gradual Silence Techniques in FL
- [Updated] Premier Microphone Picks for Blogging Pros
- Crafting a Blended Media Experience with Tunes for 2024
- Discover the Power of IComponent for .NET Custom Controls and Reusability
- Elevating Your Storage Analysis Game with the Power of DiskUsage in Windows
- Expert Reviews and Advice on Cutting-Edge Computer Hardware by Tom's Team
- Fortifying the Fortress: Stabilizing Windows-Dwarf Gameplay
- Implementing Defense Strategies for Insider Sets
- In 2024, Dose Life360 Notify Me When Someone Checks My Location On Oppo A59 5G? | Dr.fone
- Mastering the File Explorer in Windows 11 - Tips and Tricks for a Better Experience
- MP4 to DivX Conversion: A Guide for Users of Windows 11, Mac OS & Online Tools
- Overcoming Obstacles of Skyrim's SSE on Windows
- Samsung BD-J5900 Review - 2023 Update
- Securing Your Devices with Longer PINs in Win11
- Skyrocketing Download Speeds: Tips for Windows Users
- Steps to Rectify Errors During OneDrive Syncs
- Techniques to Reduce Windows Browser Resource Demand
- Title: Command Line Connections: Utilizing WSL in Windows
- Author: David
- Created at : 2024-12-03 02:12:07
- Updated at : 2024-12-07 08:46:35
- Link: https://win11.techidaily.com/command-line-connections-utilizing-wsl-in-windows/
- License: This work is licensed under CC BY-NC-SA 4.0.