Clearing Up Dark Screen with Windows Webcam

Clearing Up Dark Screen with Windows Webcam
No one wants interruptions when video chatting or streaming with friends and family. A black screen on your webcam can disrupt these moments and cause frustration. If you are experiencing this issue on your Windows computer, here are some solutions to fix it.
1. Start With Generic Fixes
Before diving into specific solutions, try these generic fixes first:
- Close any other apps or programs using your webcam.
- Disconnect and reconnect your webcam from the computer.
- Check for Windows updates and install them. Microsoft releases patches to fix known issues.
- If you’re using an external webcam, try connecting it to a different USB port.
If these generic fixes don’t work, it’s time to try something more specific.
2. Check Your Webcam Hardware and Connections
If your Windows webcam displays a black screen, first check the hardware and connections. Make sure the cable connecting your webcam to your computer is not damaged or loose. If you have a wireless webcam, check its battery level and Bluetooth connections.
Dust or debris often clogs the camera’s view. Therefore, check for any physical obstructions blocking your webcam lens. In addition, many laptops come with privacy shutters to prevent prying eyes from peeking. If so, make sure it’s not covered or closed.
These simple checks often resolve the problem without technical expertise.
3. Restart the Computer
This may sound strange, but restarting your computer often resolves technical problems. It clears temporary files, refreshes system settings, and resolves conflicts that may cause webcams to black out.
So, if your webcam was working fine before but suddenly shows a black screen, reboot your computer and see if that works.
4. Update Webcam Drivers
Another possible cause of a black screen on your Windows webcam is outdated or corrupted drivers.
To update your webcam driver, follow these steps:
- Press Win + X and choose Device Manager from the menu.
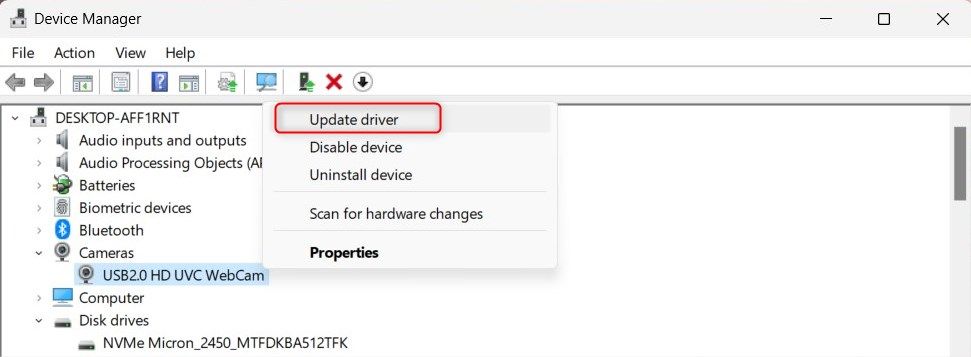
- In the Device Manager window, locate the Cameras category and click on the arrow to expand it. You should now see your webcam listed.
- Right-click on your webcam and select Update driver.

- On the next page, click Search automatically for drivers.
This will prompt your computer to search the internet for the latest driver software for your webcam. Windows either finds and installs the latest driver or notifies you that you already have it.
If Windows can’t find a new driver, go to your webcam manufacturer’s website and download the latest one.
5. Roll Back Drivers
If you recently updated your webcam drivers and now get a black screen, try reverting to the previous version. Here’s how to do it:
- Open Device Manager and expand the Cameras category.
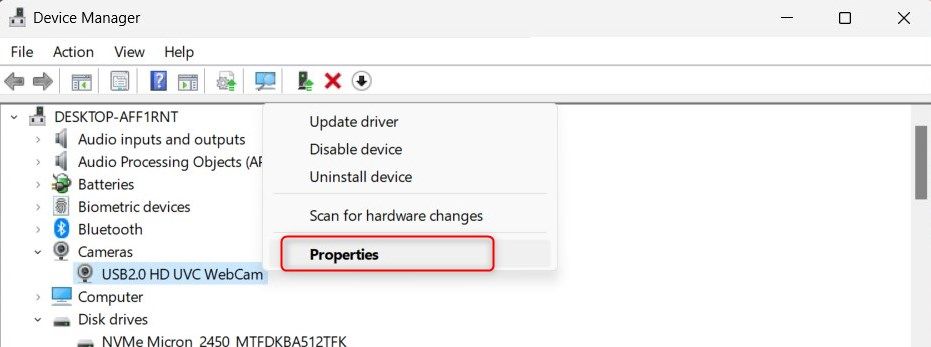
- Right-click on your webcam driver and choose Properties.

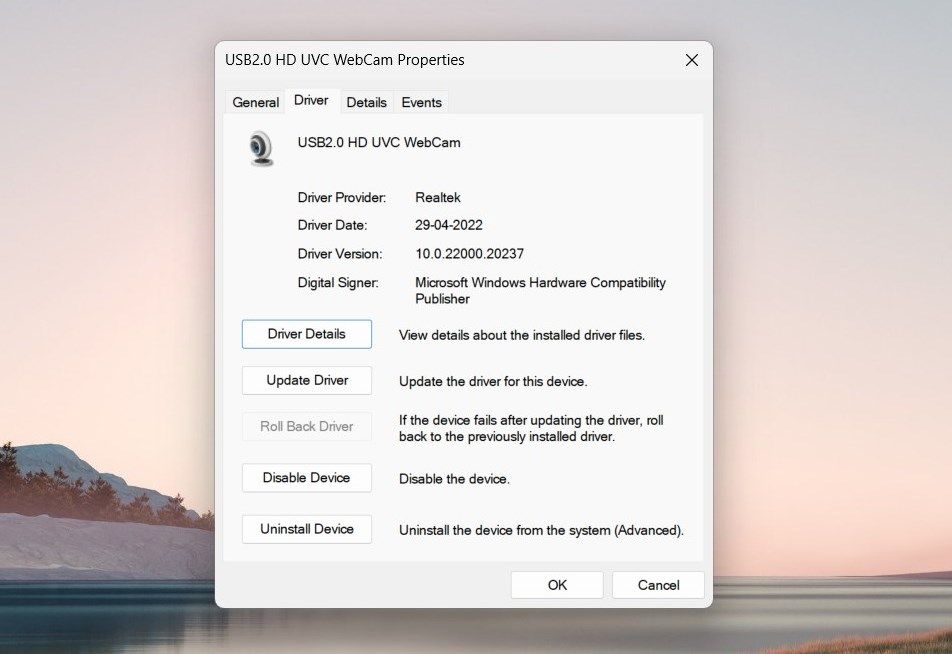
- In the Properties window, switch to the Driver tab.

- Here, you’ll find the Roll Back Driver button. Click on it. If the button is grayed out, there’s no driver version to roll back to.
A new window will pop up asking why you want to roll back. Choose a reason that fits your situation, then click Yes. Windows will now restore the previous driver version. After doing this, restart your computer to apply the changes.
6. Reinstall Webcam Drivers
If updating or rolling back drivers doesn’t work, you may need to reinstall them completely. Don’t worry about losing your webcam; Windows will detect and install the drivers automatically after rebooting.
To reinstall webcam drivers, follow these steps:
- Open the Run command window .
- Type devmgmt.msc in the text box and press Enter.
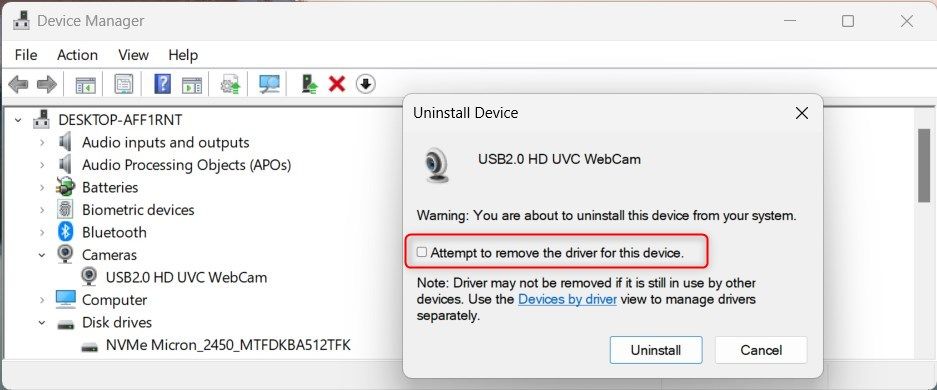
- In Device Manager, uninstall the webcam driver first. For this, expand the Cameras category, right-click on your webcam, and select Uninstall device.
- A pop-up will appear, asking if you’re sure you want to remove it. Check the box next to Attempt to remove the driver for this device and click Uninstall.

- After finishing the process, restart your computer.
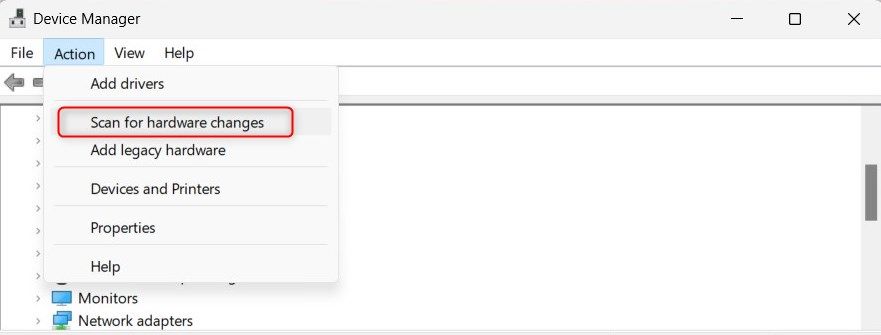
- When your computer starts, open Device Manager again and click Action on the toolbar.

- Select Scan for hardware changes. This will prompt Windows to detect your webcam and install drivers automatically.
Once that’s done, test your webcam again. It shouldn’t show a black screen anymore.
7. Check App Permissions
Apps installed on your computer require specific permissions to access hardware like a webcam. If you accidentally denied your webcam permission, it could be the reason for a black screen.
To check and adjust your permissions, do the following:
- Press Win + I on your keyboard to open the Settings app.
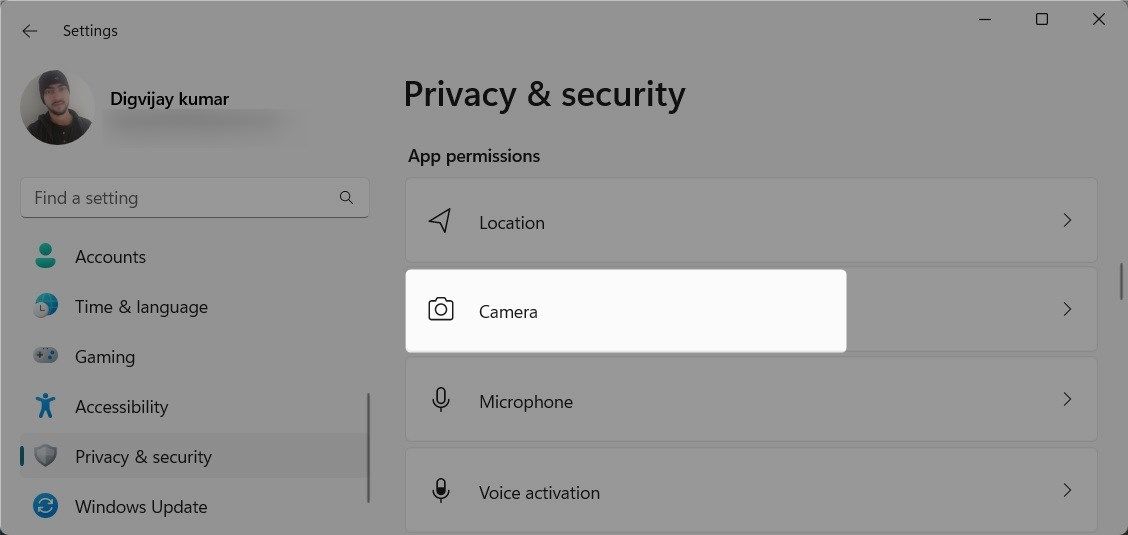
- In the Settings window, click Privacy & security.

- On the right panel, scroll down to App permissions and select Camera. Here, you’ll see a list of apps that access your webcam.
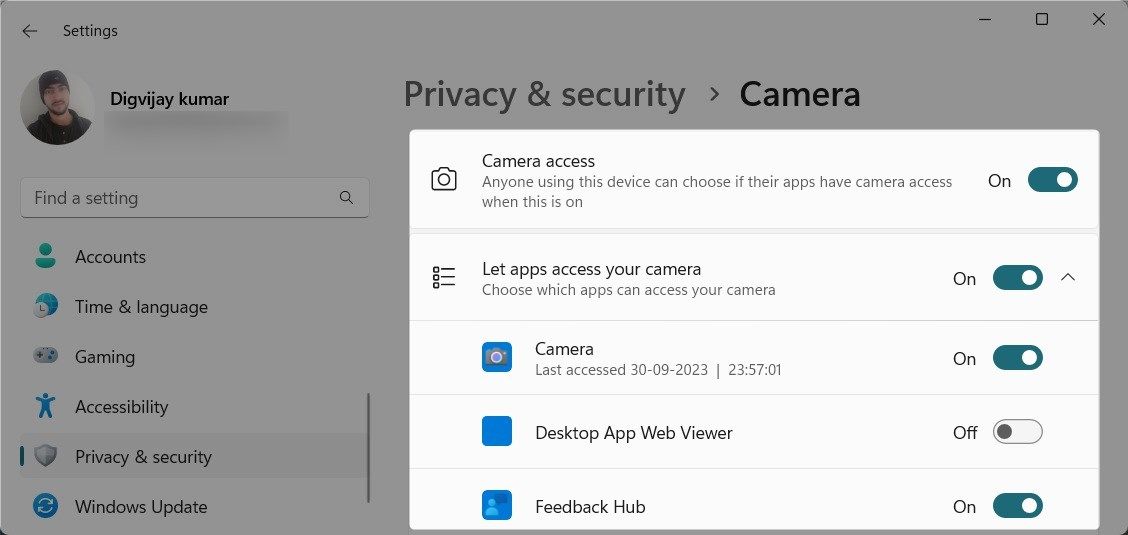
4. Make sure the apps you use for video chatting or conferencing can access your camera. If not, toggle the switch to turn on camera access for these apps.
After adjusting the permissions, restart your computer and check if the webcam black screen is resolved.
8. Scan for Malicious Programs
This problem may also occur if your computer has malware or malicious apps installed. Malware can interfere with your webcam and turn the screen black.
To check for malicious programs, employ trusted antivirus software and perform a full system scan . Additionally, you may use the Windows Security tool to swiftly scan and eliminate any identified threats from your device.
9. Run the Hardware and Device Troubleshooter
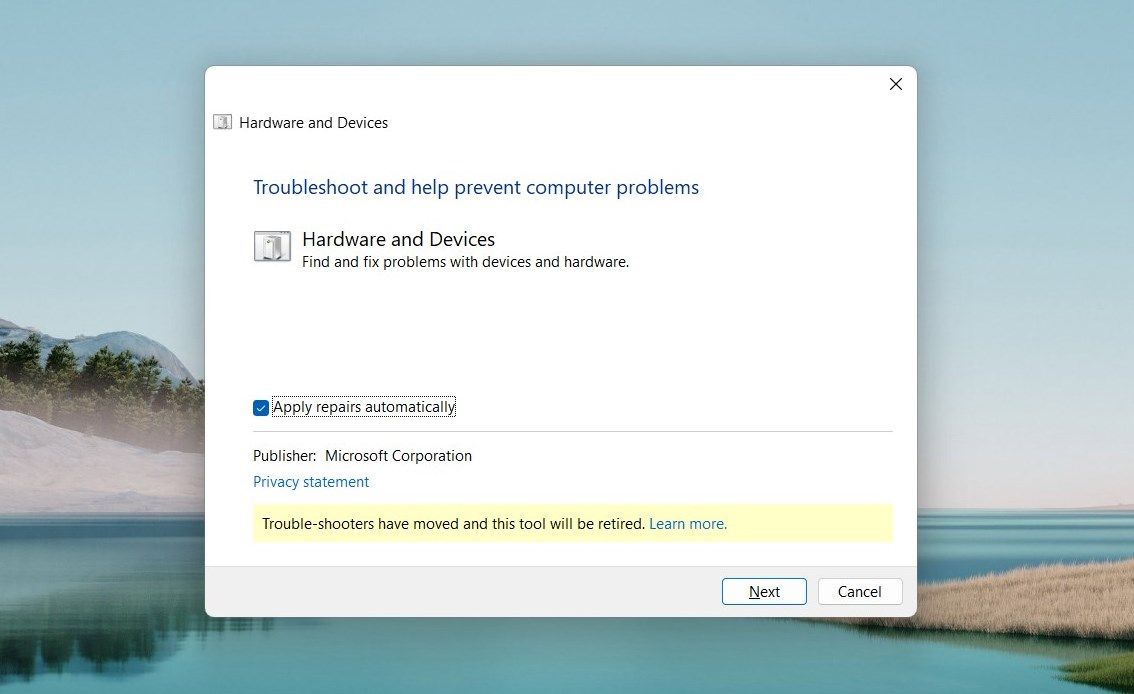
If the above solutions don’t work, you can try running the Hardware and Devices troubleshooter. This built-in tool can scan for and fix common hardware issues.
To run the Hardware and Devices troubleshooter, follow these steps:
- Press the Win + R keys simultaneously to open the Run dialog box.
- In the text box, type cmd and press the Ctrl + Shift + Enter keys together. This will launch the Command Prompt in administrator mode.
- If the UAC prompt appears, click Yes to grant administrative privileges.

- In the Command Prompt window, enter the following command and press Enter:
msdt.exe -id DeviceDiagnostic
Wait for the troubleshooter to complete its process. If you find any issues, follow the on-screen prompts to resolve them. After that, restart your computer and see if it works.
Resolving Windows Webcam Black Screen Issues
It doesn’t matter how fancy your computer is or what OS it runs on, things are bound to go wrong. One common issue Windows users encounter is a black screen on their webcam. But with the solutions listed in this guide, you can troubleshoot and fix it quickly.
Start with the basic checks and then move on to more technical fixes if needed. Hopefully, one of these solutions worked and resolved the issue.
Also read:
- [Updated] In 2024, Ad-Based Revenue Tracking for YouTubers' Success
- [Updated] In 2024, Discover the Best Practices to Master Snapchat's Video Timeline
- 1. Effortless Conversion: Turning M4A Files Into MP3 Formats Using Free Online Tools
- 2024 Approved Video Capturing Warriors Choosing Between OBS and Fraps
- Efficient Practices Archiving Google Voice Transcripts for 2024
- In 2024, Free Online Archive Copyright-Free Gaming Harmonies
- In 2024, Step-by-Step Tutorial How To Bypass Infinix Smart 7 FRP
- In 2024, Top 7 Skype Hacker to Hack Any Skype Account On your Honor Magic 6 Lite | Dr.fone
- Mastering Device Compatibility: Driver Installation Tips for Windows XP to 10
- Microsoft Office Alternatives Unveiled – Explore the Best Solutions for Professional Use
- Struggling to Extract DVDs on Windows Media Player? Discover Top-Rated Alternatives!
- Top-Rated Tablets with Built-In DVD Player Capability
- Troubleshooting FLV Format Issues with Lightworks - Quick Fixes for Smooth Editing
- USB and Streaming: The Ultimate Guide to Play DVDs on an Acer Laptop Running Windows 10/11
- WonderFox Solves Missing Page Issue - Error Code 404 No More
- ビデオ再生中の音量設定 - AviSynthを使って
- Title: Clearing Up Dark Screen with Windows Webcam
- Author: David
- Created at : 2025-01-31 05:34:09
- Updated at : 2025-02-04 08:57:58
- Link: https://win11.techidaily.com/clearing-up-dark-screen-with-windows-webcam/
- License: This work is licensed under CC BY-NC-SA 4.0.
