Clearing Up Access Issues: Top 5 Fixes for Access Denied on Windows 11

Clearing Up Access Issues: Top 5 Fixes for Access Denied on Windows 11
Quick Links
- Why Are You Getting the “Access Denied” Error?
- Check the Filesystem’s Permissions
- Set Your Account to Administrator
- Enable the Hidden Administrator Account
- Take Ownership of the File
- Disable Your Third-Party Antivirus Software
Key Takeaways
- The “Access Denied” error on Windows 11 indicates a lack of permissions. Check system permissions and grant full control to your user account.
- Make your account the computer’s administrator to fix Access Denied errors. Set the account to an admin in User Accounts settings to gain access.
- You can also enable the hidden Administrator account in Windows 11 for unrestricted access to files and folders. Switch to this account to bypass severe access problems.
When you encounter the “Access Denied” error in Windows 11, it can feel like you’re being locked out of your own computer. While having trouble accessing your files, directories, and folders is frustrating, don’t panic—with a few simple tweaks, you can regain access to your system.
Why Are You Getting the “Access Denied” Error?
The Access Denied error is a common issue on Windows systems that indicates you don’t have permission to view a file or folder. This is because your system has not granted access to that directory for the user account you’re currently using. Simply put, you’re using an unauthorized account to access paths, folders, and files on your computer or external drives from other computers.
In some cases, ownership issues and file encryptions can also lead to this error. It’s also possible that your third-party antivirus software has prohibited access. Some programs can mistake a genuine setup wizard as a threat—usually a false positive detection.
Below are some common fixes for the Access Denied error on Windows 11.
1. Check the Filesystem’s Permissions
This is a simple solution you can try to ensure your account has the proper access to the file or folder you are opening:
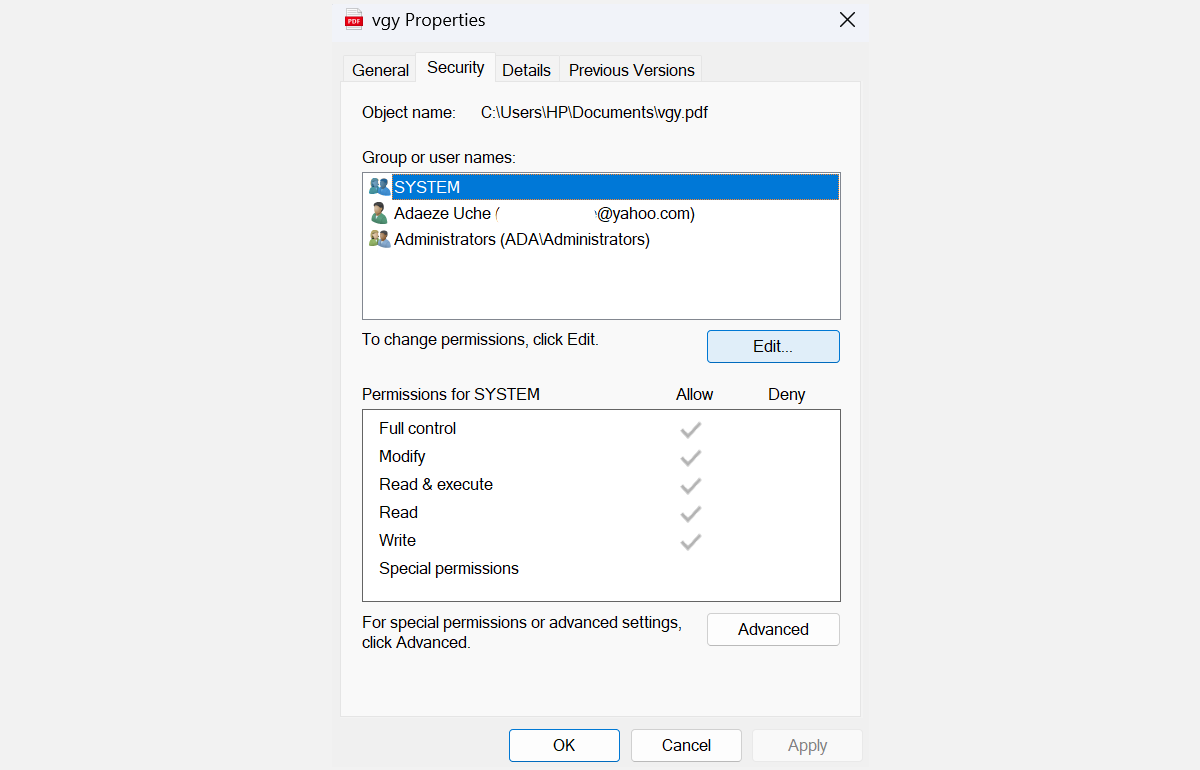
- Locate the file, folder, or directory you are trying to access. Right-click on it and choose Properties from the menu.
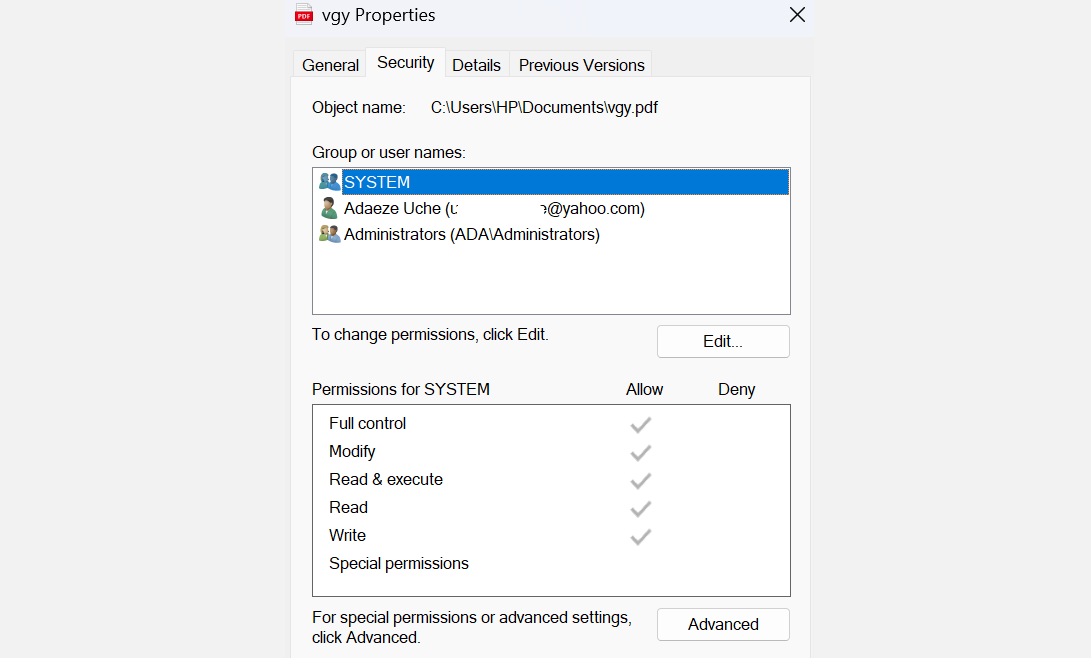
- Go to the Security tab and click the Editbutton.

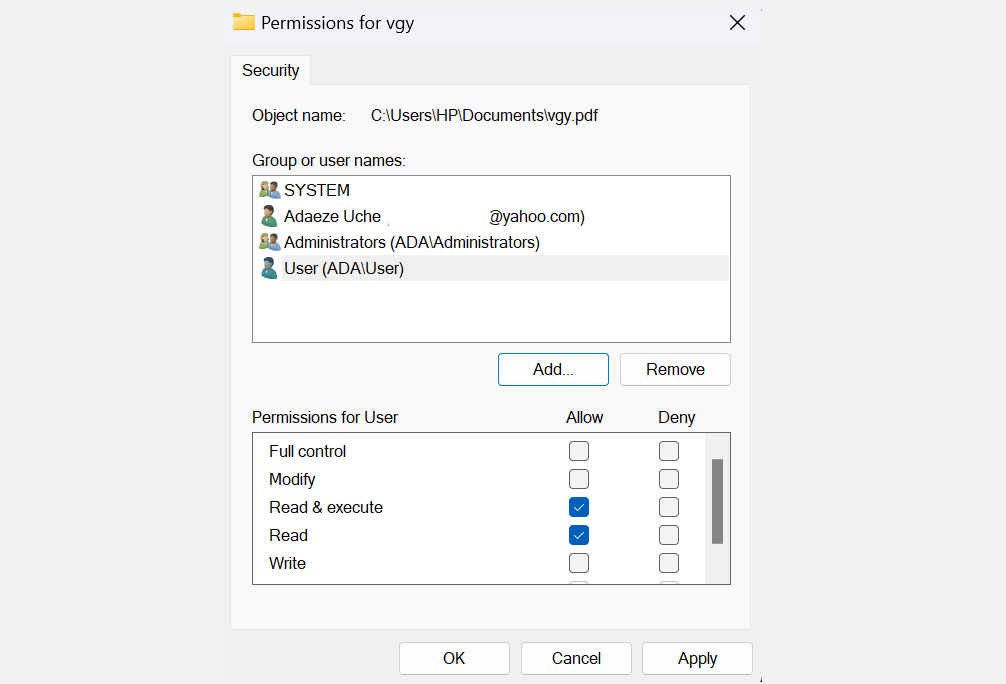
- Choose your username from the list and check the box beside Full control in the Allow column under the Permissions for User section. Then, click OK.

Note: If your username is not on the list, you have to add it manually and then change its permissions.
You can also try restoring the default permissions using the icacls command in Command Prompt. Resetting permissions with icacls can help resolve access issues caused by changes to the default permissions.
2. Set Your Account to Administrator
In most cases, the Access Denied error can be fixed by making your user account a computer administrator. Here’s how you can set your account to admin:
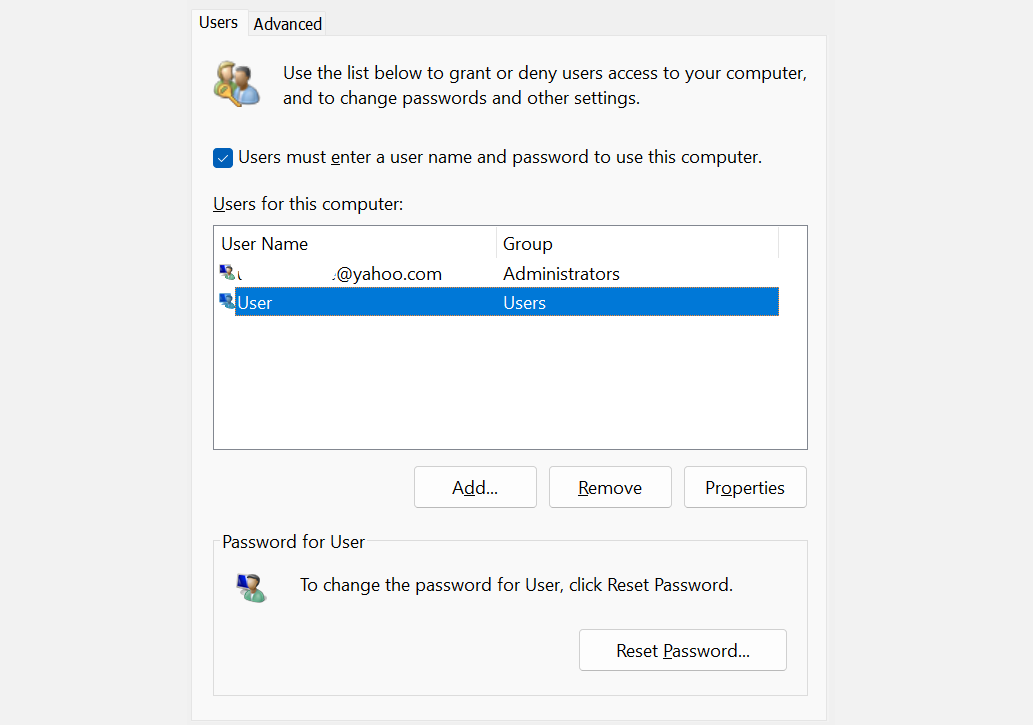
- Press Win + R to open Run. Type control userpasswords2 and click OK.
- On the User Accounts window, check the box beside Users must enter a username and password to use this computer. If this isn’t present, skip this step.

- Select your account and click the Properties button below it.
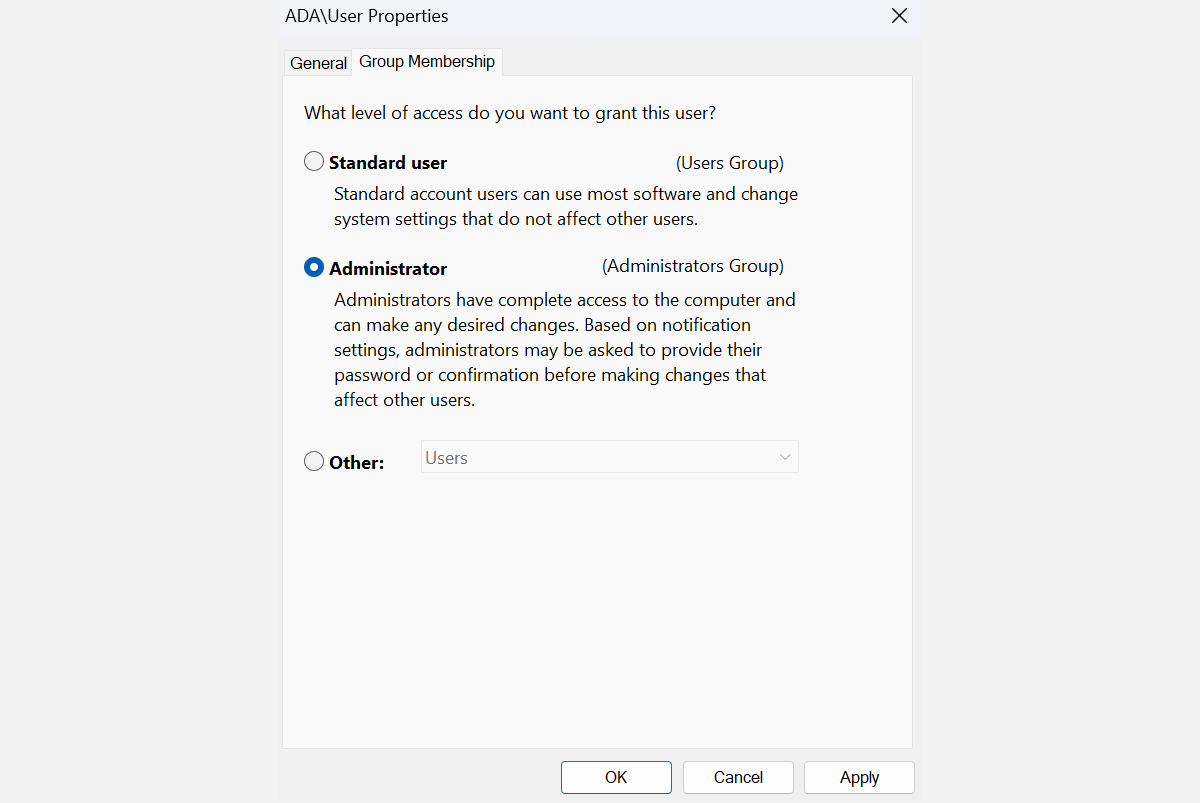
- Next, go to the Group Membership tab. Choose Administrator from the menu, then click Apply and OK.

Now, restart your computer and see if it resolves the problem. Otherwise, move to the next step.
3. Enable the Hidden Administrator Account
Your Windows 11 system has a hidden administrator account with more privileges than a regular account. You can enable this to access files, folders, and paths restricted to regular users—it’s especially helpful if you’re unable to switch your user account from standard to administrator .
- Open Windows search by pressing Win + S.
- Next, type CMD, right-click Command Prompt, and click Run as administrator.
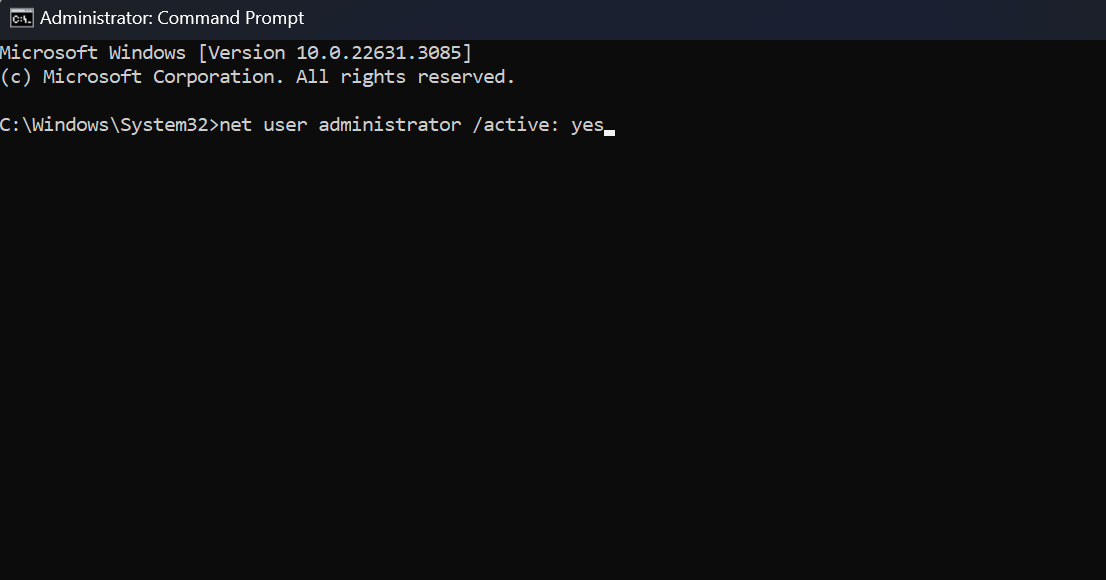
- On the Command Prompt, run the following command: net user administrator /active:yes. This will unlock the administrator account.

- Log off the current account and switch to the newly enabled Administrator account. Using this account, you won’t run into access problems, as it has more privileges than a normal admin account.
- Once you’re done with the Administrator account, log off and sign into your main account again. Repeat steps 1 and 2, then run this command: net user administrator /active:no. This will disable the Administrator account.
Switching back to your main account will cause the error to appear again. If you need to constantly access the files, use the hidden Administrator account to make the necessary changes to your system and fix the ownership or access issue. You might also consider copying the items to another location your usual account can access.
4. Take Ownership of the File
As mentioned previously, the “Access Denied” error sometimes stems from ownership problems. If this is the cause of the error, taking ownership of the file can instantly give you the access you need:
- Locate the folder or file you want to access and right-click on it. Click Properties from the menu.
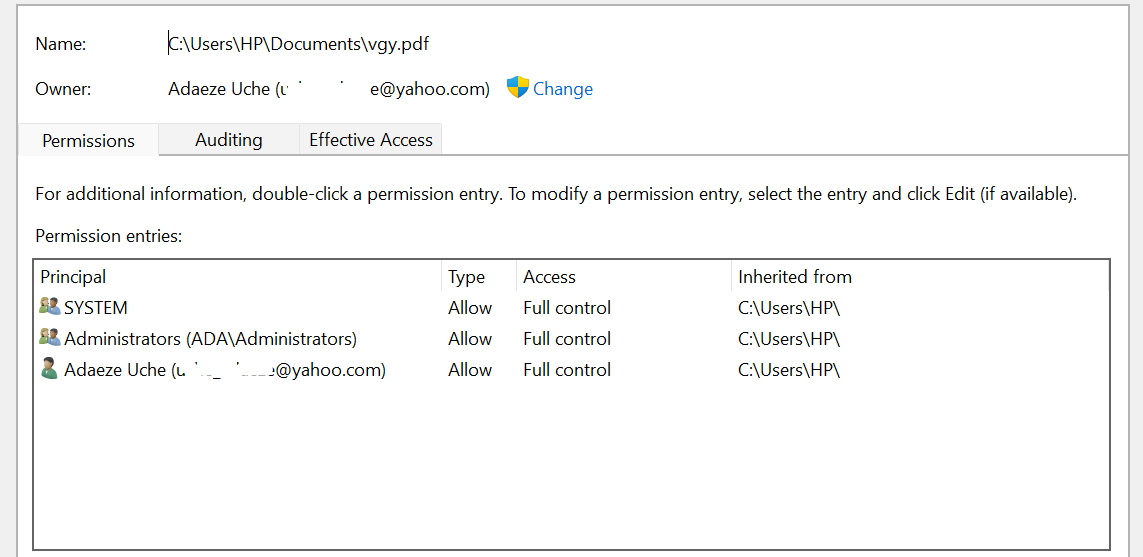
- Go to the Security tab and click the Advanced button.

- Next, look for the Owner section on the top of the window and click Change. This will open a new dialog box.

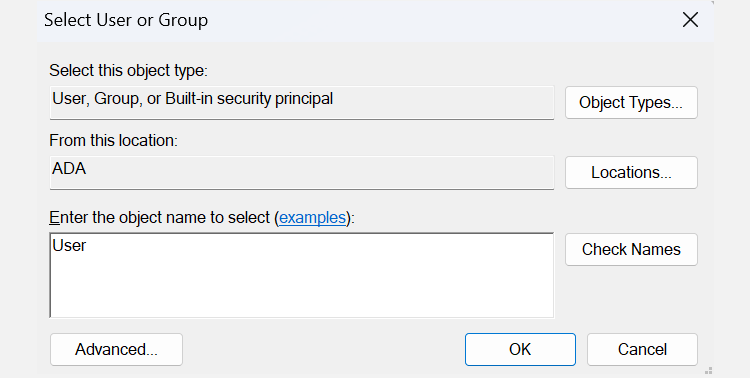
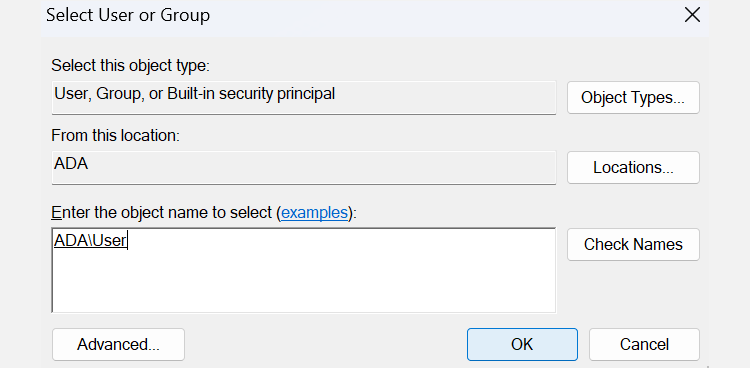
- In the Select User or Group window, type your username or Administrators in the Enter the object name field.

- Then, click the Check Names and OK buttons to save your changes.
6. Next, click Apply.
- You’ll see a Windows Security prompt. Click OK.
- In the main interface, click OK to save changes.
Apart from doing it manually, you can also take ownership of the file using the Command Prompt. Follow the steps below if you prefer typing commands instead:
- Open Command Prompt through Windows search by pressing Win + S and typing CMD. Click Run as administrator in the Command Prompt tab from the result.
- In the Command Prompt, type or paste the following commands and press Enter after each:
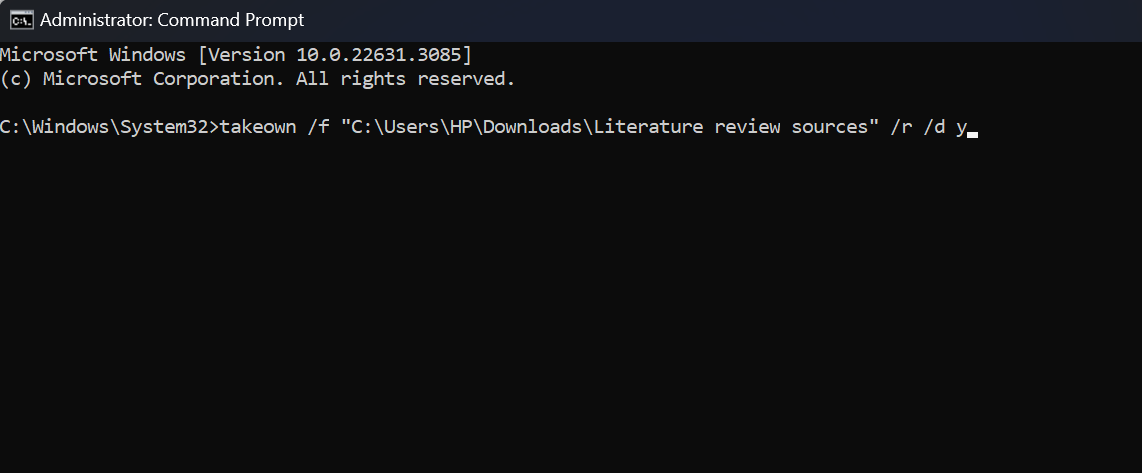
- takeown /f “path_to_folder”/r /d y
- icacls “path_to_folder”/grant administrators:F /t
You need to replace the “path_to_folder” section with the path to the inaccessible file or folder. Here’s how you can obtain the path:
- Navigate to the file or folder in question.
- Right-click it and select Copy as path.
- Replace “path_to_folder” with the copied path. For instance, “C:\Users\HP\Downloads\Literature review sources”

Restart your computer once you’re done with the steps above to check if the problem is resolved. But usually, after running these commands, you should regain access to the files and folders.
5. Disable Your Third-Party Antivirus Software
On the off chance that the issue isn’t resolved, consider turning off your third-party antivirus software.
Antivirus software is necessary to protect your system from threats and malicious actors. However, it can cause errors, such as access-denied issues and false positives. For example, many users have reported receiving the “Access Denied” error when attempting to install certain apps, and the main reason ends up being their security program.
To check if this is also your case, temporarily disable your third-party antivirus program and try to access the file or install the program. If the error does not appear, your antivirus software is likely the cause, and you should consider another program to protect your computer. Otherwise, use the Windows 11 built-in security program: Microsoft Defender.
Resolving the “Access Denied” error is straightforward and does not require a lot of technical steps. You can regain control over your files and system by employing a few key strategies. Simply ensure your user account has the necessary permissions and, if needed, elevate your privileges to an administrator level.
Also read:
- [New] Essential Steps for High-Quality Twitch Broadcasts for 2024
- [New] In 2024, Strategies for Effectively Swapping Gender Identity in Digital Media Images
- [Updated] In 2024, Embedding Your Pre-Recorded Video in a Live Facebook Showcase
- 2024 Approved Frequencies Fused Mac Studios Soundscapes
- In 2024, Fun at No Cost Top Quality, Gratuitous Meme Templates
- In 2024, Innovative Video Marketing YouTube Trailers with Filmora
- Quick Tutorial: How To Securely Get Your ASUS Wifi Drivers Installed.
- Reviving Your Lenovo Laptop's Dead Pixels: Fixes for Unresponsive Keys
- Top Females in YouTube A List of Leading Creators for 2024
- Transforming DVD Menus Into MP4 Format Using HandBrake
- Troubleshooting AVCHD Video Edits in DaVinci Resolve - Step-by-Step Solutions
- Ultimate Guide to DVD Conversion: Top Tools for Seamless Format Changes From Video/Audio
- Ultimate Guide: Securely Transferring Your Tunes – Downloading & Storing Music on USB
- Windows/Android/iOSでのDiscord音声会話録音法:ハイクオリティサウンドガイド
- Xbox
- Title: Clearing Up Access Issues: Top 5 Fixes for Access Denied on Windows 11
- Author: David
- Created at : 2025-01-28 18:55:34
- Updated at : 2025-02-03 16:10:51
- Link: https://win11.techidaily.com/clearing-up-access-issues-top-5-fixes-for-access-denied-on-windows-11/
- License: This work is licensed under CC BY-NC-SA 4.0.
