
Changing Windows 11 Registry Access Settings
Changing Windows 11 Registry Access Settings
Although the Registry Editor on Windows makes it easy for administrators to access critical settings and configurations, making incorrect changes to registry files can cause the system to become unstable and compromise its security. This is a common concern among Windows users who share their computers with others.
Fortunately, it’s possible to disable (or enable) Registry Editor access on your Windows 11 PC. Let’s see how.
1. How to Disable or Enable Registry Editor Access via the Group Policy Editor
The most straightforward way to block access to the Registry Editor on Windows is via the Group Policy Editor. However, it’s important to note that this tool is only available on Windows Pro, Education, and Enterprise editions. If you happen to be using Windows Home, refer to our guide on how to access the Group Policy Editor on Windows Home before proceeding.
- Press Win + R to open the Run dialog box.
- Type gpedit.msc in the box and press Enter.
- In the Local Group Policy Editor window, use the left pane to navigate to User Configuration > Administrative Templates > System.
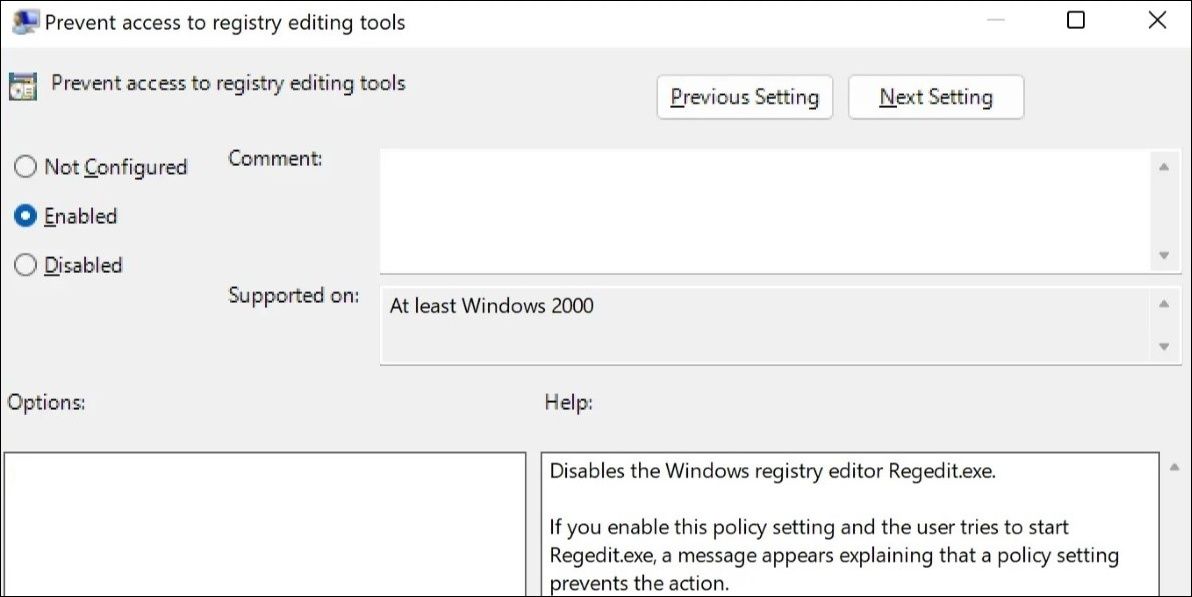
- Double-click the Prevent access to registry editing tools policy in the right pane.
- Select the Enabled option.
- Click Apply followed by OK.

Following this, users will see the “Registry editing has been disabled by your administrator” message when they attempt to access the Registry Editor. If you want to re-enable Registry Editor later, repeat the above steps and set the Prevent access to registry editing tools policy to Not configured or Disabled.
2. How to Disable or Enable Registry Editor Access via the Registry Editor
Another way to restrict the Registry Editor access on Windows involves using the Registry Editor itself. Here are the steps you can follow.
- Click the search icon on the taskbar to access the search menu.
- Type regedit in the box and press Enter.
- Select Yes when the User Account Control (UAC) prompt appears.
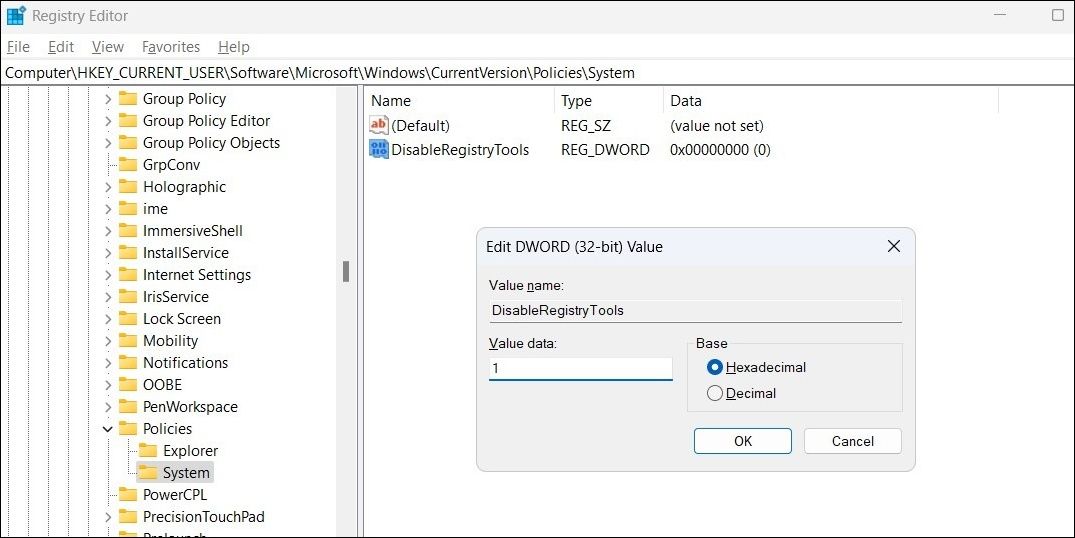
- In the Registry Editor window, use the left pane to navigate to HKEY_CURRENT_USER > SOFTWARE > Microsoft > Windows > CurrentVersion > Policies.
- Right-click on the Policies key and select New > Key. Name it System.
- Right-click on the System key and select New > DWORD (32-bit) Value. Name it DisableRegistryTools.
- Double-click the newly created DWORD, type 1 in the Value data field, and hit OK.
Once you complete the above steps, the Registry Editor will be disabled on your PC.
Although you cannot access the Registry Editor to reverse the above changes, it’s still possible to re-enable Registry Editor access. For that, you will have to create and run a REG file . Here’s how you can go about it.
- Press Win + S to open the search menu.
- Type notepad in the search box and press Enter.
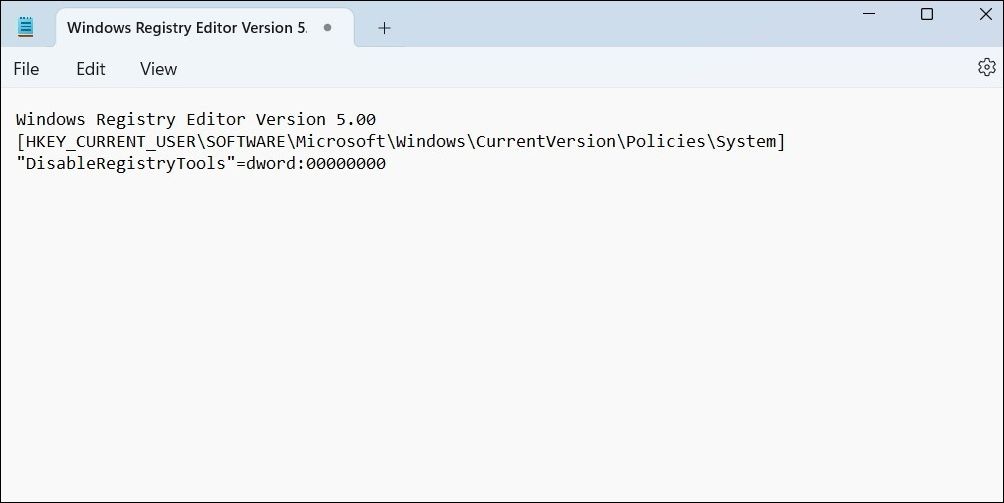
- In the notepad window, paste the following command.
Windows Registry Editor Version 5.00 [HKEY_CURRENT_USER\SOFTWARE\Microsoft\Windows\CurrentVersion\Policies\System] "DisableRegistryTools"=dword:00000000 - Click the File menu and select Save as.
- Select Desktop in the Save as dialog box.
- Enter a suitable name followed by “.reg” and hit Save. For instance, you could name the file ReEnableRegistry.reg or something similar.
- Use one of the many ways to open the Command Prompt with admin rights .
- Type the following command in the console and hit Enter. Make sure you replace the [username] in the following command with your actual username.
cd C:\Users\[username]\Desktop - Paste the following command, replace FileName with the actual name of the REG file, and press Enter.
regedit.exe /s FileName.reg
Once you run the above command, the Registry Editor will become accessible again.
Allowing or Disallowing Registry Editor Access on Windows
Blocking access to the Registry Editor is an effective way to protect your system from registry mishaps. Nonetheless, if you opt to re-enable access to the Registry Editor on your PC, make sure to exercise caution to avoid messing up the Windows Registry.
Fortunately, it’s possible to disable (or enable) Registry Editor access on your Windows 11 PC. Let’s see how.
Also read:
- [Updated] 2024 Approved Navigating Recordings in Windows 11 A Compreayer's Guide
- [Updated] The Key Ingredients for Successful Instagram Unboxing Reels
- [Updated] Unlock the Power of Any Video With These Free Online Editors
- Best Free iPhone XR IMEI Checker
- Boosting Stream Consistency with OBS Fixes for 2024
- ChatGPT Troubleshooting Guide: Fixing the Infamous Body Stream Error in 7 Steps
- Eliminate Printer Problems Fast: Win11 Fixed
- Enhance Your Marketing Analytics Using the Cookiebot Platform
- Guarding Your Gateway: Identifying Authenticity in Windows Apps
- Hyper-V Integration: Establishing a Linux Environment on Windows Host
- Installing VirtualBox on Windows? Set Up the Dependencies First for Error-Free Installation
- Methodology to Rectify Managed Chromium & Microsoft Edge Configurations
- Overcome Stuck Keyboard Arrows - Effective Troubleshooting Tips Inside!
- Prime Android Space-Savers Compendium for 2024
- Pro Tips for Background Deletion in Paint 3D
- Sidestep Immediate Edge Tabs in Win11
- Switch to Shadows: Making Paint Dark
- The Ultimate Review of Linksys WRT3200ACM Router: Unleashing the Potential of Open Source WiFi Solutions
- Updated In 2024, Vlog Editing Made Easy Top 14 Software for Creating Engaging Content
- Title: Changing Windows 11 Registry Access Settings
- Author: David
- Created at : 2025-02-14 22:06:02
- Updated at : 2025-02-15 21:17:01
- Link: https://win11.techidaily.com/changing-windows-11-registry-access-settings/
- License: This work is licensed under CC BY-NC-SA 4.0.