
Blowing Up GPU Usage: 7 Remedies for WM in Win11
Blowing Up GPU Usage: 7 Remedies for WM in Win11
The Desktop Window Manager (DWM) is an essential Windows process that oversees the visual elements of your desktop interface. It manages tasks such as visual animations, transparency effects, thumbnails, and the taskbar.
However, the DWM can occasionally consume significant GPU resources, affecting the overall system performance. If you find that the Desktop Window Manager consumes a lot of GPU resources, try the solutions below to troubleshoot the problem for good.
What Causes the Desktop Windows Manager’s High GPU Usage on Windows?
Before getting into the solutions, it’s crucial to understand the root causes behind this issue. While the Desktop Window Manager (DWM) may consume a significant amount of GPU resources for various reasons, the most common ones are listed below:
- Outdated or corrupted graphics card drivers often stand as the primary cause of excessive GPU consumption by the Desktop Window Manager.
- Hardware acceleration on third-party applications can increase the burden on your GPU, ultimately leading to the issue at hand.
- Your computer’s HDR display settings could also be a reason behind the high GPU consumption by the Desktop Window Manager.
Now that you know the potential culprits, let’s check out the methods to rectify them.

1. Update Your Graphics Driver
We cannot stress enough the importance of regularly updating your graphics driver. An updated graphics driver ensures your system remains immune to graphics-related issues and provides you access to the latest features from your GPU manufacturer.
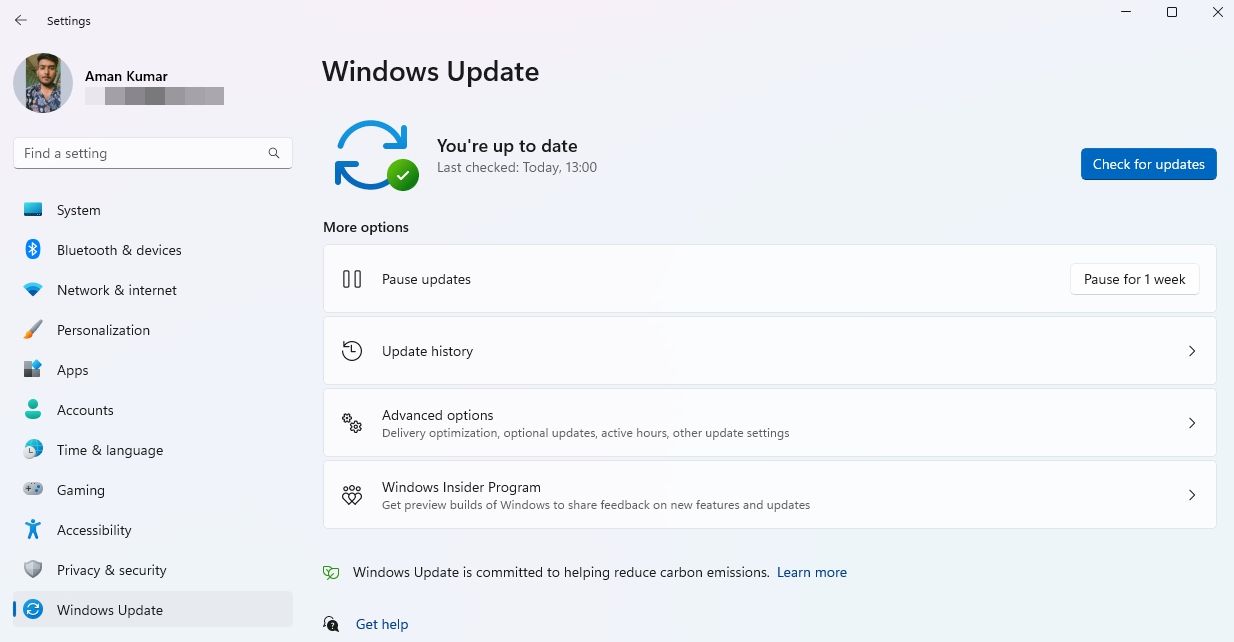
To update the graphics driver, open the Settings app (see how to launch Settings on Windows ), choose Windows Update from the left sidebar, and click the Check for updates button.
Windows will not search for any available updates for all the installed components, including the graphics driver. If it finds any, it will automatically download it without much user input.
Alternatively, you have the option to directly download the latest update for your graphics driver from the manufacturer’s website.
Upon successfully updating the graphics driver, restart your computer and check if the DWM GPU consumption is back to normal.
.png) Kanto Player Professional
Kanto Player Professional2. Turn Off Hardware-Accelerated GPU Scheduling
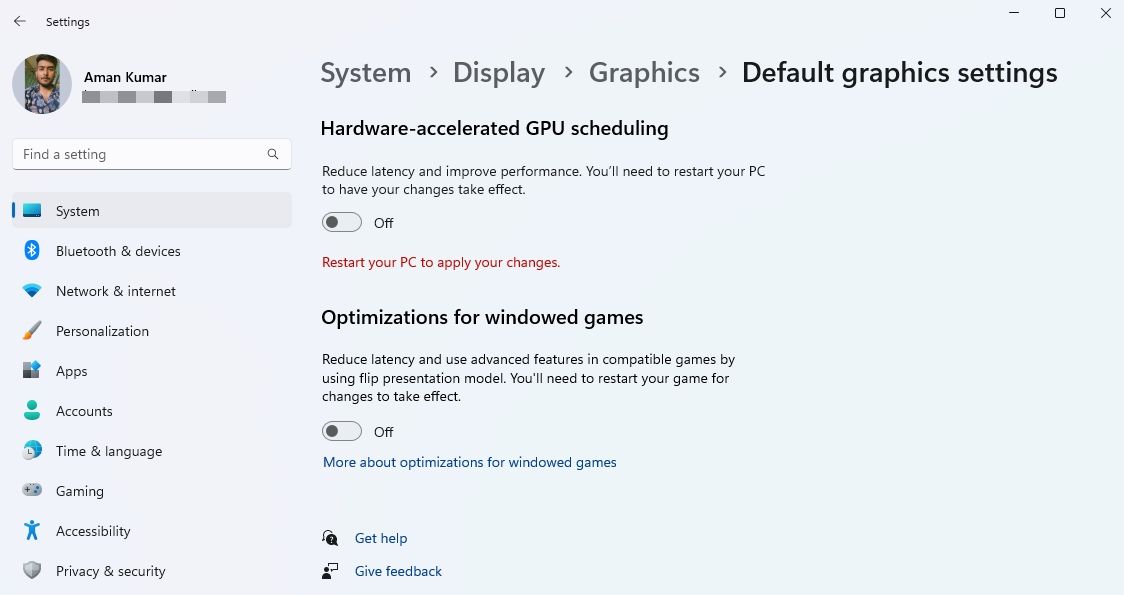
Hardware-accelerated GPU scheduling is a handy Windows feature that reduces the CPU workload by allocating graphics-intensive tasks to the GPU. While this feature typically operates well, there are instances when it might lead to unintended consequences, particularly on systems with weak GPUs.
Enabling GPU scheduling on a weak GPU could result in latency issues and high GPU consumption by various processes, including the Desktop Window Manager. Consequently, you can disable GPU scheduling if you face graphics-related problems on your PC subsequent to its activation.
3. Configure the NVIDIA Control Panel Settings
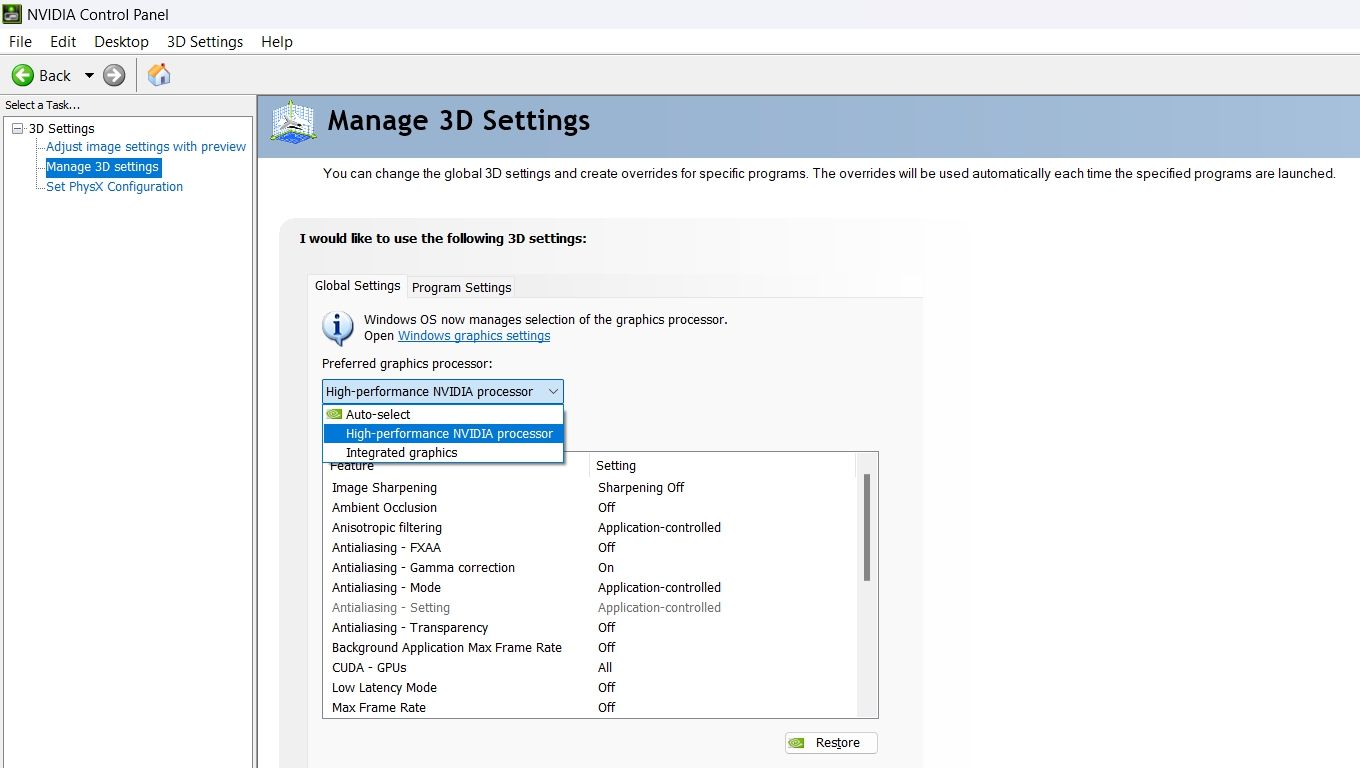
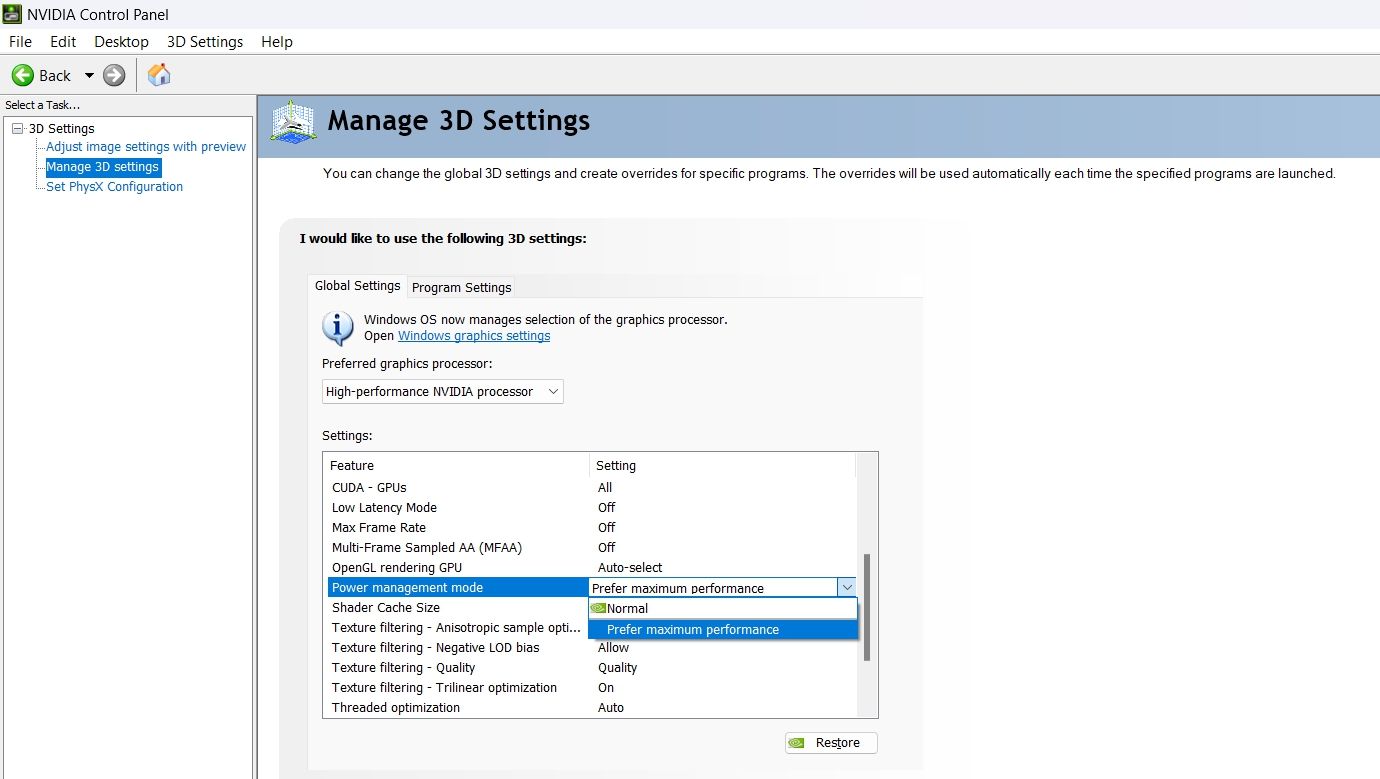
Desktop Windows Manager’s high GPU consumption issue also stems from your NVIDIA GPU’s incorrect power management settings. To resolve this, you’ll need to access the NVIDIA Control Panel and use it to configure your GPU’s power consumption. Here’s how to do it:
- Press Win to open the Start Menu, type NVIDIA Control Panel in the search bar, and press Enter.
- Choose Manage 3D settings from the left sidebar.
- Choose the High-performance NVIDIA processor option from the Preferred graphics process drop-down menu.
- Click the drop-down icon next to Power management mode and choose Prefer maximum performance.
- Click Apply.
Next, restart your computer and check for the issue.
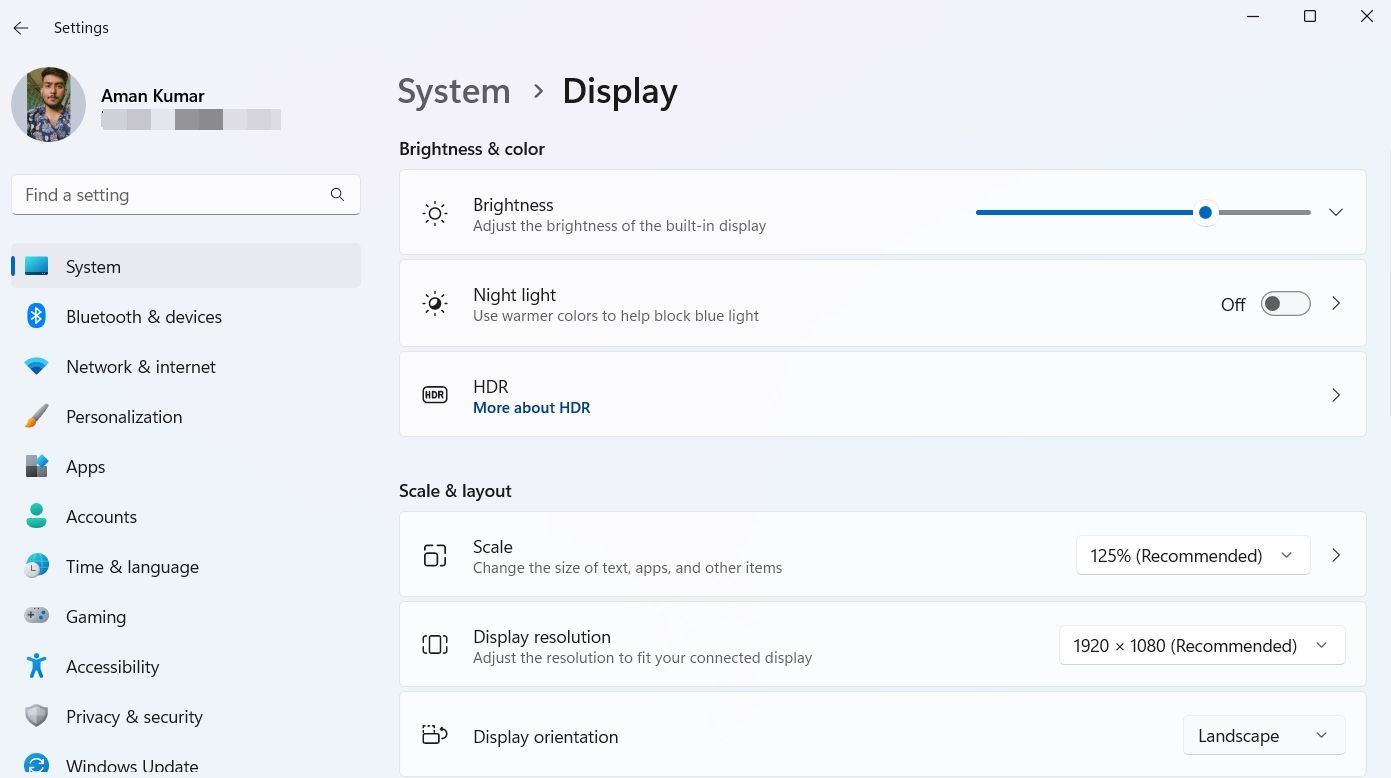
4. Adjust the Resolution and Scaling Settings
Windows allows you to manually configure your display resolution and scaling settings. But sometimes configuring these settings to more than the recommended value can cause high GPU usage.
So, configure your display’s scale and resolution to the recommended value. Follow the below instructions to do that:
- Open Settings, choose System from the left sidebar, and Display from the right pane.
- Click the drop-down icon next to Scale and choose the recommended value.
- Choose the recommended value from the Display resolution drop-down menu.
After that, open the Task Manager and check the Desktop Window Manager GPU consumption.
5. Disable HDR
HDR, or High Dynamic Range, is a technology that uses your system’s GPU to display a wider range of brightness and colors. However, enabling HDR on a weak GPU can do more harm than good.
If you’re experiencing compatibility issues or if apps and processes consume more GPU resources than you’d like, you should disable the HDR feature.
To disable HDR in Windows 11, open Settings, select System from the left sidebar, and then select Display from the right pane. Then, disable the toggle switch next to Use HDR.
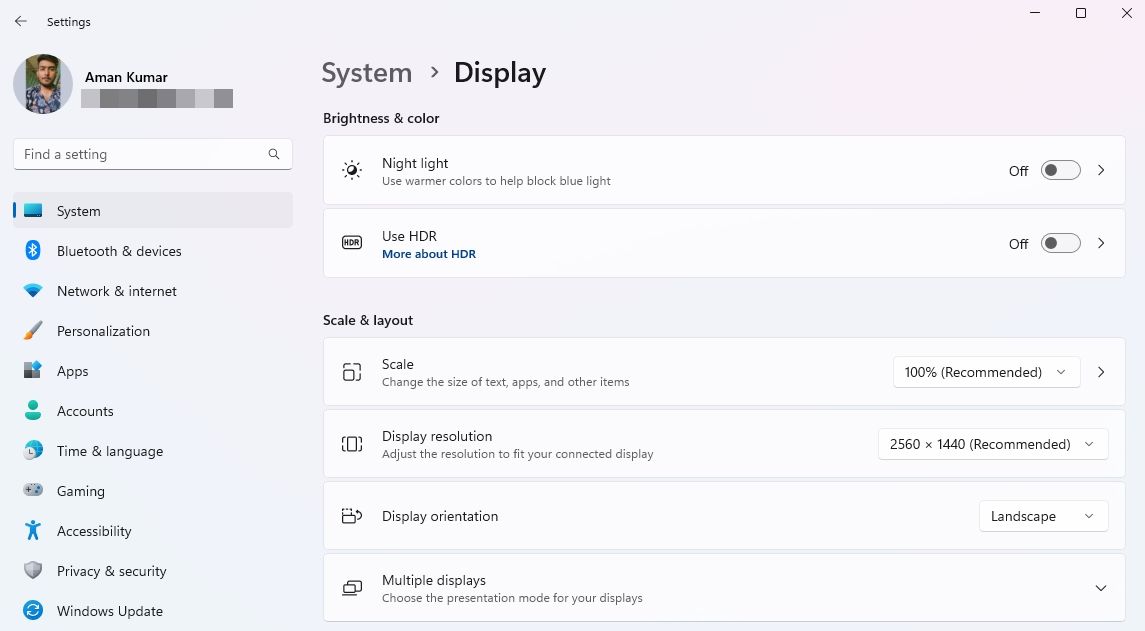
After that, your display will momentarily go blank. Subsequently, you’ll observe a shift in display color, indicating that you’ve successfully disabled HDR.

6. Optimize Your Visual Effect Settings
As aforementioned, the Desktop Window Manager oversees the visual aspects of your computer’s interface. But, if your computer’s visual effects settings are not correctly configured, the Desktop Window Manager might consume a significant amount of GPU resources.
To resolve this, you must optimize your computer’s visual effects settings. Here’s how you can do it:
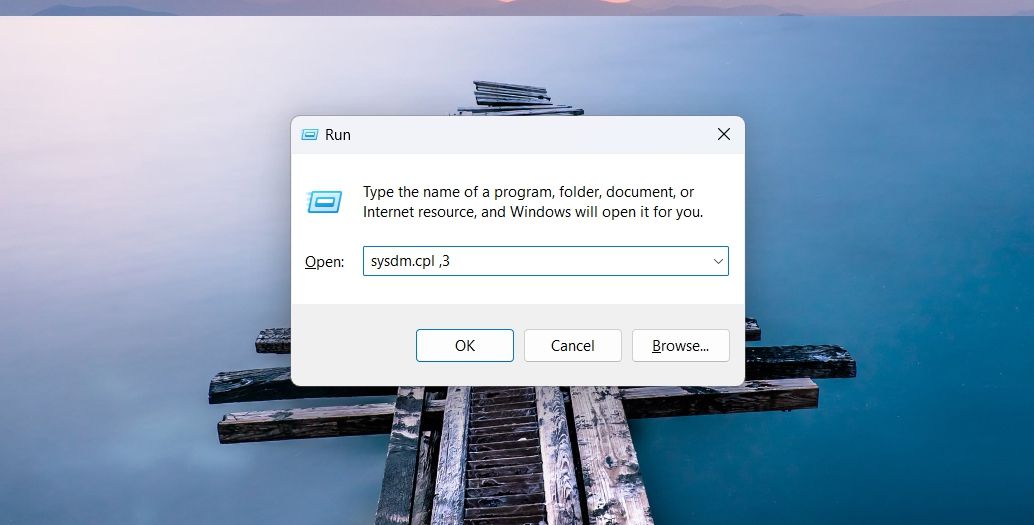
- Press the Win + R hotkey to open the Run dialog box.
- Type sysdm.cpl ,3 into the search bar and press Enter.
PCDJ Karaoki is the complete professional karaoke software designed for KJs and karaoke venues. Karaoki includes an advanced automatic singer rotation list with singer history, key control, news ticker, next singers screen, a song book exporter and printer, a jukebox background music player and many other features designed so you can host karaoke shows faster and easier!
PCDJ Karaoki (WINDOWS ONLY Professional Karaoke Software - 3 Activations) - Under the Performance section, click on Settings.
- Select the Adjust for best performance option.
- Click Apply and then OK to save the changes.
 PCDJ Karaoki is the complete professional karaoke software designed for KJs and karaoke venues. Karaoki includes an advanced automatic singer rotation list with singer history, key control, news ticker, next singers screen, a song book exporter and printer, a jukebox background music player and many other features designed so you can host karaoke shows faster and easier!
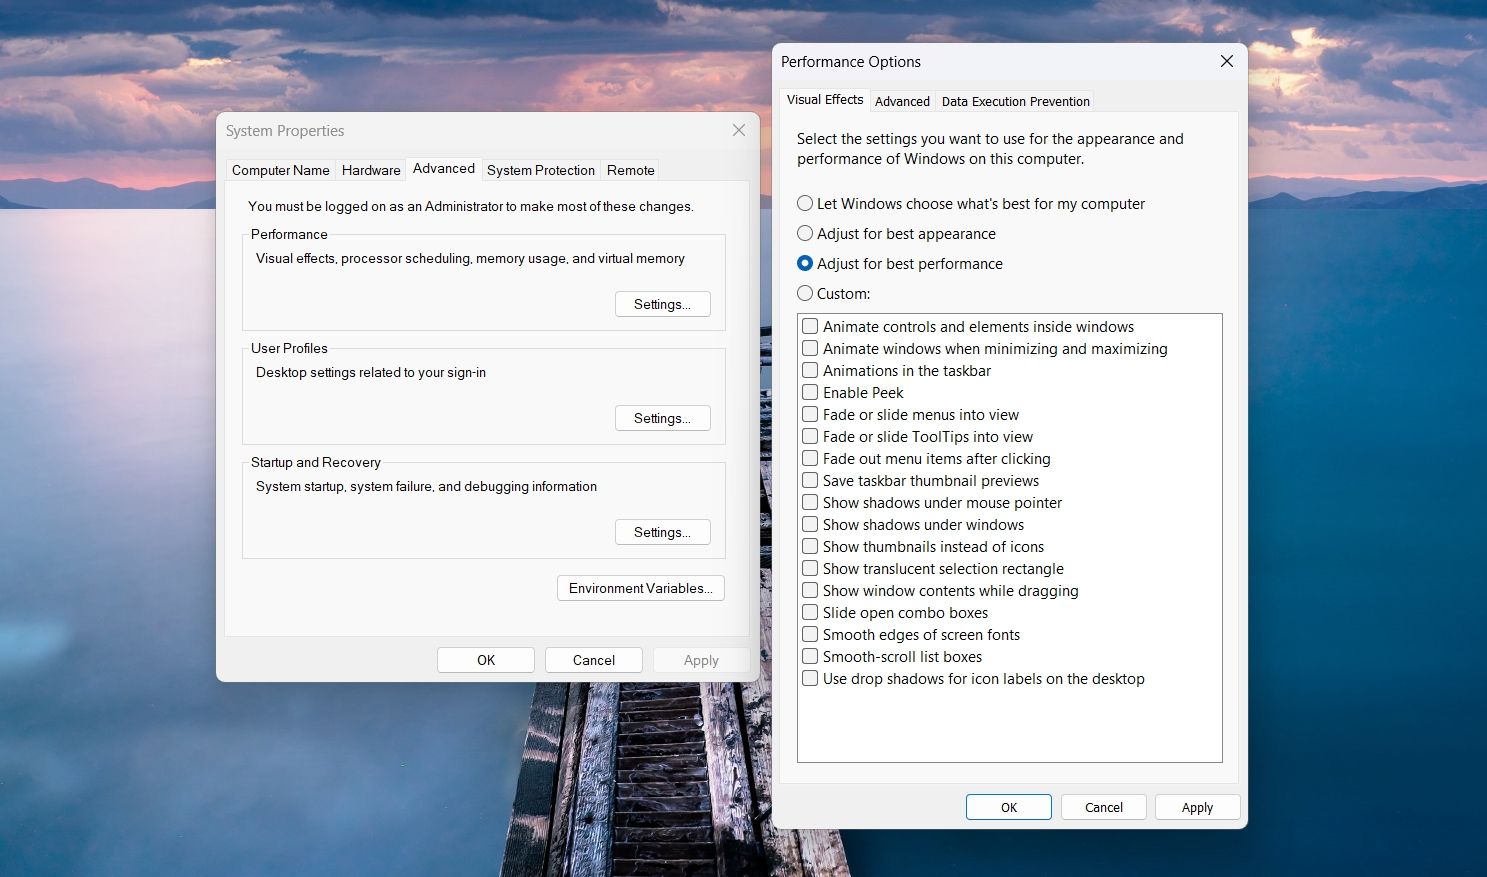
Now, monitor your computer’s GPU consumption. If it remains high, there’s a possibility that corruption in important system files is causing the issue.
7. Run an SFC Scan
It’s common for Windows files to become corrupted due to malware attacks or sudden system crashes. Unfortunately, corruption in these system files not only results in data loss but also disrupts the regular functioning of your computer.
While recovering the lost data might prove challenging, repairing the corrupt files to resolve ongoing system issues is relatively easy.
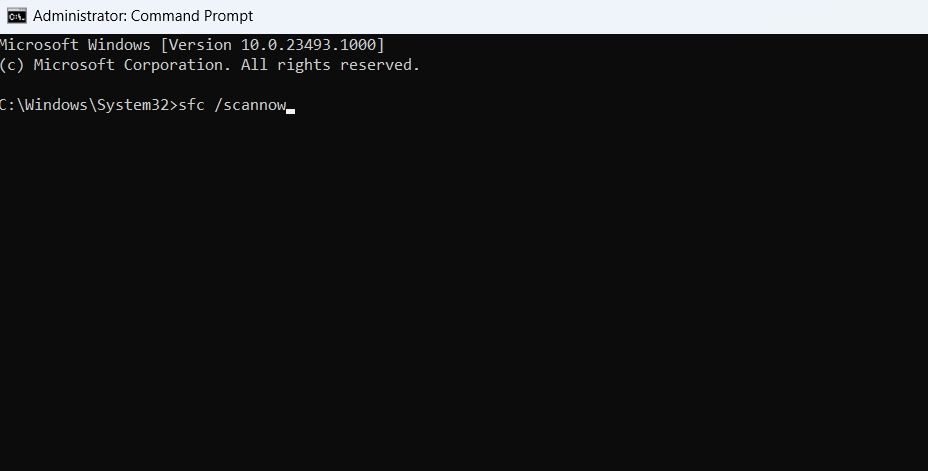
SFC, or System File Checker, is a Windows built-in utility that looks for and repairs current system files. To run an SFC scan, open Command Prompt as an administrator (see how to launch Command Prompt with administrative rights ), type sfc /scannow, and press Enter.
After the scan is complete, restart your computer, and you will see that you’re no longer facing the Desktop Window Manager high GPU consumption issue.
Prevent the Desktop Window Manager From Hogging Your GPU
Excessive GPU consumption can cause various graphics-related issues on your computer. Hopefully, the above solutions will help you fix the Desktop Window Manager’s high GPU usage.
However, if you are still struggling with the problem, the issue may be related to your hardware. In that case, you should replace it with a new one.
However, the DWM can occasionally consume significant GPU resources, affecting the overall system performance. If you find that the Desktop Window Manager consumes a lot of GPU resources, try the solutions below to troubleshoot the problem for good.
- Title: Blowing Up GPU Usage: 7 Remedies for WM in Win11
- Author: David
- Created at : 2024-08-16 00:37:18
- Updated at : 2024-08-17 00:37:18
- Link: https://win11.techidaily.com/blowing-up-gpu-usage-7-remedies-for-wm-in-win11/
- License: This work is licensed under CC BY-NC-SA 4.0.