
Addressing Windows Failure Codes: 0X80072f8f

Addressing Windows Failure Codes: 0X80072f8f
The Windows Media Creation Tool prepares installation media for upgrading your PC or creating a USB drive to perform a clean Windows installation. It is the perfect tool to make sure you are using the latest Windows version and is quite easy to use.
However, there are times when users can run into errors while using the Media Creation Tool. One such error is the error code 0x80072f8f – 0x20000, which appears when users attempt to launch the MediaCreationTool.exe file.
Below, you will find several effective troubleshooting methods that will help you fix this issue in no time.
1. Run the Media Creation Tool as an Administrator
Certain programs and processes on Windows operating system need administrative privileges to perform their jobs properly. If they are not allowed these extra permissions, you are likely to run into error codes such as this one.
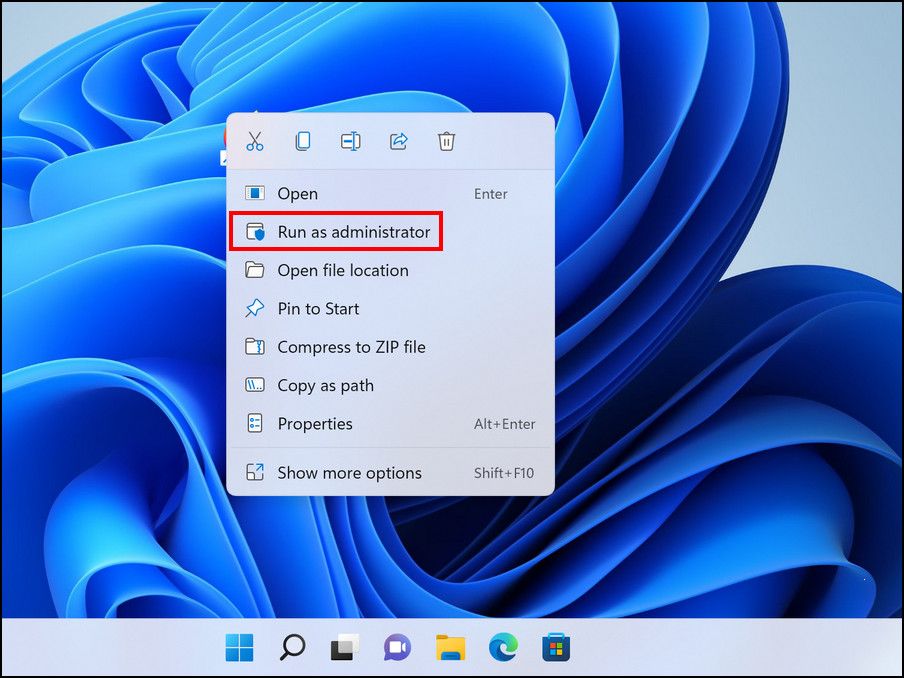
So, the first thing that you need to do if you encounter the error code 0x80072f8f - 0x20000 upon attempting to use the Media Creation Tool is to launch the file as an administrator. If insufficient permissions are causing the problem, this should fix it without you having to go through any of the complex troubleshooting methods.
Follow these steps to run the file as administrator:
- Right-click on the targeted file and selectRun as administrator from the context menu.

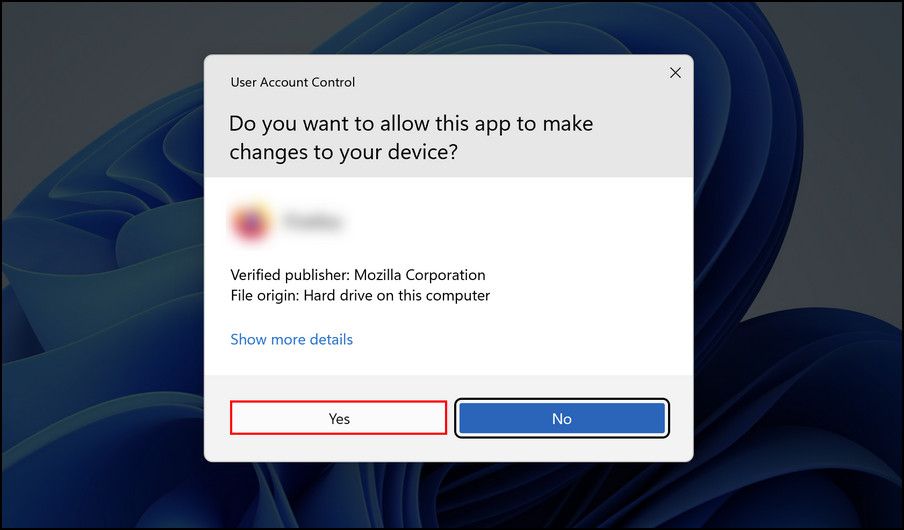
- ClickYes in the confirmation prompt and check if the file runs without any issues now.

If the error persists, it indicates that there is another cause behind it. In that case, proceed with the next method.
2. Use a Different USB Port
Often, faulty ports cause issues during the creation of the installation media. There are several ways to test if the USB port is faulty . You can begin by switching to another port and checking if the USB works fine there.
You can also try using the same USB on another device and see if it works fine there.
3. Modify the Windows Registry
Making some changes in the Windows Registry to allow Media Creation Tool to run smoothly is another potential fix that you can try.
Windows Registry is an administrative-level, powerful utility that stores information about the programs and processes of your operating system. The information here is stored as keys and values. You can modify the relevant keys/values to customize the processes of your system, which is exactly what we are going to do in this method.
However, before you proceed with this method, we highly recommend creating a Registry backup . This will help you restore the current state of your system in case anything goes wrong during the process.
When you have created a backup, follow these steps.
- PressWin +R to open a Run dialog.
- Typeregedit in Run and clickEnter .

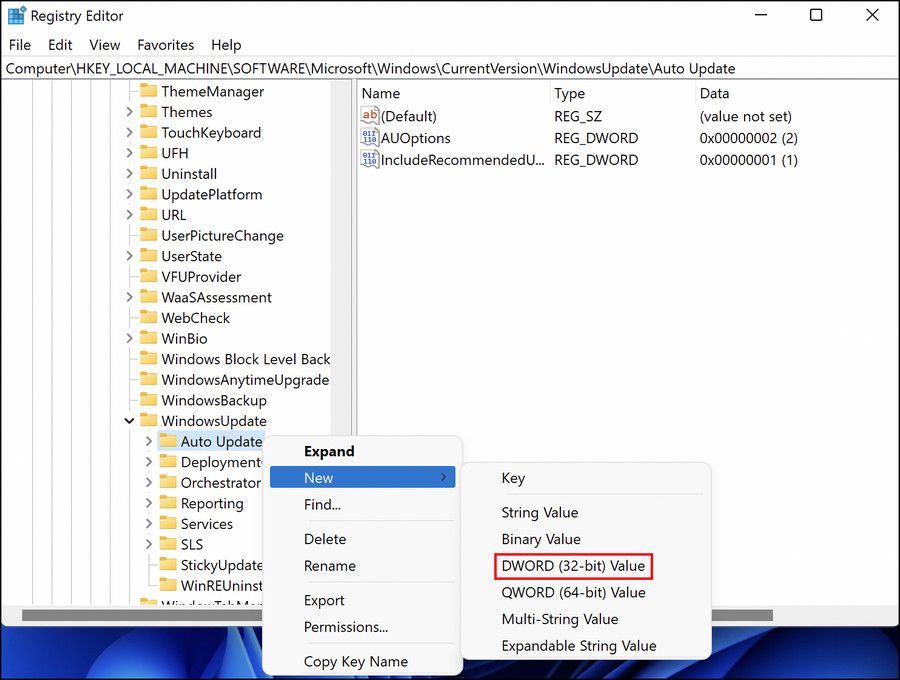
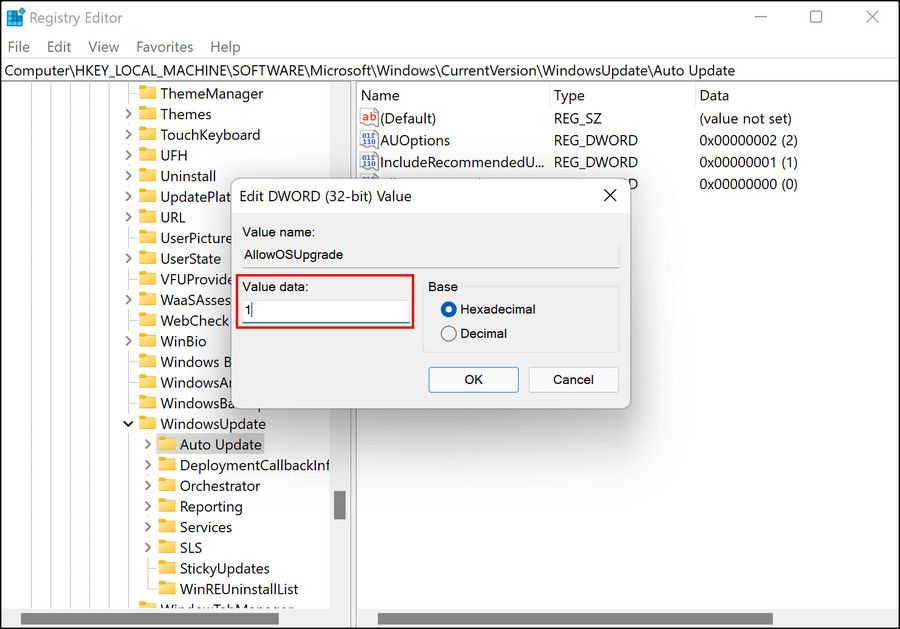
- Once you are inside the Registry Editor, navigate to the location mentioned below:
Computer\HKEY_LOCAL_MACHINE\SOFTWARE\Microsoft\Windows\CurrentVersion\WindowsUpdate\Auto Update - Right-click in an empty area in the right pane and selectNew >DWORD (32-bit) Value from the context menu.

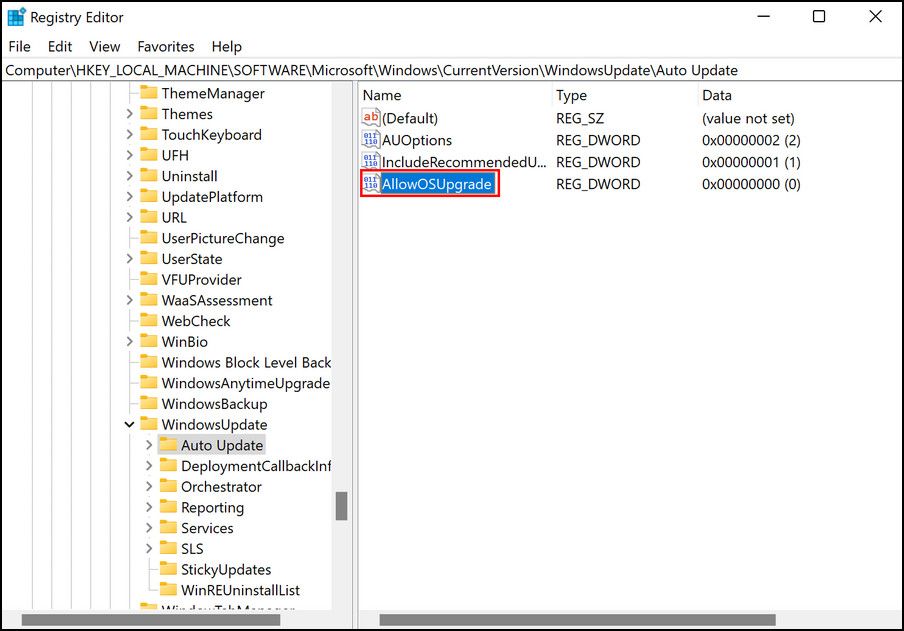
- Name this value asAllowOSUpgrade .

- Double-click onAllowOSUpgrade and type1 under Value data.

- HitOK and close the Registry Editor.
You can now restart your PC and upon reboot, check if the Media Creation Tool works fine.
4. Delete the Content of the Software Distribution Folder
Another solution that worked for users was deleting the contents of the Software Distribution folder. This folder contains temporary files that might be interfering with the process of the Media Creation Tool.
If this scenario is applicable, deleting the contents of the Software Distribution folder by following the steps below should do the trick for you.
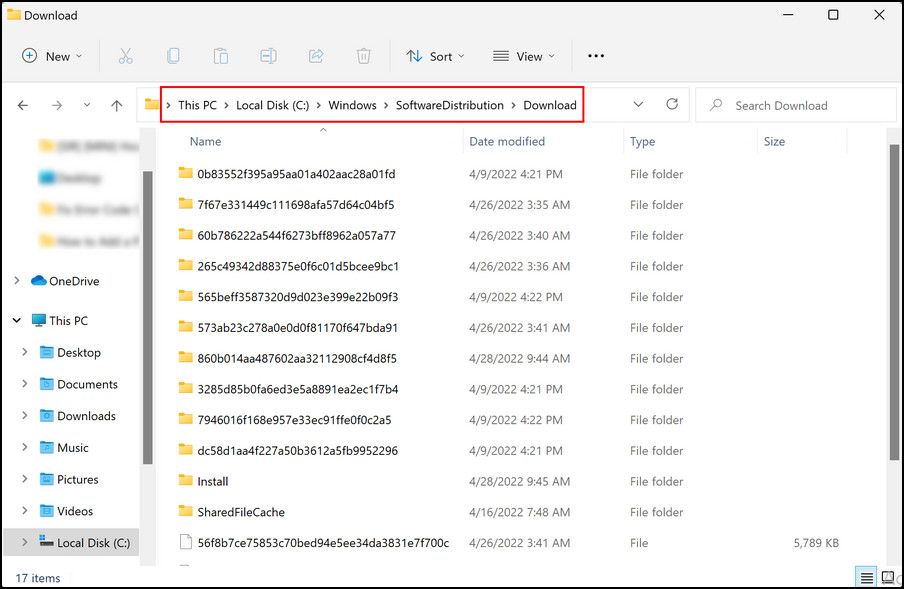
- Launch File Explorer and navigate to the location below:
C:\Windows\SoftwareDistribution\Download
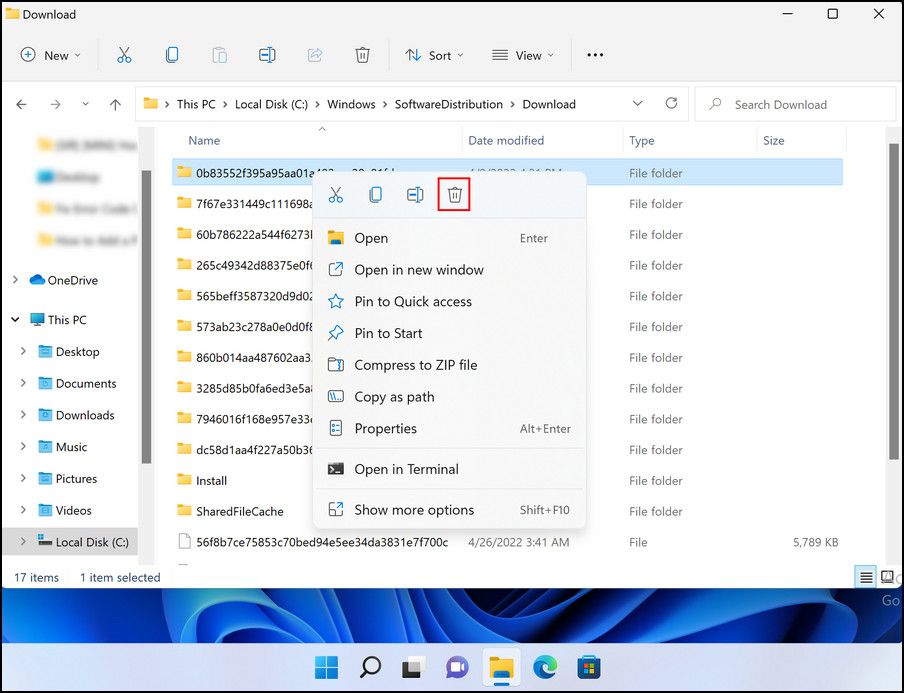
- Select all the contents of the Download folder and right-click on them.
- Click on thebin icon in the context menu to delete them.

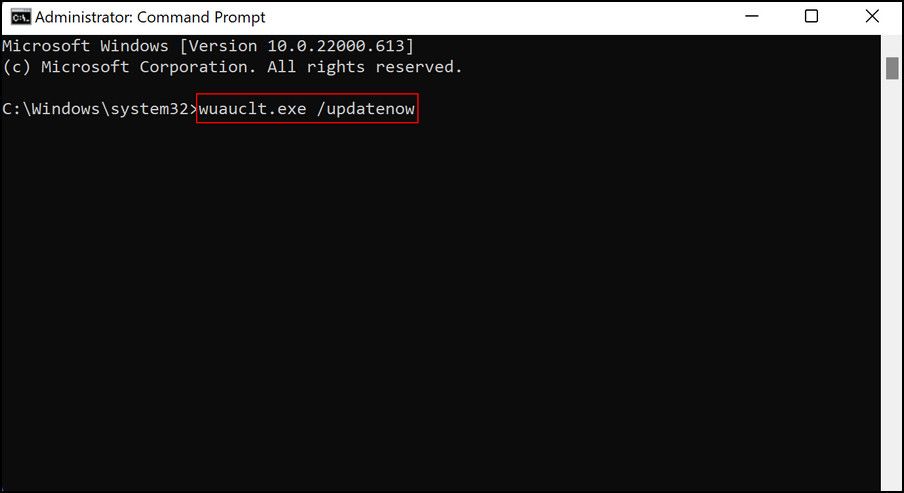
- Once you delete the files, typecmd in the search area of the taskbar and selectRun as administrator .
- Type the following command in the Command Prompt window and hitEnter .
wuauclt.exe /updatenow

- Then, restart your PC and try launching Media Creation Tool again.
5. Enable Relevant Services
Programs and processes on the Windows operating system require relevant services to be functioning to work. If any of the relevant services are disabled or corrupt, the program will fail to function.
For instance, the Windows Update process requires the Windows Update service to run. If the settings of this service are not configured properly, you will fail to install the latest updates.
Similarly, Media Creation Tool is related to the following services, and they should be working fine for you to use it:
- Windows Update
- Background Intelligent Transfer Service
- Server
- Workstation
- TCP/IP NetBIOS Helper
- IKE and AuthIP IPsec Keying Modules
In this method, we will make sure that these services are configured accurately, and we will be using the Windows Update service to demonstrate the steps.
- Open a Run dialog by pressingWin +R keys .
- Typeservices.msc in the dialog and hitEnter . This should launch Windows Services.
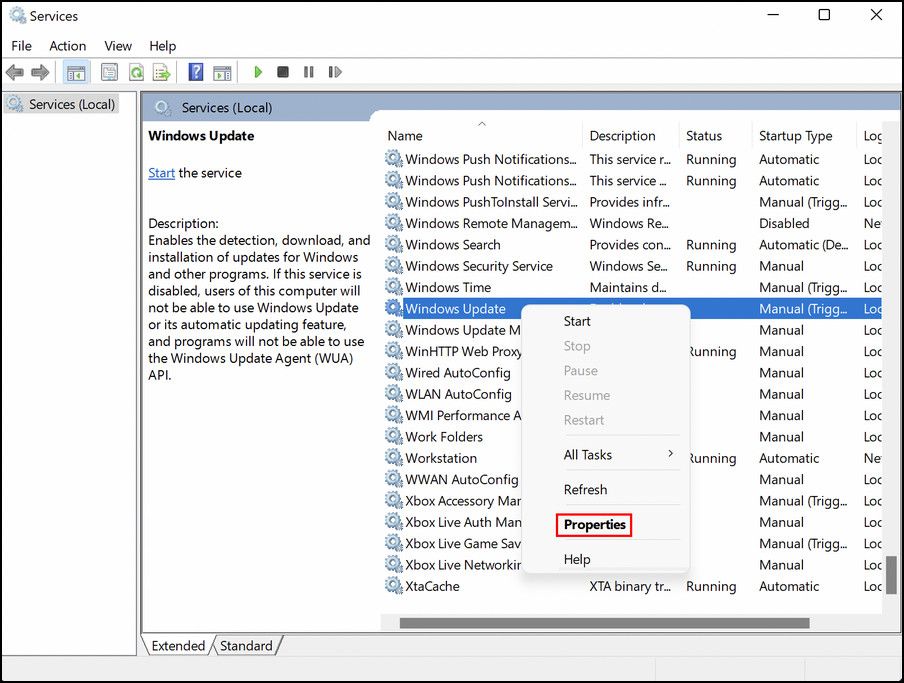
- In the following window, right-click on theWindows Update service and chooseProperties from the context menu.

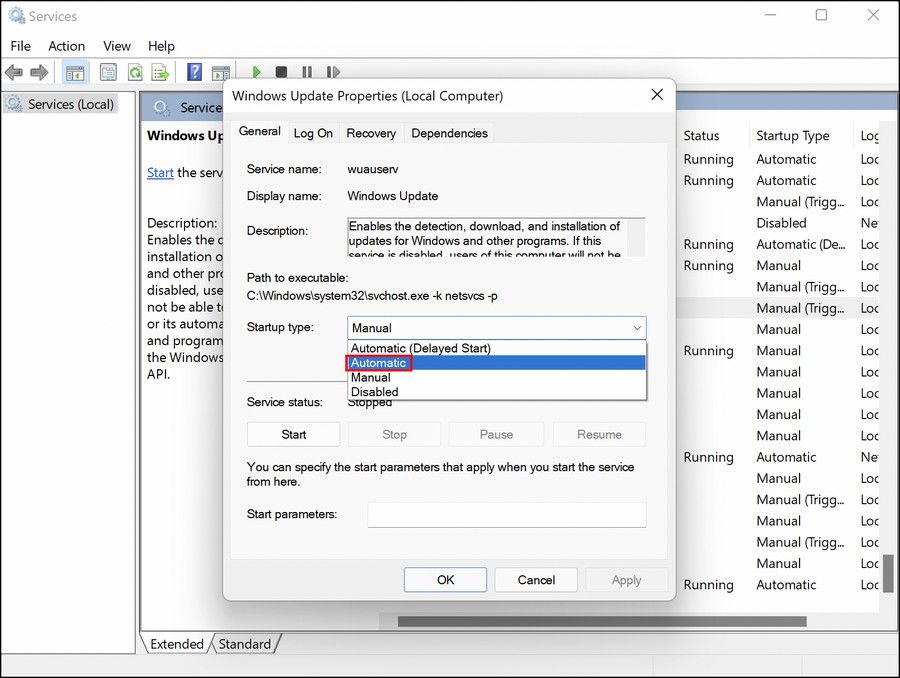
- In the Properties dialog, change the Startup type toAutomatic .

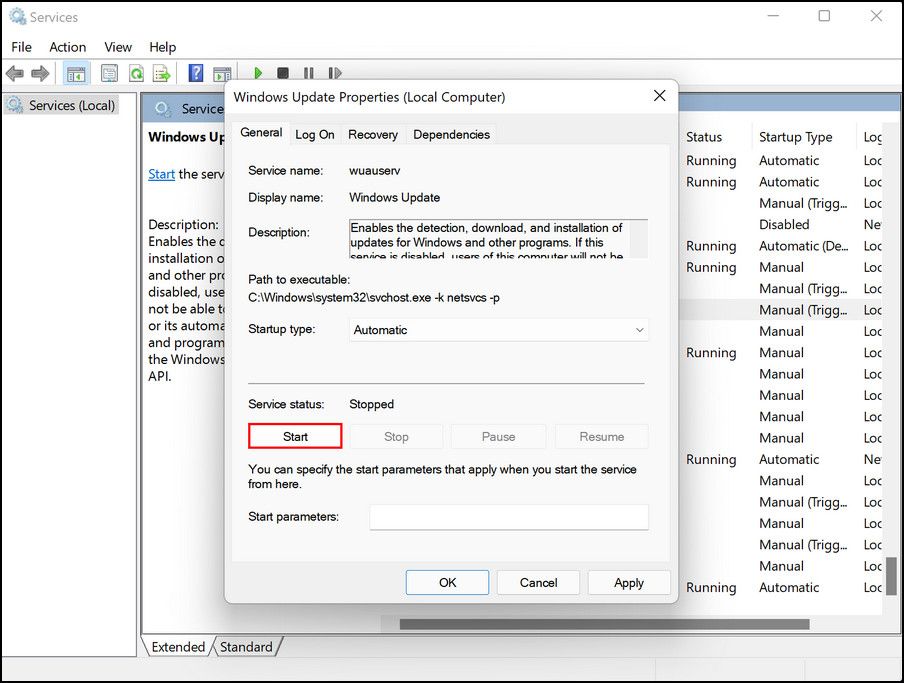
- If the service is stopped, click on theStart button and selectApply >OK to save the changes.


- Repeat the same steps for the rest of the above-mentioned services.
Once done, check if you can run the Media Creation Tool without any issues now.
8. Perform a Clean Boot
The issue can also arise due to a driver or software conflict within the system. To check if this is the case, you can perform a clean boot to launch the system with a minimal set of drivers and startup programs. If the issue does not appear in this mode, then it implies that a background process or driver is indeed causing the problem. You can then take necessary steps to remove it from the system.
Here is how you can perform a clean boot in Windows:
- Press the Win + R keys together to open Run.
- Type msconfig in the text field of Run and click Enter.
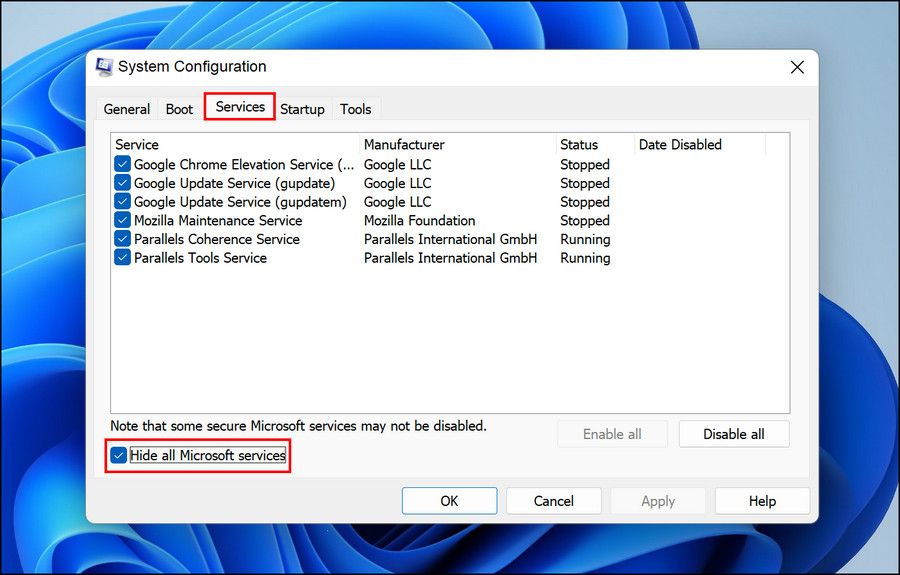
- In the System Configuration window, head over to theServices tab and checkmark the box forHide all Microsoft services .

- Click on theDisable all button .
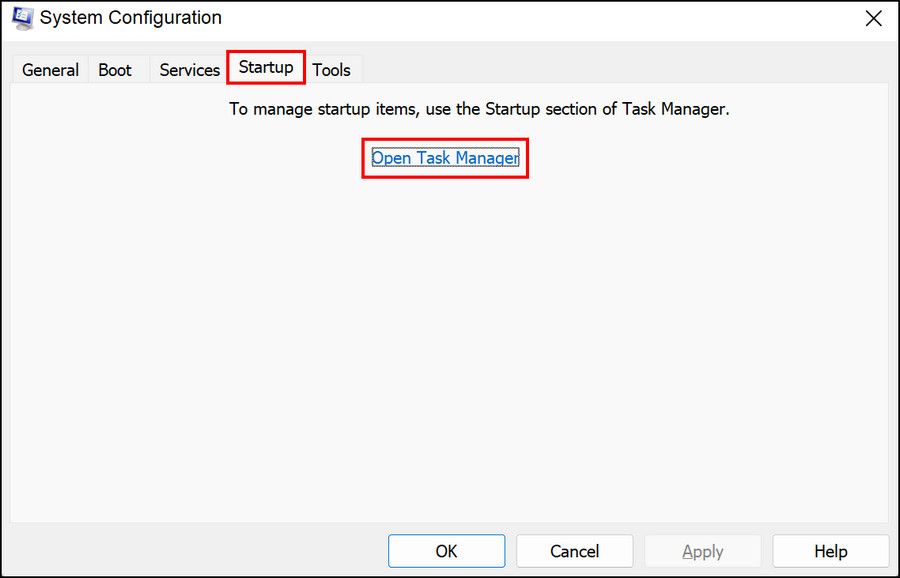
- Now, navigate to theStartup tab and click onOpen Task Manager .

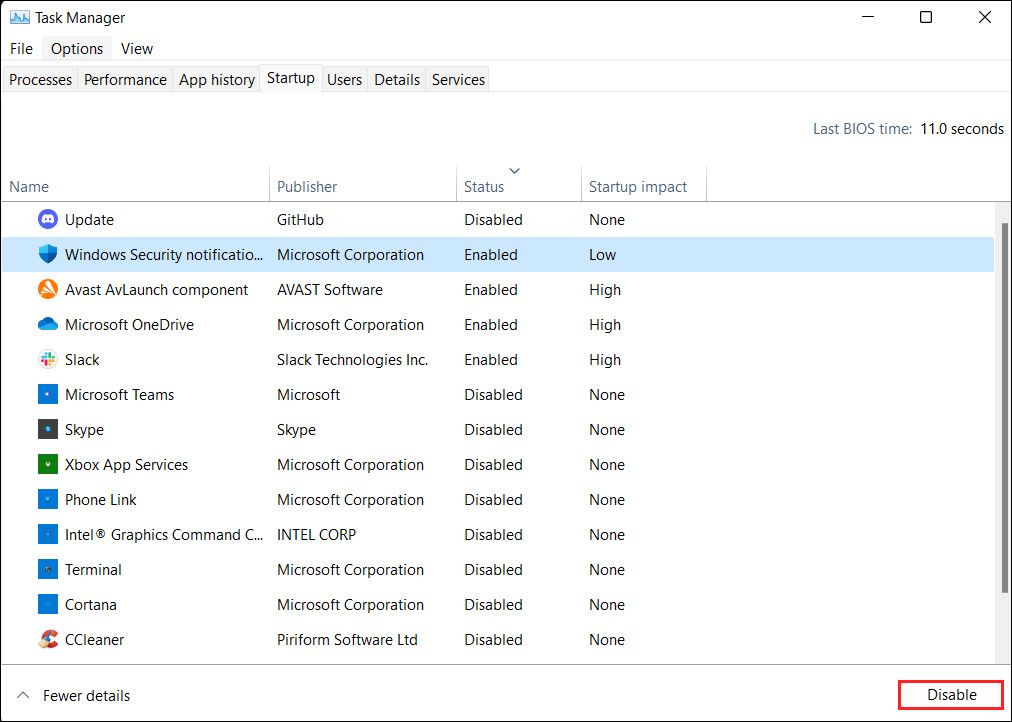
- In the Startup tab, right-click on all the items and chooseDisable .

 SwifDoo PDF Perpetual (2-PC) Free upgrade. No monthly fees ever.
 - Once done, close the Task Manager and go back to the System Configuration window.
- ClickApply >OK to save the changes.
- Finally, restart your computer.
If the error code 0x80072f8f - 0x20000 is not present after a clean boot, it suggests that the issue was caused by a software or driver conflict. If this situation is applicable, you can either manually remove the recently installed software that you think might be leading to the issue, or perform a system restore to return to an older functioning state of the system.
7. Disable Your Antivirus
If you are using a third-party antivirus in Windows, there is a chance that it is blocking the process of Media Creation Tool because of a false alarm. To check if this is the case, you can disable or uninstall your antivirus and then run the Media Creation Tool.
If the antivirus program is the culprit, then we recommend switching to another similar service for better performance.
Media Creation Tool Error, Now Resolved
Media Creation Tool is undoubtedly one of the most useful and easy-to-use tools offered by Microsoft for Windows. The troubleshooting methods listed above will hopefully allow you to use it without any issues. If the error appears again, you can reach out to the official Microsoft support team and report the problem to them. Hopefully, they will be able to identify the exact cause of the issue and suggest you a fix accordingly.
- Title: Addressing Windows Failure Codes: 0X80072f8f
- Author: David
- Created at : 2024-08-16 00:01:26
- Updated at : 2024-08-17 00:01:26
- Link: https://win11.techidaily.com/addressing-windows-failure-codes-0x80072f8f/
- License: This work is licensed under CC BY-NC-SA 4.0.





 SwifDoo PDF Perpetual (2-PC) Free upgrade. No monthly fees ever.